Show
Login as admin
Create a course with the admin enrolled - Course A
Create a course with the admin NOT enrolled - Course B
Test 1
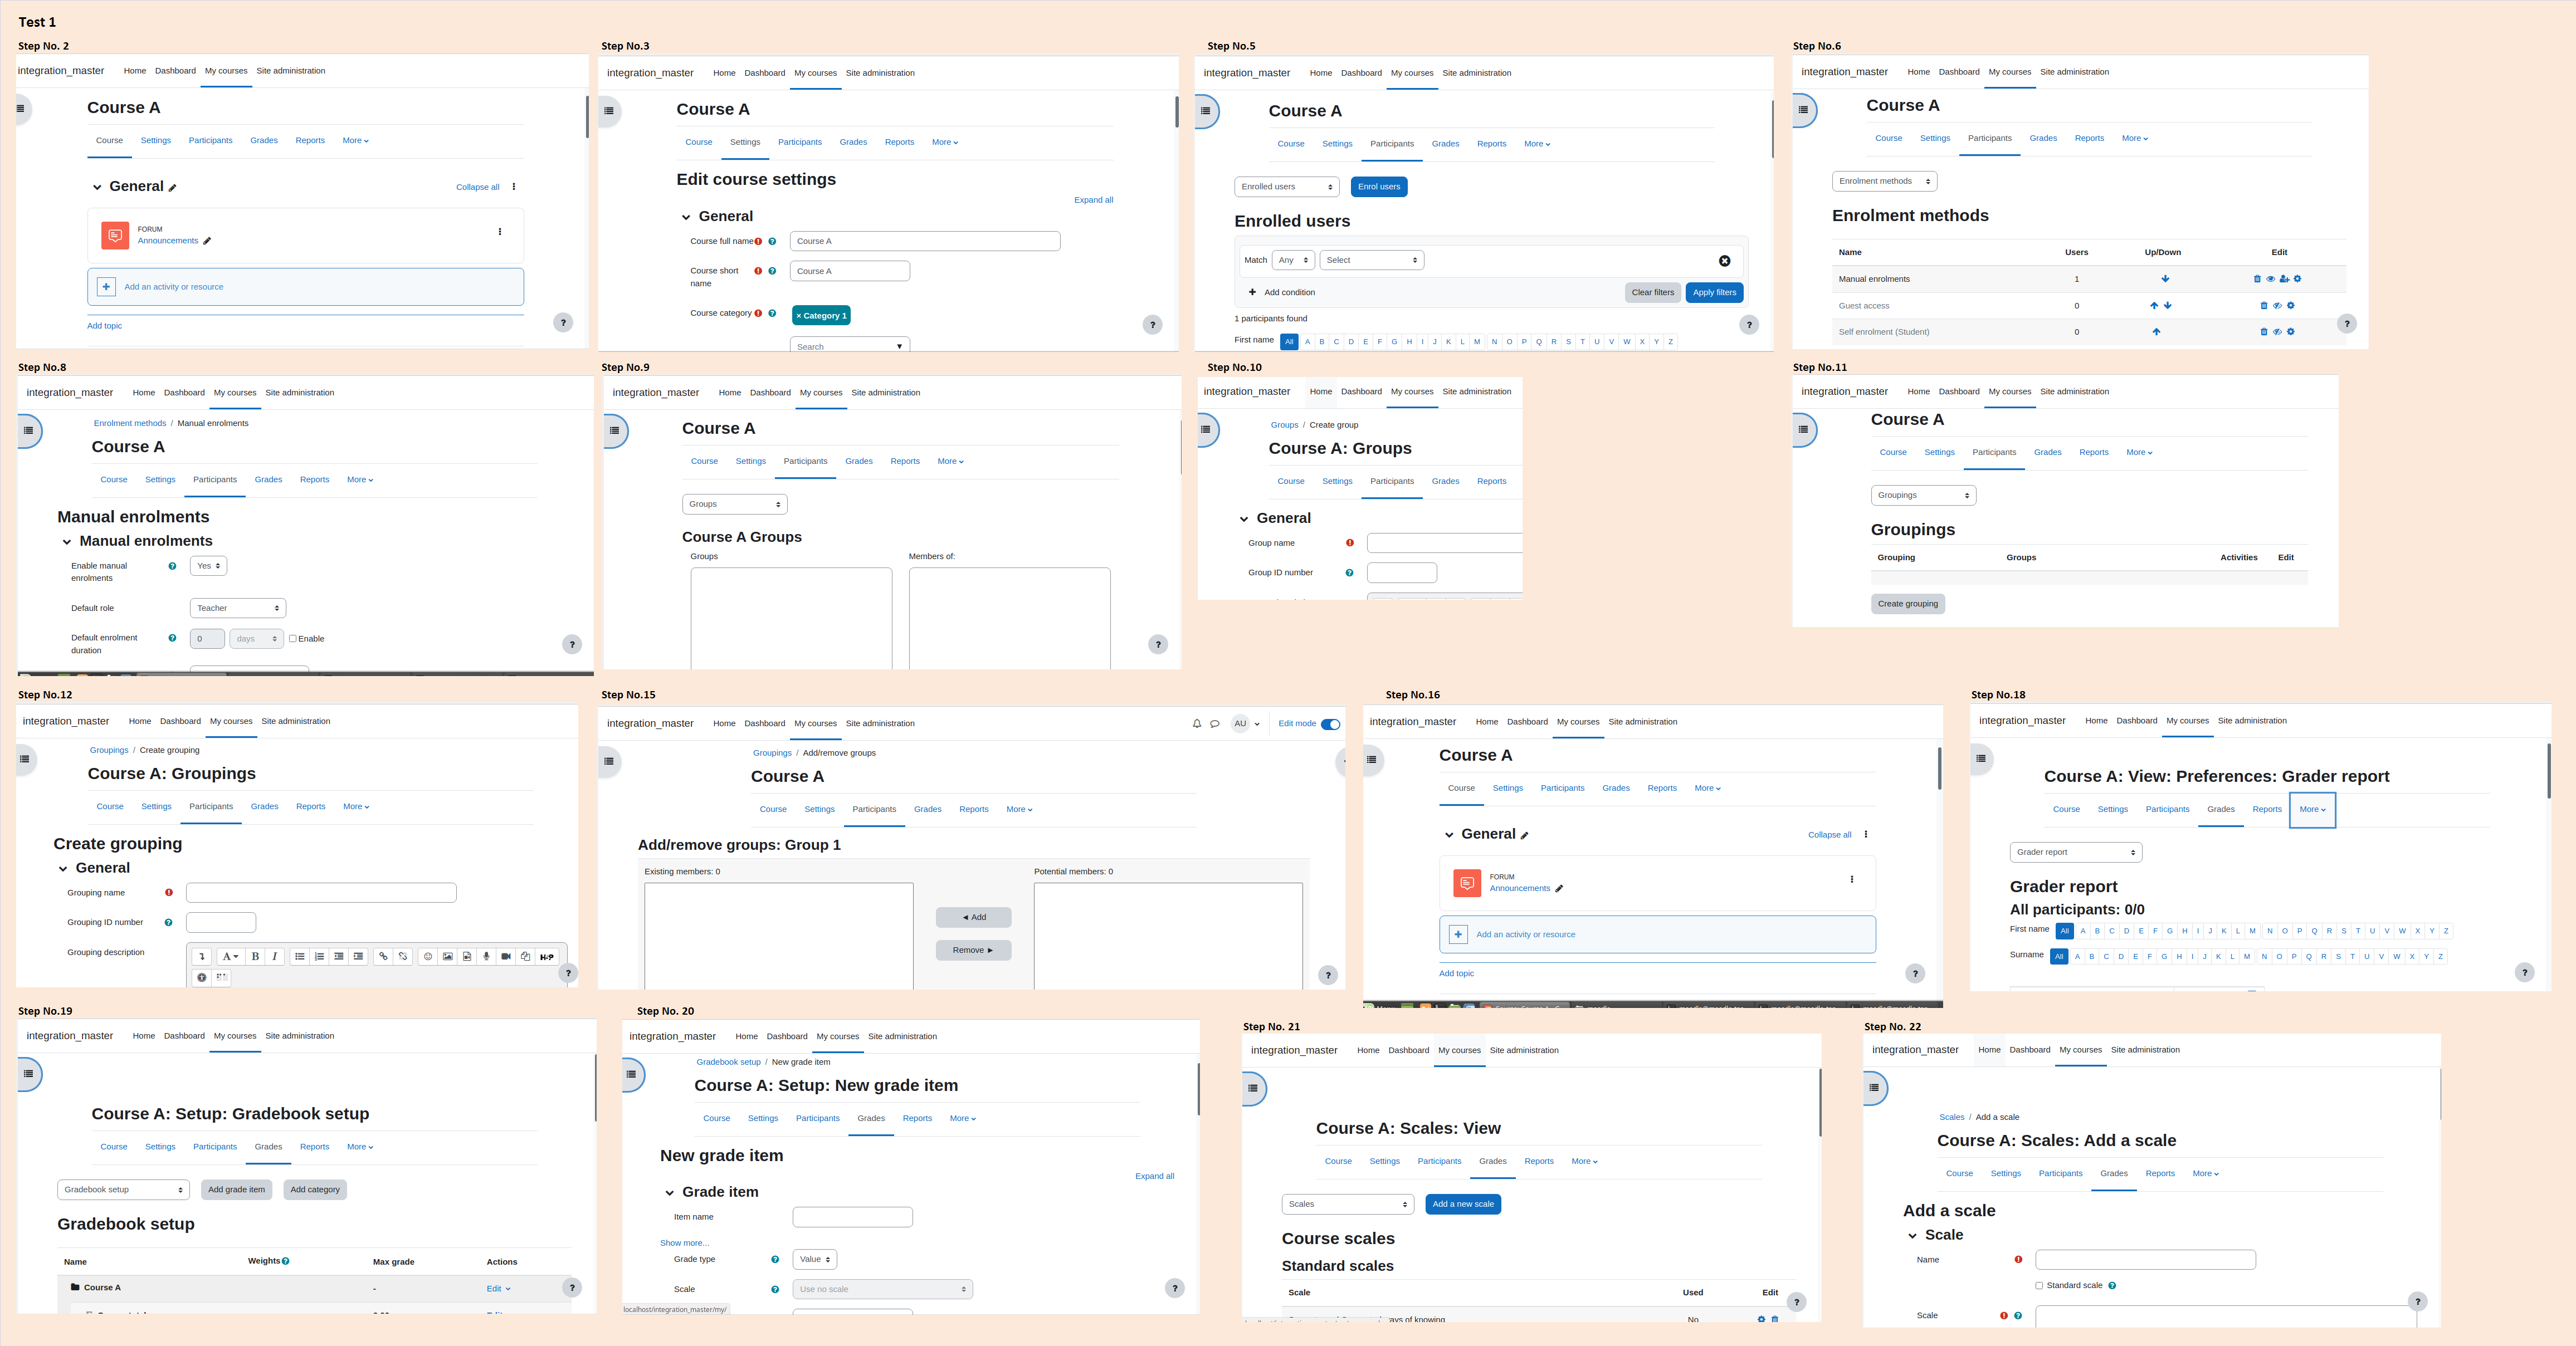
Go to the Course A
In the course homepage
confirm that there are no breadcrumbs
Navigate to Settings (from the secondary navigation menu in course)
confirm that there are no breadcrumbs
Navigate to Participants (from the secondary navigation menu in course)
In the Enrolled users page
confirm that there are no breadcrumbs
Navigate to Enrolment methods (from the tertiary navigation selector)
confirm that there are no breadcrumbs
Edit one of the enrolment methods (ex. Manual enrolments or Guest access)
In the edit page:
confirm that you can see breadcrumbs
confirm that you cannot see any items from the primary or secondary navigation in the breadcrumbs
confirm that you do not see any duplicated breadcrumb items
confirm that you can navigate back to the Enrolment methods page using the breadcrumbs.
Navigate to Groups (from the tertiary navigation selector)
confirm that there are no breadcrumbs
Click on each of the available buttons (Create group, Auto-create groups, etc.) and each time
confirm that you can see breadcrumbs
confirm that you cannot see any items from the primary or secondary navigation in the breadcrumbs
confirm that you do not see any duplicated breadcrumb items
confirm that you can navigate back to the Groups page using the breadcrumbs.
Navigate to Groupings (from the tertiary navigation selector)
confirm that there are no breadcrumbs
Click on Create groupings
confirm that you can see breadcrumbs
confirm that you cannot see any items from the primary or secondary navigation in the breadcrumbs
confirm that you do not see any duplicated breadcrumb items
confirm that you can navigate back to the Groupings page using the breadcrumbs.
Create grouping
In the groupings page, click on the 'Show groups in grouping' icon for the created grouping
In the Add/remove groups page:
confirm that you can see breadcrumbs
confirm that you cannot see any items from the primary or secondary navigation in the breadcrumbs
confirm that you do not see any duplicated breadcrumb items
confirm that you can navigate back to the Groupings page using the breadcrumbs.
Navigate to Overview (from the tertiary navigation selector)
confirm that there are no breadcrumbs
Navigate to Grades (from the secondary navigation menu in course)
Navigate to every Gradebook report page (under the View section in the tertiary navigation selector)
confirm that there are no breadcrumbs
Navigate to Gradebook setup (from the tertiary navigation selector)
confirm that there are no breadcrumbs
Click on the available buttons (Add grade item, Add category)
confirm that you can see breadcrumbs
confirm that you cannot see any items from the primary or secondary navigation in the breadcrumbs
confirm that you do not see any duplicated breadcrumb items
confirm that you can navigate back to the Gradebook setup page using the breadcrumbs.
Navigate to Scales (from the tertiary navigation selector)
confirm that there are no breadcrumbs
Click on Add a new scale
confirm that you can see breadcrumbs
confirm that you cannot see any items from the primary or secondary navigation in the breadcrumbs
confirm that you do not see any duplicated breadcrumb items
confirm that you can navigate back to the Scales page using the breadcrumbs.
Navigate to Outcomes (from the tertiary navigation selector) NOTE: you need to enable outcomes ('enableoutcomes') in Site administration.
confirm that there are no breadcrumbs
Click on Manage outcomes
confirm that you can see breadcrumbs
confirm that you cannot see any items from the primary or secondary navigation in the breadcrumbs
confirm that you do not see any duplicated breadcrumb items
confirm that you can navigate back to the Outcomes page using the breadcrumbs.
Navigate to Grade letters (from the tertiary navigation selector)
confirm that there are no breadcrumbs
Click on Edit
confirm that you can see breadcrumbs
confirm that you cannot see any items from the primary or secondary navigation in the breadcrumbs
confirm that you do not see any duplicated breadcrumb items
confirm that you can navigate back to the Grade letters page using the breadcrumbs.
Navigate to Import (from the tertiary navigation selector)
confirm that there are no breadcrumbs
In the Import page, navigate to Key manager (need to enable grade publishing ' gradepublishing' in site administration to be able to access this link)
Click on the Add user key button
confirm that you can see breadcrumbs
confirm that you cannot see any items from the primary or secondary navigation in the breadcrumbs
confirm that you do not see any duplicated breadcrumb items
confirm that you can navigate back to the import Key manager page using the breadcrumbs.
Add a new user key and save changes
In the Key manager page, click on the delete icon for the newly create user key
In the delete user key page
confirm that you can see breadcrumbs
confirm that you cannot see any items from the primary or secondary navigation in the breadcrumbs
confirm that you do not see any duplicated breadcrumb items
confirm that you can navigate back to the import Key manager page using the breadcrumbs.
Navigate to Export (from the tertiary navigation selector)
confirm that there are no breadcrumbs
In the Export page, navigate to Key manager (need to enable grade publishing ' gradepublishing' in site administration to be able to access this link)
Click on the Add user key button
confirm that you can see breadcrumbs
confirm that you cannot see any items from the primary or secondary navigation in the breadcrumbs
confirm that you do not see any duplicated breadcrumb items
confirm that you can navigate back to the export Key manager page using the breadcrumbs.
Add a new user key and save changes
In the Key manager page, click on the delete icon for the newly create user key
In the delete user key page
confirm that you can see breadcrumbs
confirm that you cannot see any items from the primary or secondary navigation in the breadcrumbs
confirm that you do not see any duplicated breadcrumb items
confirm that you can navigate back to the export Key manager page using the breadcrumbs. { }
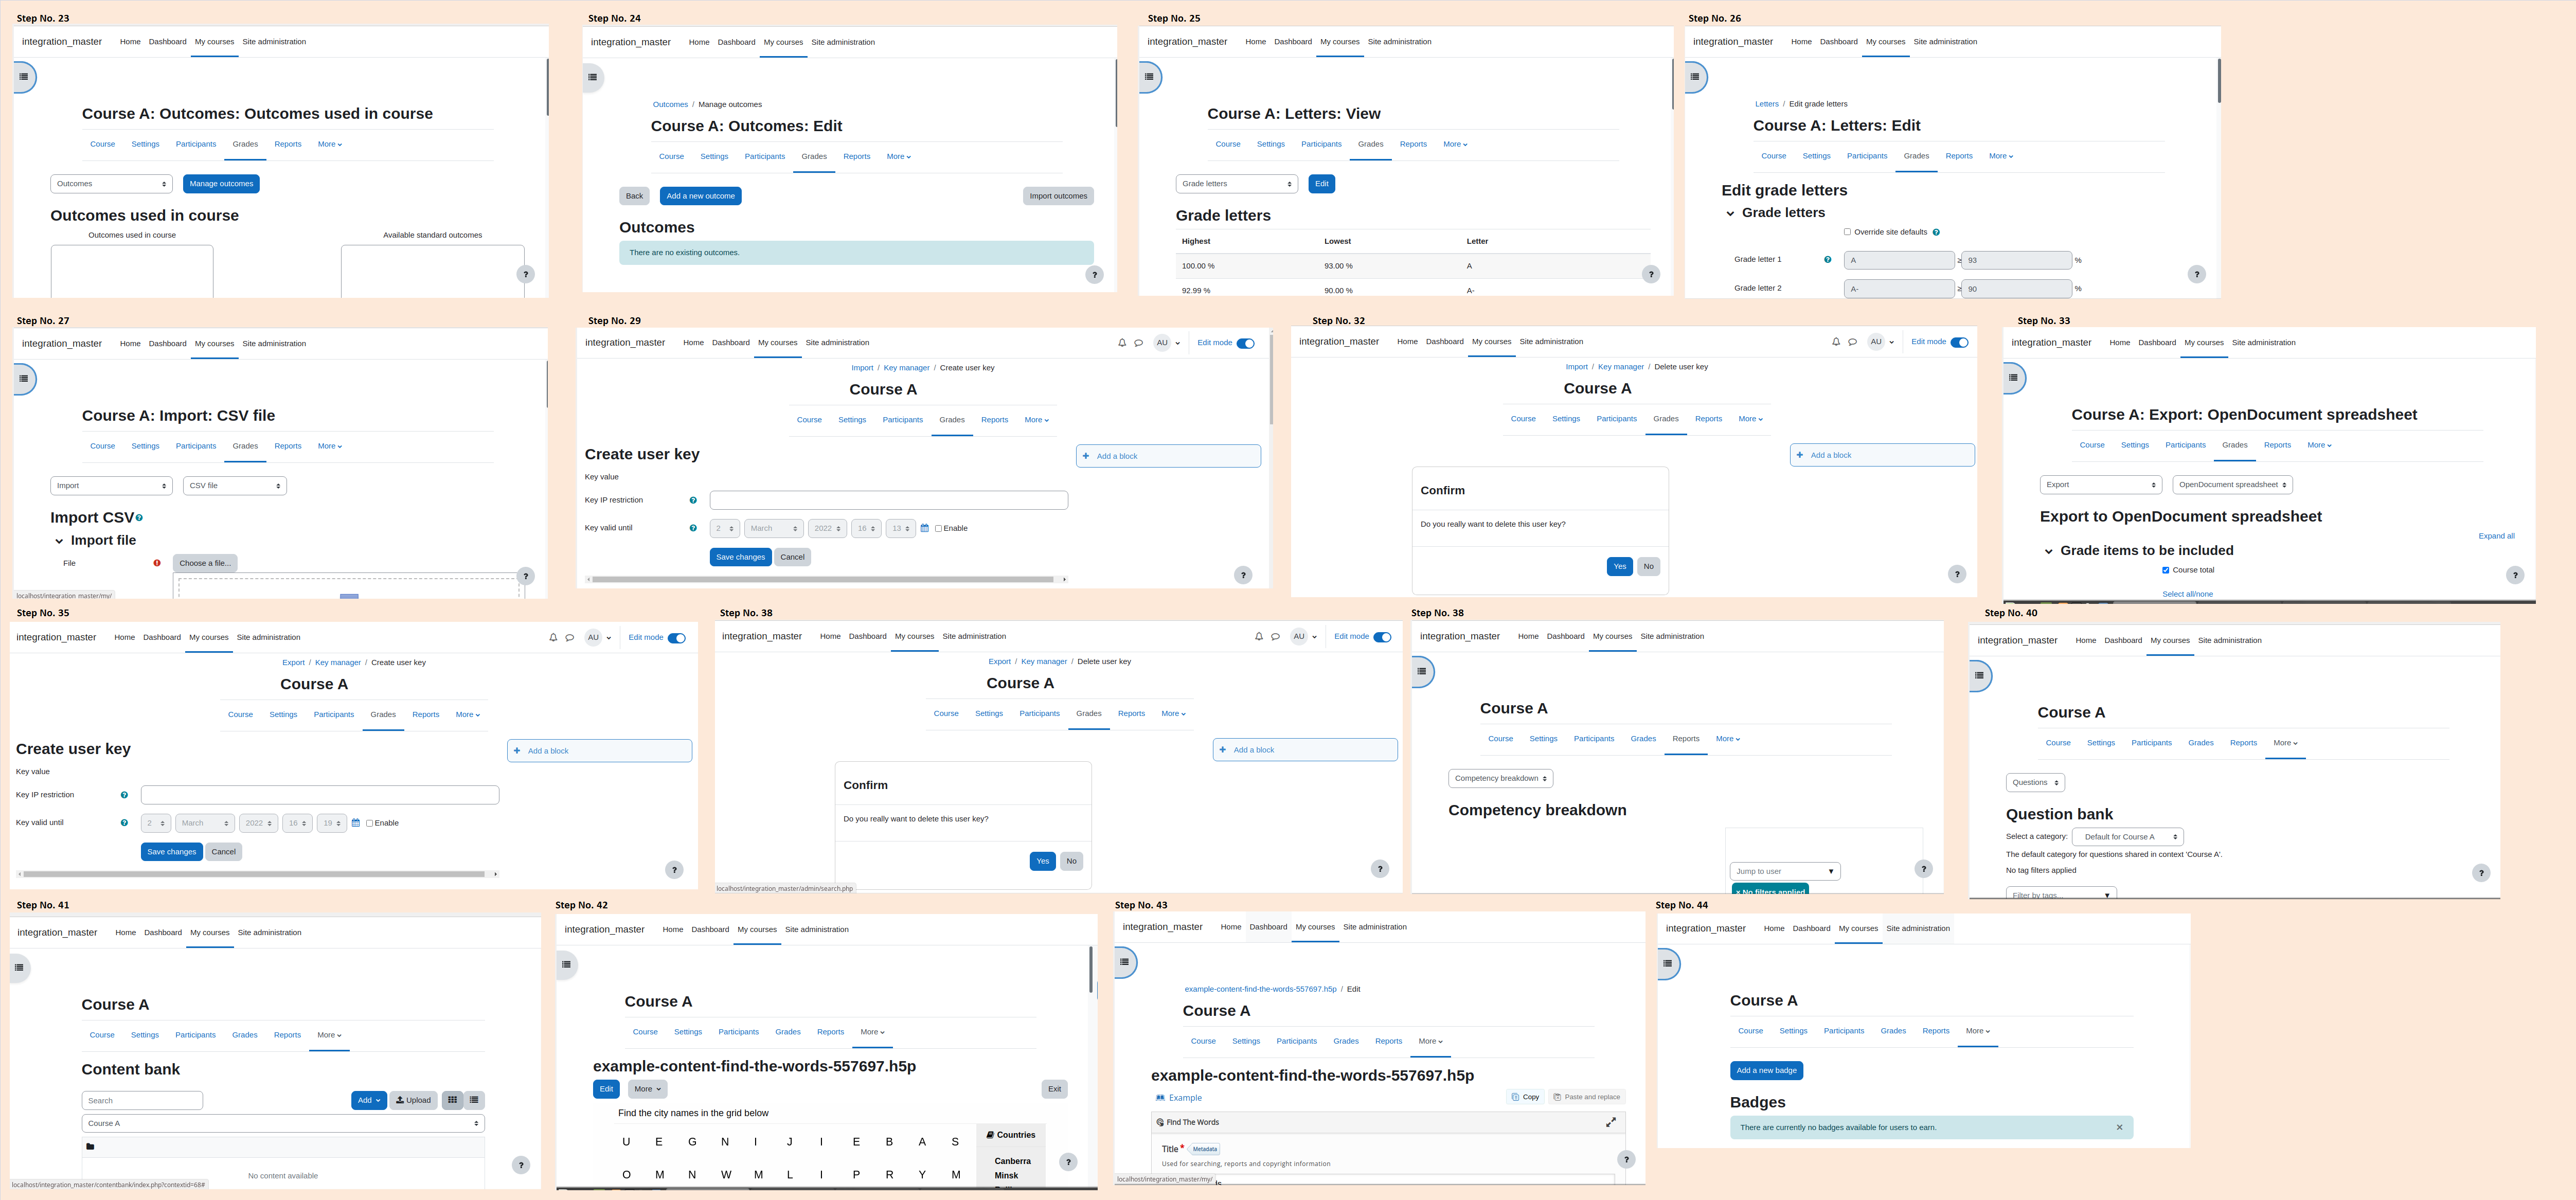
Navigate to course Reports (from the secondary navigation menu in course)
confirm that there are no breadcrumbs in the course report pages
Navigate to Question bank (from the secondary navigation menu in course)
confirm that there are no breadcrumbs
Navigate to Content bank (from the secondary navigation menu in course)
confirm that there are no breadcrumbs
Upload a new h5p file in the content bank (you can use the attached file example-content-find-the-words-557697.h5p )
confirm that there are no breadcrumbs
Click on the Edit button
confirm that you can see breadcrumbs
confirm that the following breadcrumb trail is displayed: " example-content-find-the-words-557697.h5p / Edit"
Navigate to Badges (from the secondary navigation menu in course)
confirm that there are no breadcrumbs
Click on Add a new badge
confirm that there are no breadcrumbs (NOTE: The back link to Badges is already present in the secondary navigation)
Add a new badge and go back to the Manage badges page.
Edit the badge
In the edit badge details page
confirm that you can see breadcrumbs
confirm that you cannot see any items from the primary or secondary navigation in the breadcrumbs
confirm that you do not see any duplicated breadcrumb items
confirm that you can navigate back to the Manage badges page using the breadcrumbs.
Navigate to the other badge related pages (Overview, Criteria, Related badges, etc) using the tertiary navigation selector
confirm that you can see breadcrumbs
confirm that you cannot see any items from the primary or secondary navigation in the breadcrumbs
confirm that you do not see any duplicated breadcrumb items { }
confirm that you can navigate back to the Manage badges page using the breadcrumbs.
When in the badge Criteria page, select a badge criteria from the selector element (ex. Course completion)
In the criteria settings page:
confirm that you can see breadcrumbs
confirm that you cannot see any items from the primary or secondary navigation in the breadcrumbs
confirm that you do not see any duplicated breadcrumb items
confirm that you can navigate back to the Manage badges page using the breadcrumbs.
confirm that you can navigate back to the Badge's overview page using the breadcrumbs.
confirm that you can navigate back to the Criteria page using the breadcrumbs.
When in the Recipients page, click on the Award badge button (need to enable access first to be able to see this button)
confirm that you can see breadcrumbs
confirm that you cannot see any items from the primary or secondary navigation in the breadcrumbs
confirm that you do not see any duplicated breadcrumb items
confirm that you can navigate back to the Manage badges page using the breadcrumbs.
confirm that you can navigate back to the Badge's overview page using the breadcrumbs.
confirm that you can navigate back to the Badge recipients page using the breadcrumbs.
Navigate to Course reuse (from the secondary navigation menu in course)
In the Import page
confirm that there are no breadcrumbs
Navigate to the other Course reuse related pages (Backup, Restore, Copy course, etc) using the tertiary navigation selector
confirm that there are no breadcrumbs
Repeat the test with Course B and confirm that everything is displayed as expected
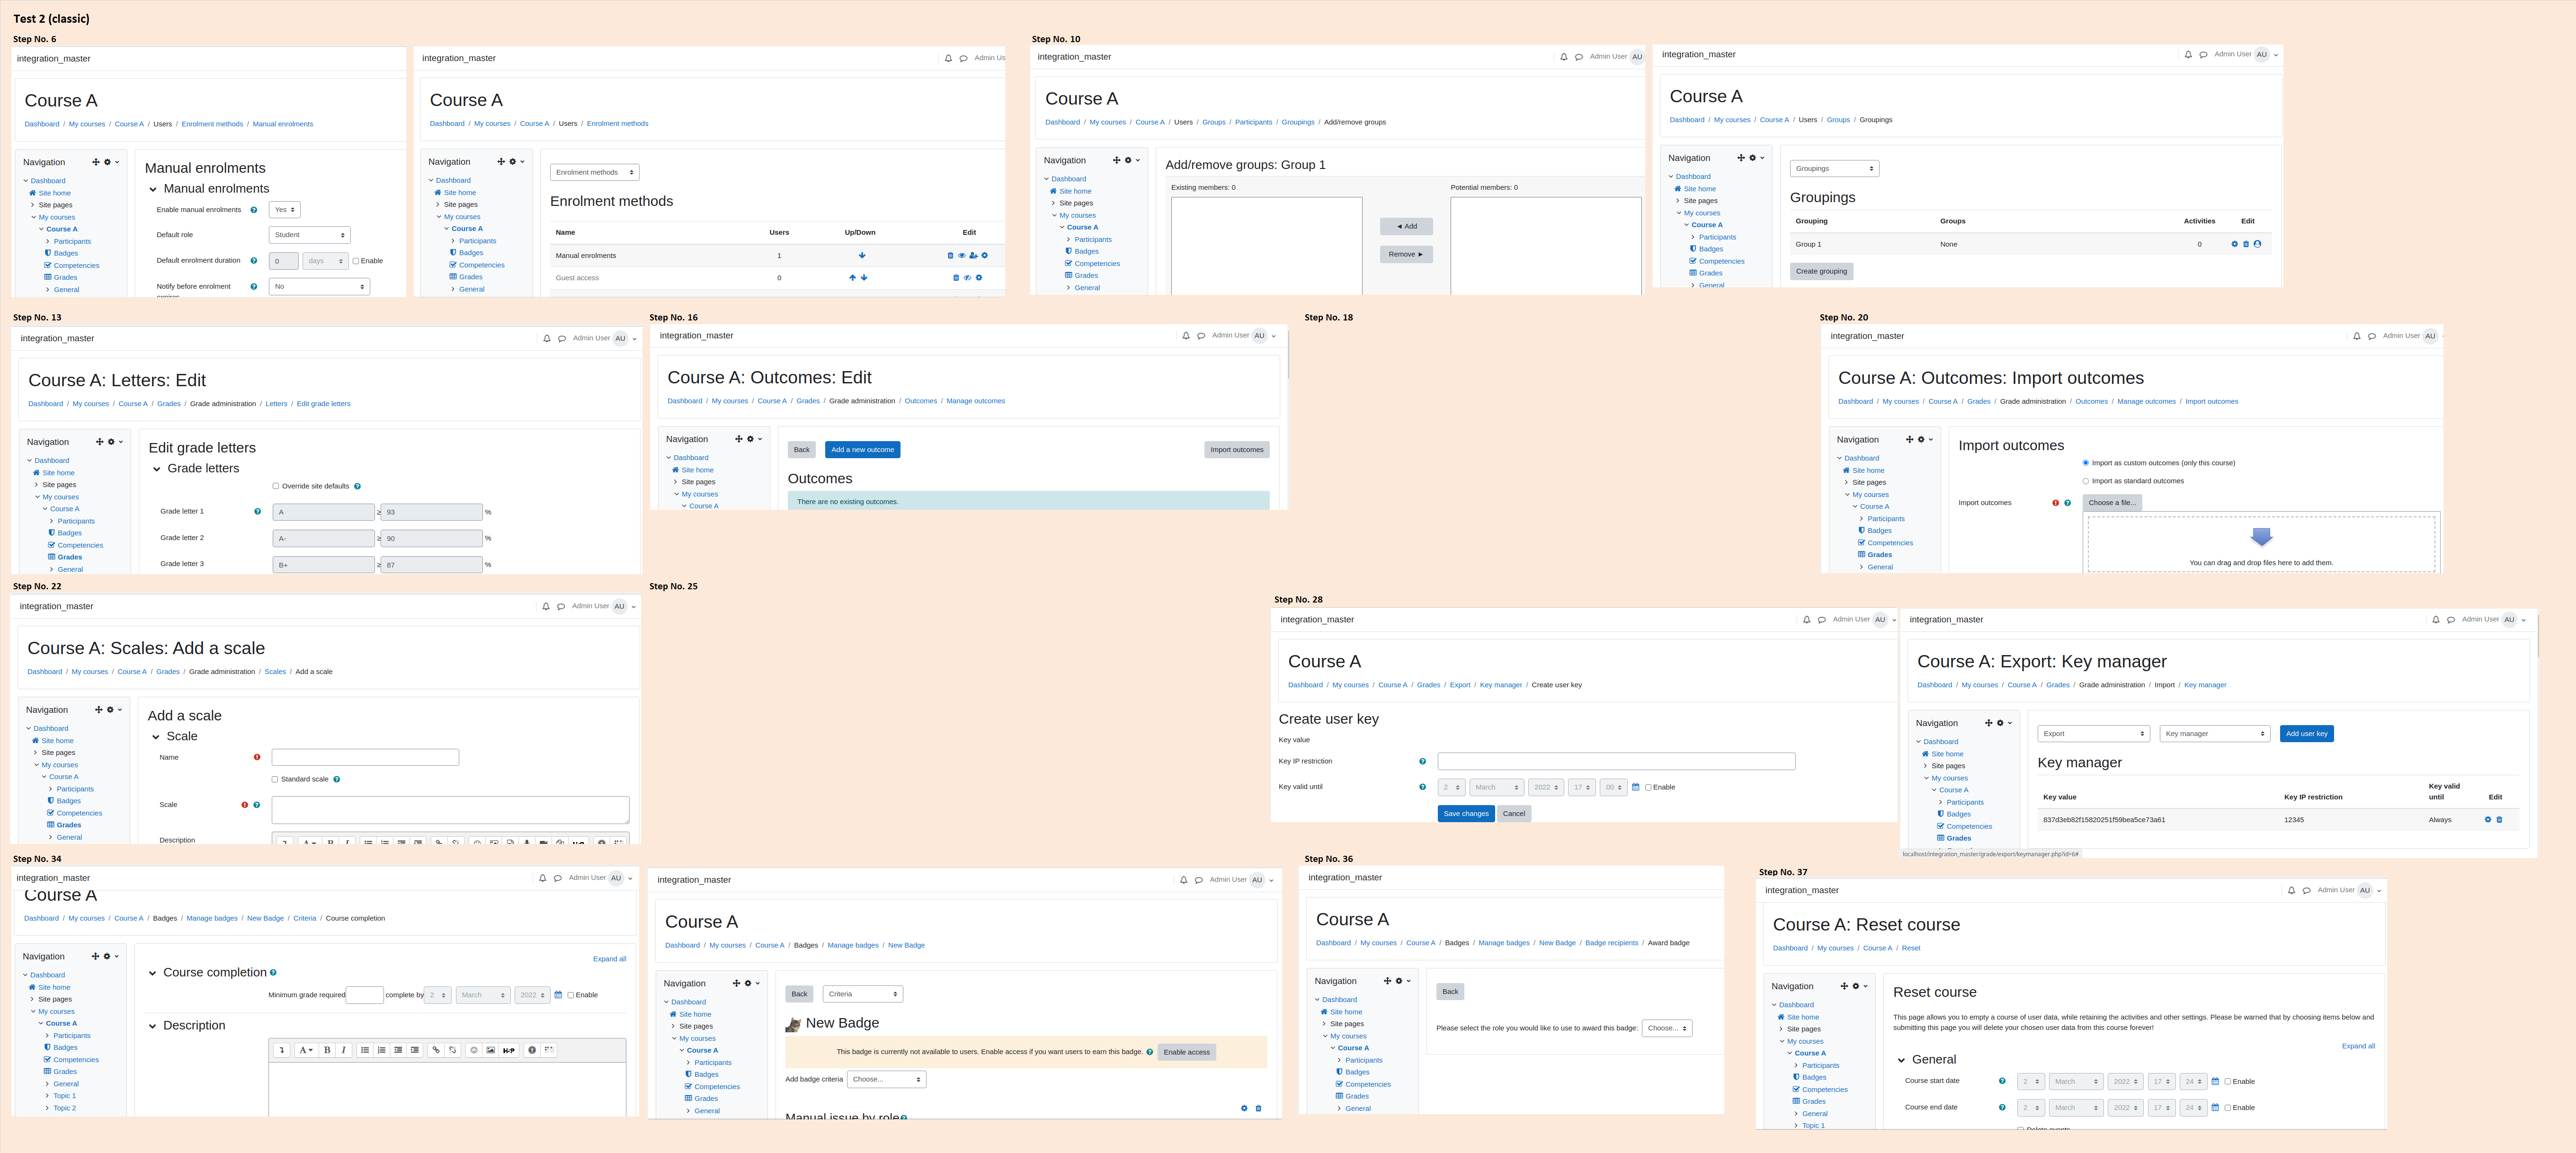
Test 2 (classic)
Change the theme to classic (Site administration > Appearance > Themes > Theme selector)
Go to the course.
Navigate to the course Participants page
Navigate to Enrolment methods (from the tertiary navigation selector) { }
Edit some of the enabled and also disabled methods (ex. Manual enrolments and Guest access)
In the edit page:
confirm that you can navigate back to the Enrolment methods page using the breadcrumbs.
Navigate to Groupings (from the tertiary navigation selector)
Create grouping
In the groupings page, click on the 'Show groups in grouping' icon for the created grouping
In the Add/remove groups page:
confirm that you can navigate back to the Groupings page using the breadcrumbs.
Navigate to the course Gradebook.
Navigate to Grade letters (from the tertiary navigation selector)
Click on the Edit button
confirm that there is "Edit grade letters" item in the breadcrumbs
confirm that you can navigate back to the Letters page using the breadcrumbs.
Navigate to Outcomes (from the tertiary navigation selector)
Click on Manage outcomes
In the manage outcomes page
confirm that there is "Manage outcomes" item in the breadcrumbs
confirm that you can navigate back to the Outcomes page using the breadcrumbs.
Click on Add a new outcome
In the Add an outcome page
confirm that there is "Add an outcome" item in the breadcrumbs
confirm that you can navigate back to the Manage outcomes page using the breadcrumbs.
In the manage outcomes page. click on Import outcomes
In the Import outcomes page
confirm that there is "Import outcomes" item in the breadcrumbs
confirm that you can navigate back to the Manage outcomes page using the breadcrumbs.
Navigate to Scales in the gradebook
Click on Add a new scale
confirm that there is "Add a scale" item in the breadcrumbs { }
confirm that you can navigate back to the Scales page using the breadcrumbs.
Navigate to Import in the gradebook (from the tertiary navigation selector)
Navigate to Key manager using the additional navigation selector and then press "Add user key"
In the Create user key page
confirm that you can navigate back to the Key manager page using the breadcrumbs.
Navigate to Export in the gradebook (from the tertiary navigation selector)
Navigate to Key manager using the additional navigation selector and then press "Add user key"
In the Create user key page
confirm that you can navigate back to the Key manager page using the breadcrumbs.
Go to course Badges
Go to Manage badges
Click on the existing badge
Navigate to the Criteria page (using the tertiary navigation selector)
Select a badge criteria from the selector element (ex. Course completion)
In the criteria settings page:
confirm that you can navigate back to the Criteria page using the breadcrumbs.
Navigate to the badge Recipients page (from the tertiary navigation selector)
In the Recipients page, click on the Award badge button (need to enable access to be able to see this button)
confirm that there is "Award badge" item in the breadcrumbs
confirm that you can navigate back to the Badge recipients page using the breadcrumbs.
Navigate to the Course reset page in course administration
confirm that there is "Reset" item in the breadcrumbs, but not "Reset course"
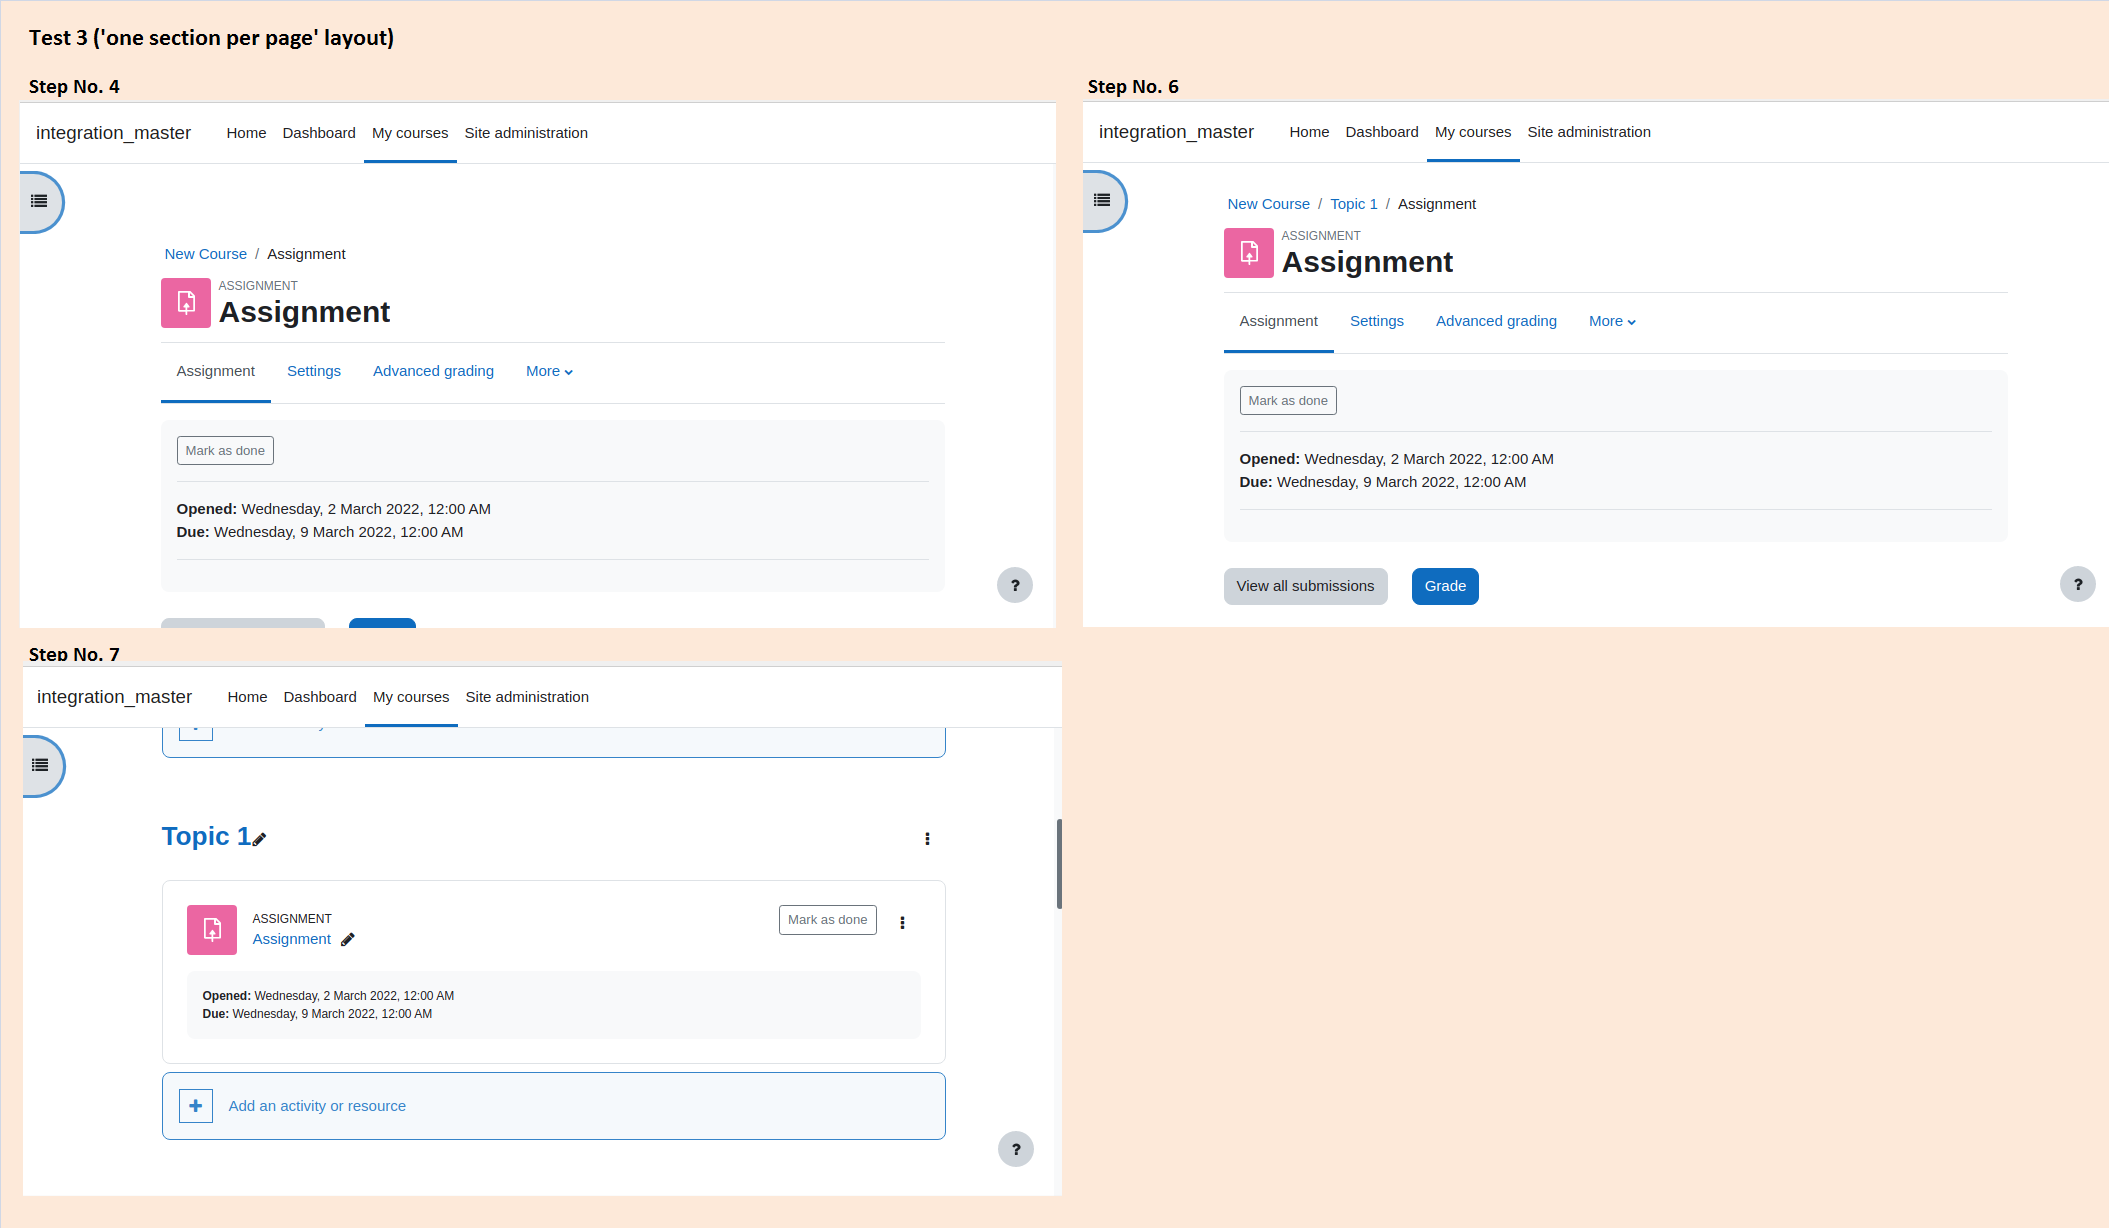
Test 3 ('one section per page' layout) { }
Login as Admin (using Boost theme)
Create a new course (using the default settings)
Go to the course and add an Assignment activity in the 'Topic 1' section of the course
Go to the Assignment activity
confirm that there is no 'Topic 1' item in the breadcrumbs
Go back to the Course and go to course Settings
In the Course format section, for Course layout select 'Show one section per page'
Save and display
Go to the Assignment activity
confirm that there is 'Topic 1' item in the breadcrumbs
Click on the 'Topic 1' breadcrumb item
confirm that you are redirected to the Topic 1 course section page
Improvement
 Major
Major

MDL-78138 Only the nearest item was removed in the breadcrumb for the non-enrolled user

MDL-73593 Review padding at the top of the page

