Uploaded image for project: 'Moodle'
  1. Moodle
  2. MDL-73373

General tertiary navigation followup

XMLWordPrintable

    • MOODLE_400_STABLE
    • MOODLE_400_STABLE
    • MDL-73373-master
    • Hide

      Prerequisites

      1. Create a course
      2. Create a student user account

      Testing instructions

      1. Login as an admin
      2. Go to the course
      3. Click on the participants page
      4. Confirm you see the heading 'Enrolled users' below the secondary and tertiary navigation
      5. Confirm you see a select box at the top of the page
      6. Confirm you see the following options:
        1. Enrolments
          1. Enrolled users
          2. Enrolment methods
        2. Groups
          1. Groups
          2. Groupings
          3. Overview
        3. Permission
          1. Permission
          2. Other users
          3. Check Permissions
      7. With each of the options #6
        1. Select the option in the dropdown
        2. Confirm the dropdown is still visible
        3. Confirm the option remains selected once redirected
        4. Confirm the title appears below the select box
        5. Confirm the 'Participants' tab remains highlighted
      8. Confirm you see the ‘Enrol users’ inline with the select box
      9. Confirm the button is marked as a primary button (i.e. it is blue)
      10. Confirm the title appears below the select box
      11. Click on the ‘Enrol users’
      12. Confirm the ‘Enrol users’ modal appears
      13. Search for the student user account in the search box
      14. Enrol the user as a student
      15. Confirm the user appears in the participants table
      16. Select ‘Other users’ from the dropdown list
      17. Click on the ‘Assign roles’ button
      18. Confirm you see a ‘Back’ button
      19. Click on the ‘Manager’ link
      20. Confirm you see a back button
      21. Click on the back button
      22. Confirm you are taken back to the previous page
      23. Confirm you still see a back button
      24. Click on the back button
      25. Confirm you are taken back to the ‘Other users’ page
      26. Go to the course
      27. Go to the ‘Announcements’ forum
      28. Click on the "Permissions" option in the "More" menu
      29. Confirm you do see the participants tertiary nav below the secondary nav bar
      30. Confirm the options are:
        1. Permissions
          1. Permissions
          2. Check Permissions
          3. Locally assigned roles
      31. For each of the option in #30:
        1. Select the item
        2. Confirm the selected item is displayed after redirect
        3. Confirm the 'More' tab is highlighted
      32. Select 'Locally assigned roles'
      33. Click on one of the roles listed
      34. Confirm you see a back button
      35. Click on the back button
      36. Confirm you are taken back to the previous page (i.e. still within the activity)
      37. Go to the ‘Site home’
      38. Confirm you see the 'Participants' option in the secondary navigation bar
      39. Click on the 'Participants' option
      40. Confirm you see the tertiary nav below the secondary navigation
      41. Confirm you do not see the 'Enrol users' button
      42. Confirm you see the following options:
        1. Enrolments
          1. Enrolled users
        2. Groups
          1. Groups
          2. Groupings
          3. Overview
        3. Permission
          1. Permission
          2. Assigned roles
          3. Check Permissions
      43. With each of the options above
        1. Select the option in the dropdown
        2. Confirm the dropdown is still visible
        3. Confirm the option remains selected once redirected
        4. Confirm the title appears below the select box
      44. Select the ‘Assigned roles’
      45. Repeat as #19-#21

      Site admin checks

      1. Log in as admin
      2. Go to Site admin > Users > Assign system roles
      3. Confirm you do not see the dropdown from the participants page
      4. Click on the ‘Manager’ link
      5. Confirm you see a ‘Back’ button at the top of the page
      6. Click on the back button
      7. Confirm you’re taken back to the ‘Assign roles in system’ page
      8. Confirm you do not see the dropdown from the participants page
      9. Click on the ‘Users’ tab
      10. Click on the ‘Check system permissions’
      11. Confirm you do not see the dropdown from the participants page
      12. Go to Site admin > Course > Manage courses and categories
      13. For any of the categories listed, select ‘Assign roles’ from the settings cog
      14. Confirm you see a Back button
      15. Click on the back button
      16. Confirm you’re taken to the same page as #13
      17. Repeat #4-#8
      18. Create a new ‘Parent’ role as described here https://docs.moodle.org/311/en/Parent_role#Creating_a_new_role
      19. Go to Site Admin > Users > Accounts > Browser list of users
      20. Click on the student name to view the profile
      21. In the admin section, click preferences
      22. In the Roles section, click on the ‘Assign roles relative to this user’
      23. Confirm you do not see the participants tertiary nav
      24. Repeat #4-#8 with Parent role
      25. Go to Site admin > users > Permissions > Define roles > Add a new role
      26. Choose the archetype as ‘No role’
      27. Click on the continue
      28. Enter the following and save:
        1. Name: Block
        2. Context types: Block
      29. Go to the course
      30. Turn on editing
      31. Add a block if none added
      32. Click on the settings cog within the block
      33. Select the ‘Assign roles in {block_name}’ option
      34. Confirm you see a back button
      35. Click the back button
      36. Confirm you are taken back to the course
      37. Repeat #32-#33
      38. Click on the ‘Block’ role
      39. Confirm you see the back button
      40. click on the back button
      41. confirm you are taken back to the previous page
      42. Confirm you see a back button
      43. Click on the back button
      44. Confirm you are taken back to the course

      Test as student

      1. Log in as a student
      2. Go to the course
      3. Click on the participants tab
      4. Confirm you do not see the participants tertiary nav

      Classic test

      1. Repeat all on classic
        1. Secondary nav doesn’t exist on classic. Choose options within the admin block instead.

      Report option test

      1. Log into as admin
      2. Go to the course created  
      3. Go to th 'Announcements' forum
      4. Open the 'more' dropdown in the secondary navigation
      5. Confirm you do not see the Logs option in the secondary navigation
      6. Confirm you do not see the 'Competency breakdown' in the secondary navigation

      Breadcrumbs test

      Boost

      1. Log in as admin
      2. Search for 'defaulthomepage'
      3. Set it to 'My courses'
      4. Go to the course
      5. Confirm you see do not see breadcrumbs in the context header
      6. Click on an activity in the course
      7. Confirm you see the breadcrumbs in the format " {Course Name}

        /

        {Activityname}

        "

      Classic - carry on from previous

      1. Log in as admin
      2. Go to the course
      3. Confirm you see the breadcrumbs "My courses/ {Course name}"
        # Click on an activity in the course
        # Confirm you see the breadcrumbs "My courses/{Course name}

        /

        {Section name}/{Activity name}"
        # Go to site admin
        # Set 'defaulthomepage' to 'Site'
        # Go to the course
        # Confirm you see the breadcrumbs "Home/My courses/{Course name}"
        # Click on an activity in the course
        # Confirm you see the breadcrumbs "Home/My courses/{Course name}/{Section name}

        /

        {Activity name}

        "

      Show
      Prerequisites Create a course Create a student user account Testing instructions Login as an admin Go to the course Click on the participants page Confirm  you see the heading 'Enrolled users' below the secondary and tertiary navigation Confirm you see a select box at the top of the page Confirm you see the following options: Enrolments Enrolled users Enrolment methods Groups Groups Groupings Overview Permission Permission Other users Check Permissions With each of the options #6 Select the option in the dropdown Confirm the dropdown is still visible Confirm the option remains selected once redirected Confirm the title appears below the select box Confirm the 'Participants' tab remains highlighted Confirm you see the ‘Enrol users’ inline with the select box Confirm the button is marked as a primary button (i.e. it is blue) Confirm the title appears below the select box Click on the ‘Enrol users’ Confirm the ‘Enrol users’ modal appears Search for the student user account in the search box Enrol the user as a student Confirm the user appears in the participants table Select ‘Other users’ from the dropdown list Click on the ‘Assign roles’ button Confirm you see a ‘Back’ button Click on the ‘Manager’ link Confirm you see a back button Click on the back button Confirm you are taken back to the previous page Confirm you still see a back button Click on the back button Confirm you are taken back to the ‘Other users’ page Go to the course Go to the ‘Announcements’ forum Click on the "Permissions" option in the "More" menu Confirm you do see the participants tertiary nav below the secondary nav bar Confirm the options are: Permissions Permissions Check Permissions Locally assigned roles For each of the option in #30: Select the item Confirm the selected item is displayed after redirect Confirm the 'More' tab is highlighted Select 'Locally assigned roles' Click on one of the roles listed Confirm you see a back button Click on the back button Confirm you are taken back to the previous page (i.e. still within the activity) Go to the ‘Site home’ Confirm you see the 'Participants' option in the secondary navigation bar Click on the 'Participants' option Confirm you see the tertiary nav below the secondary navigation Confirm you do not see the 'Enrol users' button Confirm you see the following options: Enrolments Enrolled users Groups Groups Groupings Overview Permission Permission Assigned roles Check Permissions With each of the options above Select the option in the dropdown Confirm the dropdown is still visible Confirm the option remains selected once redirected Confirm the title appears below the select box Select the ‘Assigned roles’ Repeat as #19-#21 Site admin checks Log in as admin Go to Site admin > Users > Assign system roles Confirm you do not see the dropdown from the participants page Click on the ‘Manager’ link Confirm you see a ‘Back’ button at the top of the page Click on the back button Confirm you’re taken back to the ‘Assign roles in system’ page Confirm you do not see the dropdown from the participants page Click on the ‘Users’ tab Click on the ‘Check system permissions’ Confirm you do not see the dropdown from the participants page Go to Site admin > Course > Manage courses and categories For any of the categories listed, select ‘Assign roles’ from the settings cog Confirm you see a Back button Click on the back button Confirm you’re taken to the same page as #13 Repeat #4-#8 Create a new ‘Parent’ role as described here https://docs.moodle.org/311/en/Parent_role#Creating_a_new_role Go to Site Admin > Users > Accounts > Browser list of users Click on the student name to view the profile In the admin section, click preferences In the Roles section, click on the ‘Assign roles relative to this user’ Confirm you do not see the participants tertiary nav Repeat #4-#8 with Parent role Go to Site admin > users > Permissions > Define roles > Add a new role Choose the archetype as ‘No role’ Click on the continue Enter the following and save: Name: Block Context types: Block Go to the course Turn on editing Add a block if none added Click on the settings cog within the block Select the ‘Assign roles in {block_name}’ option Confirm you see a back button Click the back button Confirm you are taken back to the course Repeat #32-#33 Click on the ‘Block’ role Confirm you see the back button click on the back button confirm you are taken back to the previous page Confirm you see a back button Click on the back button Confirm you are taken back to the course Test as student Log in as a student Go to the course Click on the participants tab Confirm you do not see the participants tertiary nav Classic test Repeat all on classic Secondary nav doesn’t exist on classic. Choose options within the admin block instead. Report option test Log into as admin Go to the course created   Go to th 'Announcements' forum Open the 'more' dropdown in the secondary navigation Confirm you do not see the Logs option in the secondary navigation Confirm you do not see the 'Competency breakdown' in the secondary navigation Breadcrumbs test Boost Log in as admin Search for 'defaulthomepage' Set it to 'My courses' Go to the course Confirm you see do not see breadcrumbs in the context header Click on an activity in the course Confirm you see the breadcrumbs in the format " {Course Name} / {Activityname} " Classic - carry on from previous Log in as admin Go to the course Confirm you see the breadcrumbs "My courses/ {Course name}" # Click on an activity in the course # Confirm you see the breadcrumbs "My courses/{Course name} / {Section name}/{Activity name}" # Go to site admin # Set 'defaulthomepage' to 'Site' # Go to the course # Confirm you see the breadcrumbs "Home/My courses/{Course name}" # Click on an activity in the course # Confirm you see the breadcrumbs "Home/My courses/{Course name}/{Section name} / {Activity name} "
    • 3
    • Navigation push 11, Navigation push 13, Navigation push 14

      This is a followup to address any general tertiary navigation issues in the activities.

      Identified issues:

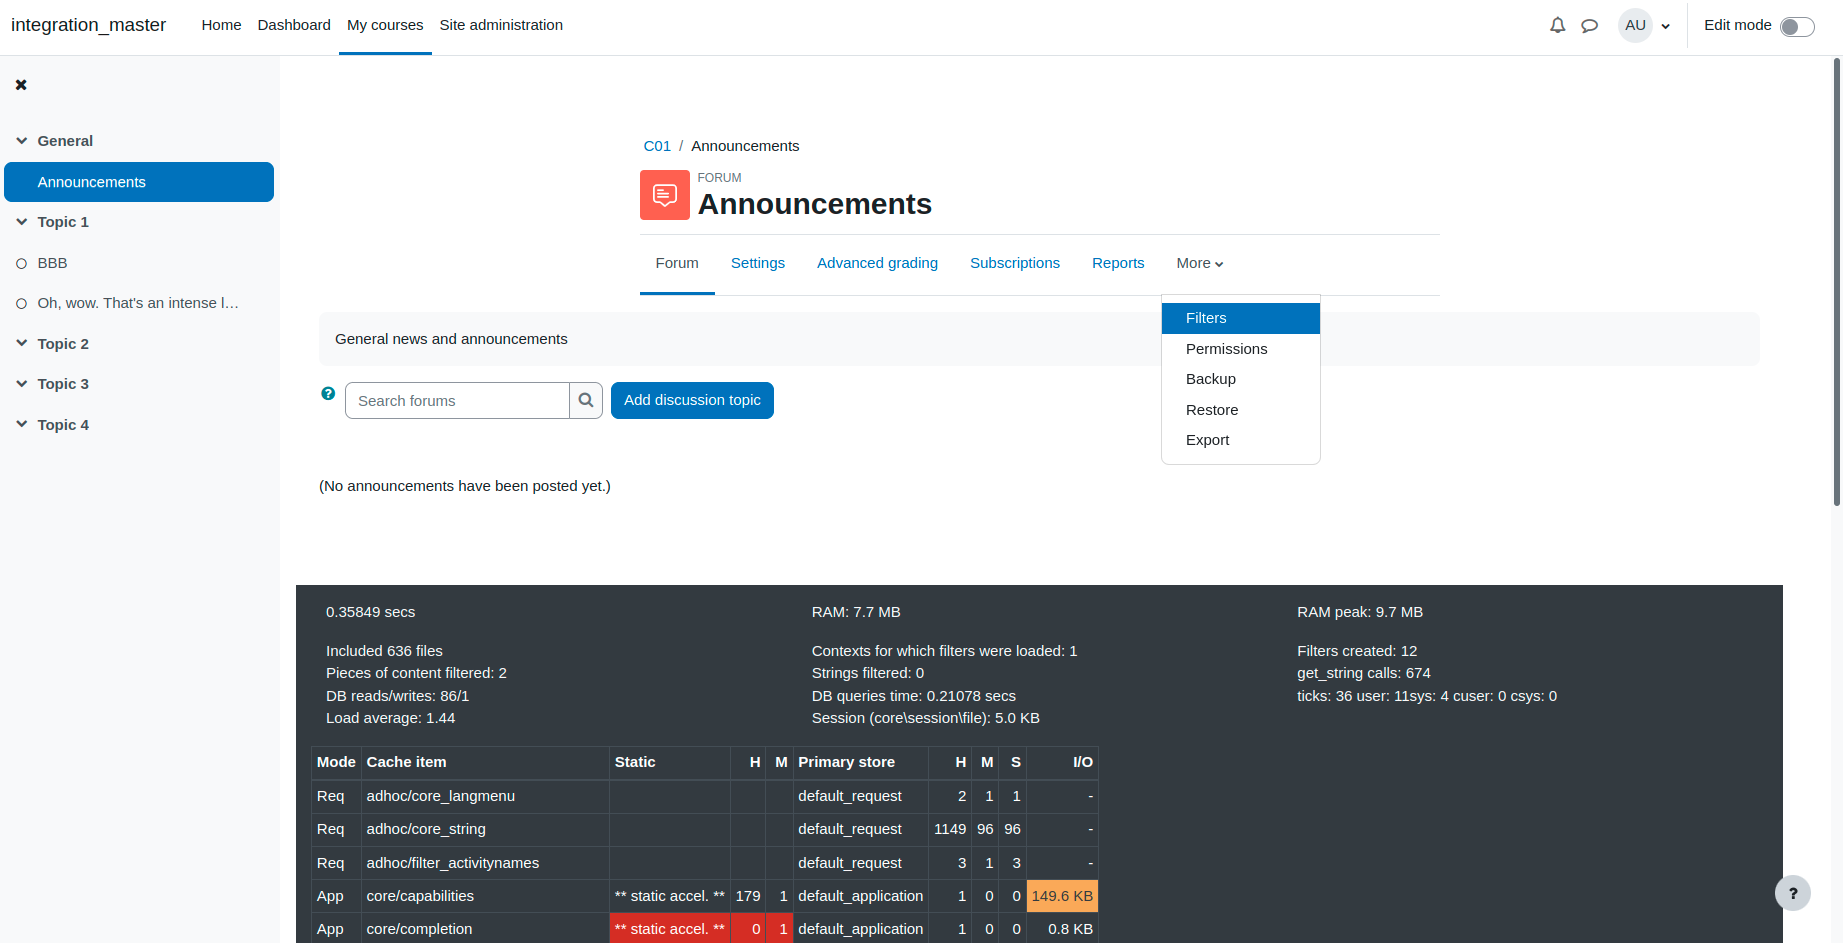
      1. Move 'Locally assigned roles' from the secondary navigation in activities into the tertiary navigation selector in the 'Permissions' page (Secondary navigation More menu > Permissions).
        1. Add the navigation selector element into the 'Locally assigned roles' page as well (Permissions, Check permissions, Locally assigned roles)
      2. Remove 'Logs' and 'Competency breakdown' from the secondary navigation in activities (These links can be accessed through Course > Reports)
      3. Remove 'Courses' from the breadcrumbs shown in the activities.
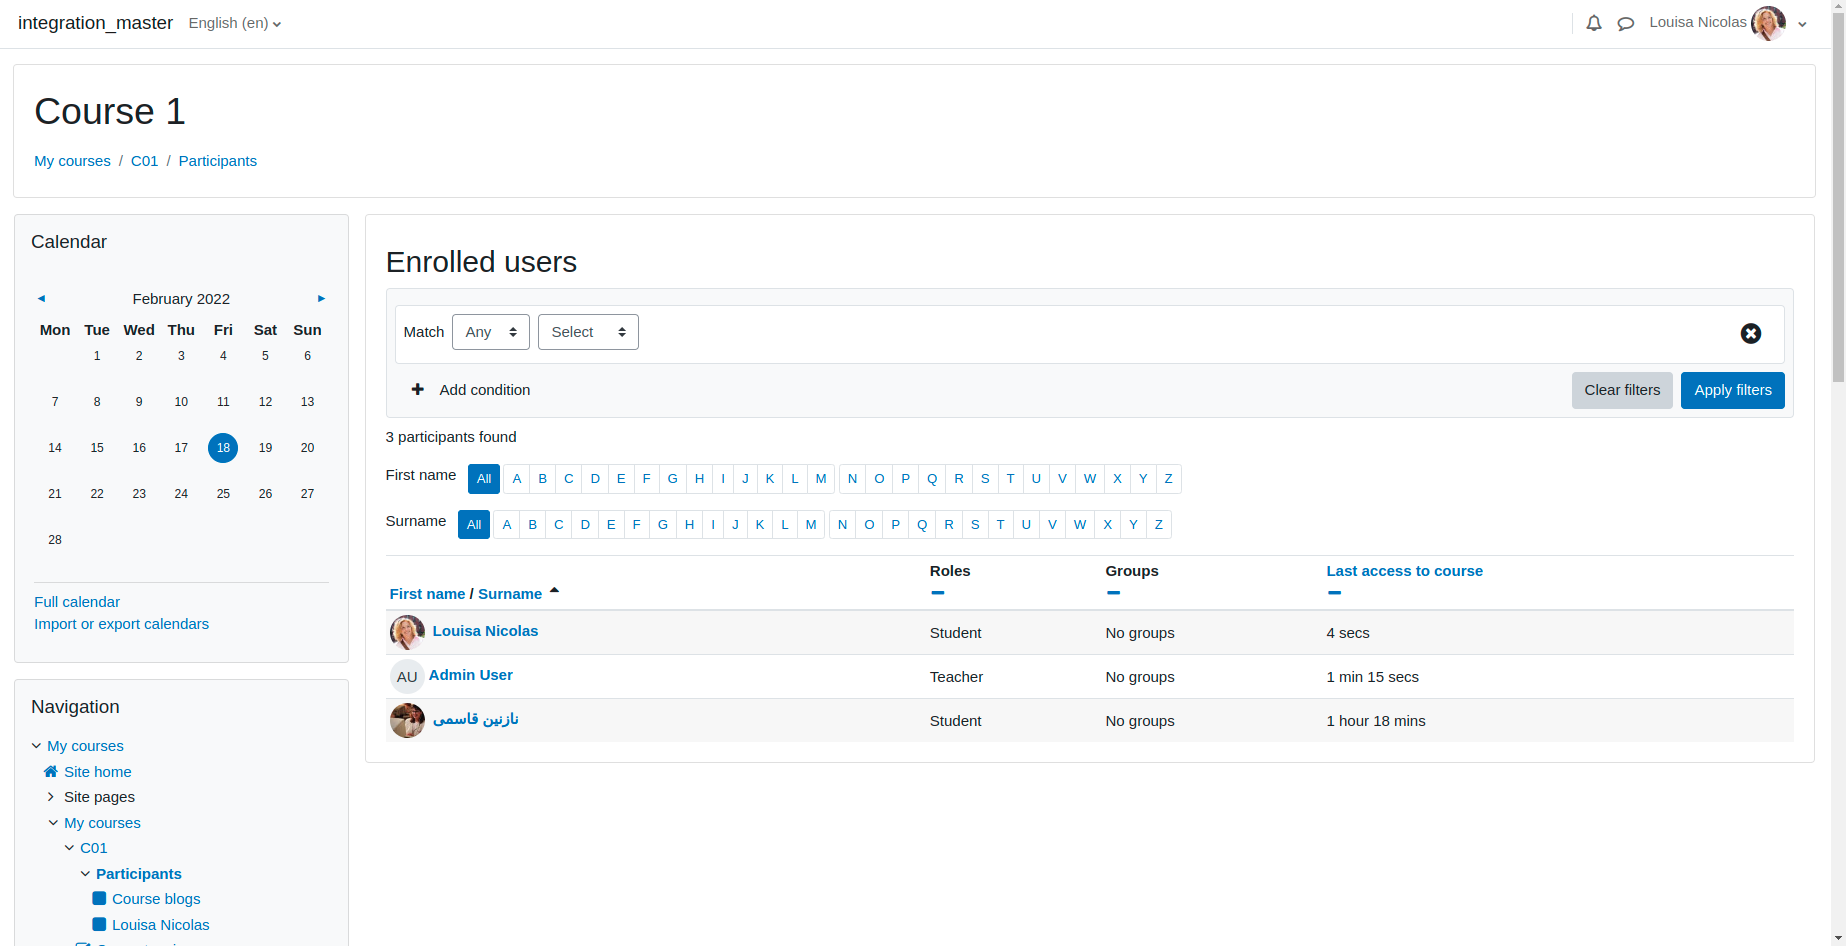
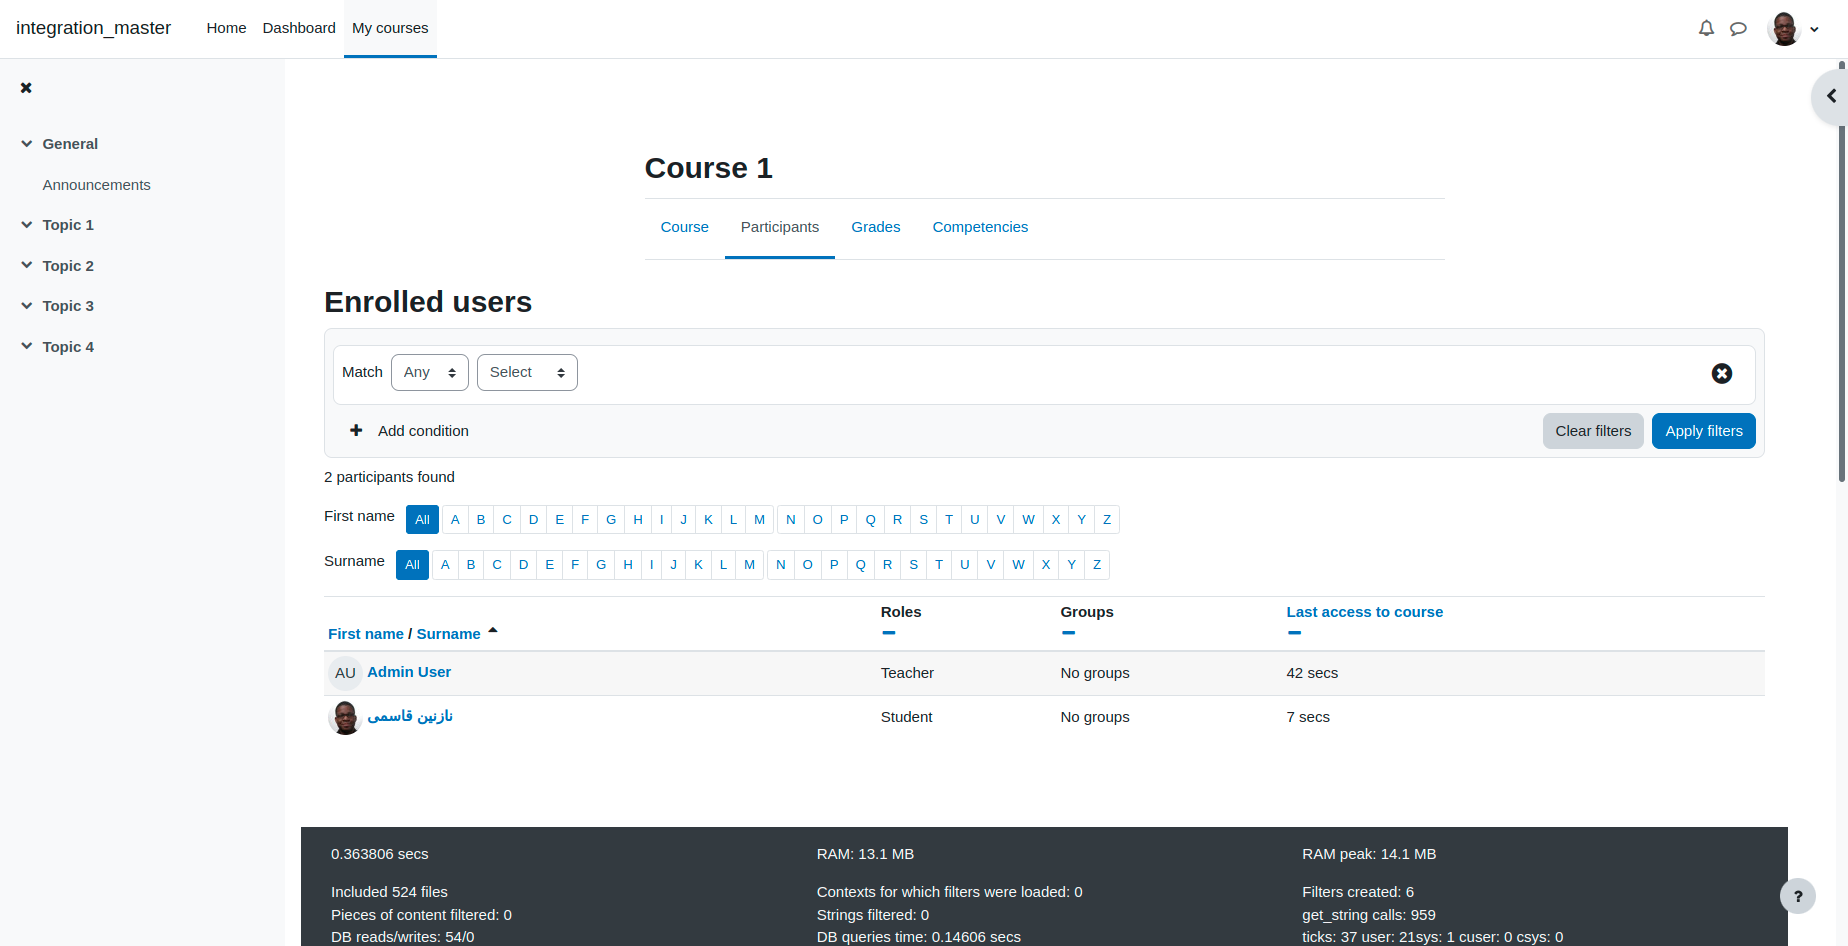
      4. Update the heading text in the Enrolled users (Participans) page from 'Participants' to 'Enrolled users'.

        1. MDL-73373_breadcrumbs_boost.webm
          610 kB
        2. MDL-73373_breadcrumbs_classic.webm
          356 kB
        3. MDL-73373_report option.png
          MDL-73373_report option.png
          139 kB
        4. MDL-73373_site admin checks_classic.webm
          1.71 MB
        5. MDL-73373_site admin checks.webm
          1.93 MB
        6. MDL-73373_site admin checks 2_classic.webm
          3.23 MB
        7. MDL-73373_site admin checks 2.webm
          2.96 MB
        8. MDL-73373_student_classic.png
          MDL-73373_student_classic.png
          114 kB
        9. MDL-73373_student.png
          MDL-73373_student.png
          112 kB
        10. MDL-73373_testing_classic.webm
          5.13 MB
        11. MDL-73373_testing.webm
          5.53 MB

            peterdias Peter Dias
            Geshoski Mihail Geshoski
            Glyn (Mathew) May Glyn (Mathew) May
            Jun Pataleta Jun Pataleta
            Angelia Dela Cruz Angelia Dela Cruz
            Votes:
            0 Vote for this issue
            Watchers:
            10 Start watching this issue

              Created:
              Updated:
              Resolved:

                Estimated:
                Original Estimate - Not Specified
                Not Specified
                Remaining:
                Remaining Estimate - 0 minutes
                0m
                Logged:
                Time Spent - 4 days, 2 hours, 40 minutes
                4d 2h 40m

                  Error rendering 'clockify-timesheets-time-tracking-reports:timer-sidebar'. Please contact your Jira administrators.