-
 Functional Test
-
 Minor
Minor
-
None
-
Moodle 5.0
It is recommended that you perform these steps in the order they are presented as they have been sequenced in a way that attempts to reduce toggling settings on and off as much as possible.
Once all the tests have been covered, it is encouraged that you explore different uses (eg in different courses/activities) and fiddle with the settings in an effort to identify any issues not covered here.
Prerequisites
- This test should be completed by Moodle HQ.
- You will require a valid OpenAI key and organisation ID, which are now available via Moodle's own AI API (reach out to Team Hedgehog in the Platform Solutions team if you need credentials).
- You will also require valid credentials for either Ollama (run locally), or Azure (reach out to the Platform team for creds if needed). Ollama is preferred as the second provider as it is a new provider this release. Ollama will be mentioned in the below steps, substitute for Azure if required. Note: If you use Azure, ensure only text actions are enabled, and disable the generate image action (it is relevant for provider ranking testing - Ollama only supports text).
- It is recommended to use a fresh install of Moodle without any AI set up yet.
- Restore the course using the file attached to this issue (you may have to run cron to complete the restore)
Tests
AI providers and actions
- Log in as admin.
- Go to Site admin -> General -> AI -> AI providers.
- Add an OpenAI provider as follows:
- Press the 'Create a new provider instance' button.
- Fill in the relevant details ('OpenAI API key' and 'Organization ID') and click 'Create instance'.
- Press the 'Enabled' toggle for the new provider.
- Repeat for the second provider (Ollama, or Azure if you are unable to set up Ollama) with relevant fields set, but do not enable the second provider yet.
- Ensure your OpenAI provider is listed first, by using the arrows in the 'Order' column (if it is not already at the top). We will be testing with that provider first.
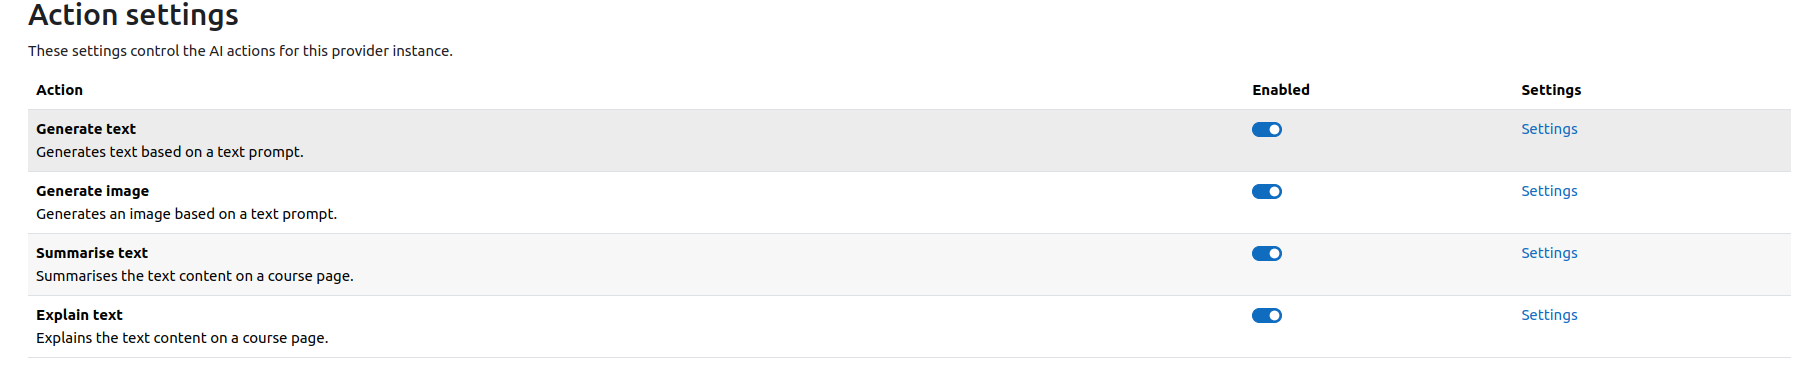
- Press 'Settings' on the OpenAI provider row.
- CONFIRM there are four provider actions under the 'Provider actions' heading and that they are all enabled by default (Generate text, Generate image, Summarise text and Explain text).
- Disable 'Generate text' and 'Generate image'.
- Go to Site admin -> General -> AI -> AI placements.
- CONFIRM there are two placements called 'Course assistance placement' and 'Text editor placement'.
- Enable 'Text Editor Placement'.
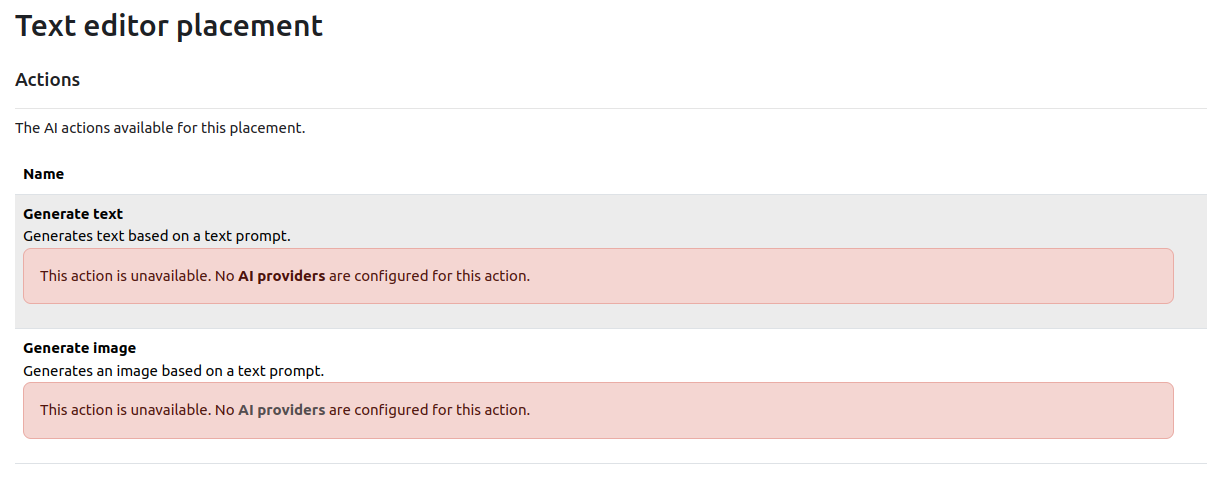
- Click the 'Settings' link for 'Text Editor Placement'.
- CONFIRM there are error messages displayed for both 'Generate text' and 'Generate image'.
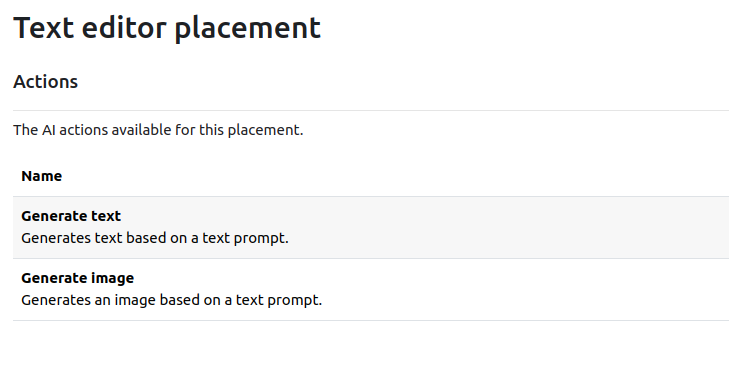
- Re-enabled 'Generate text' and 'Generate image' for the provider.
- Go back to the 'Settings' for 'Text Editor Placement'.
- CONFIRM there are no errors there now.
- Return to the AI providers page and now enable the Ollama provider, so there are two enabled (with OpenAI first on the list, and Ollama second).
Text editor placement test
- Go to the restored course (see prerequisites).
- Add a new 'Page' resource.
- Scroll to one of the editors.
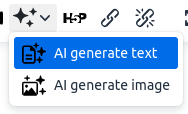
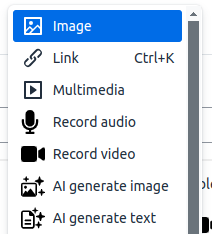
- CONFIRM there is an icon called 'Generate AI content' icon (sparkles) in the toolbar.
- Click on the the 'Generate AI content' dropdown icon.
- CONFIRM there are two options called 'AI generate text' and 'AI generate image'.
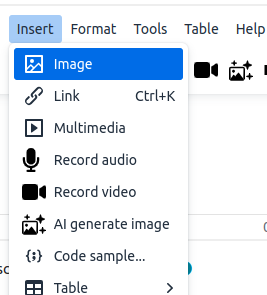
- Click on the editor's 'Insert' menu.
- CONFIRM there are two options called 'AI generate text' and 'AI generate image'.
- Go to Site admin -> General -> AI -> AI placements.
- Click the 'Settings' link for 'Text Editor Placement'.
- Disable 'Generate text'.
- Return to your 'Page' resource editor.
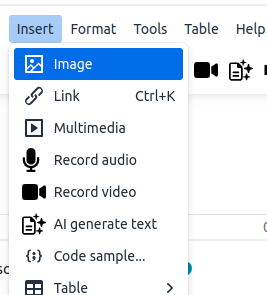
- CONFIRM that there is no longer a dropdown menu for AI generate content and you can only see the 'AI generate image' icon on the toolbar.
- Click the 'Insert' menu and confirm you can only see 'AI generate image' ('AI generate text' should not be there).
- Repeat from Step 9, but swap the disabling of text for image.
- Finally, disable both text and image and confirm you cannot see either in the editor.
- Re-enable both text and image and return to the 'Page' resource editor.
Privacy policy test
- From the editor, click 'AI generate text'.
- CONFIRM that a modal window appears with the AI usage policy.
- Click 'Decline'.
- CONFIRM the AI modal closes.
- Click 'AI generate text' again.
- CONFIRM that a modal window appears with the AI usage policy again.
- Click 'Accept and continue'.
- CONFIRM you can now access the 'Generate text using AI' window.
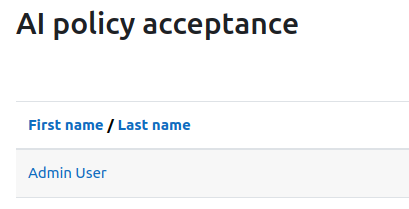
- Go to Site admin -> Reports -> AI reports -> AI usage.
- CONFIRM the admin user is listed in the report, and that the date accepted is correct (is set to roughly when you accepted the policy a couple of minutes ago).
Generate text test (1)
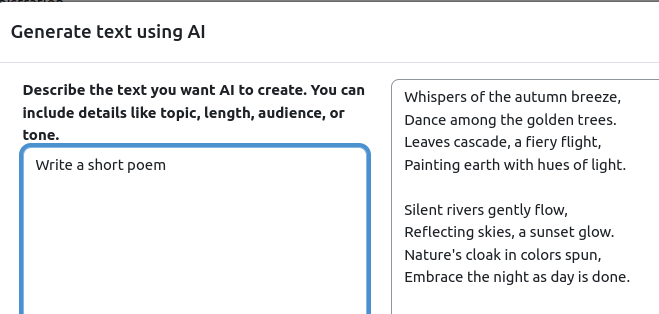
- In the text area, type in something like 'Write a short poem'.
- Click 'Generate text'.
- CONFIRM you see the expected results.
- Click 'Regenerate'.
- CONFIRM you see a variation of your original request.
- CONFIRM that you cannot edit the generated text in the modal.
- Click on 'Insert'.
- CONFIRM that the text as been added to the editor and is now editable.
- Click 'Save and display'.
- CONFIRM that the generated text has been inserted correctly.
Generate text test (2)
- Go to Site admin -> General -> AI -> AI providers.
- Click on the 'Settings' link in the 'OpenAI API Provider' row.
- Under the 'Provider actions' heading, locate the 'Generate text' row and click 'Settings'.
- Edit the 'System instruction' text by adding '3. Add the words TEST TEST TEST' to the start of the results'.
- Save changes.
- Return to the 'Page' resource again.
- Generate some text again.
- CONFIRM that your result has prepended the words 'TEST TEST TEST' (LLMs can get things wrong, repeat this if the results are not what you would expect).
- CONFIRM that you cannot edit the generated text in the modal.
- Click on 'Insert'.
- CONFIRM that the text as been added to the editor and is now editable.
- Click 'Save and display'.
- CONFIRM that the generated text has been inserted correctly.
Provider parameters test
- Go to Site admin -> General -> AI -> AI providers.
- Click on the 'Settings' link in the 'OpenAI API Provider' row.
- Under 'Action settings', click on the 'Settings' link in the 'Generate text' row.
- Select the 'GPT-4o' 'AI model' if it is not already selected.
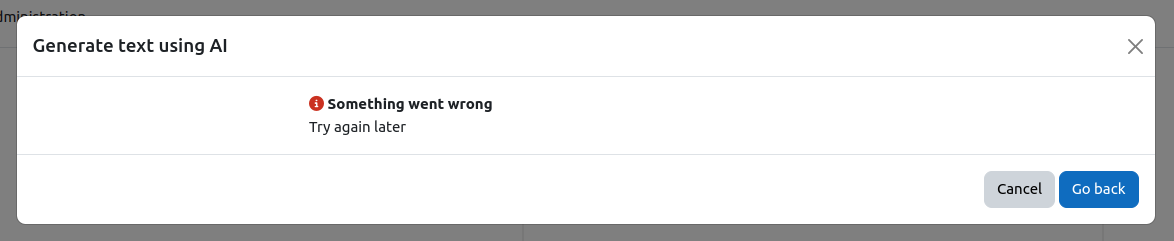
- Under 'Settings', set the 'max_tokens' value to 10 and press 'Save changes'.
- Return to the 'Page' resource again.
- Attempt to generate text with the prompt 'Tell me a joke in exactly 4 sentences'.
- CONFIRM that you either receive an error message (since the response would exceed allowed tokens), or that you receive an incomplete response (if the model is configured to not exceed the max tokens, you may receive a response, but it will be shortened within the limit and not fulfill the 4 sentence requirement).
- Return to Site admin -> General -> AI -> AI providers.
- Click on the 'Settings' link in the 'OpenAI API Provider' row.
- Under 'Action settings', click on the 'Settings' link in the 'Generate text' row.
- Select the 'Custom' 'AI model'.
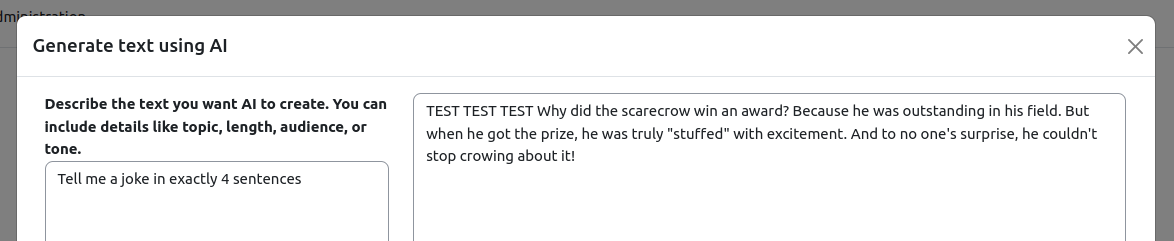
- Set the 'Custom model name' to 'gpt-4o'.
- Under 'Settings', set the 'Extra parameters' to the following:
{"max_tokens": 100} - Return to the 'Page' resource again.
- Attempt to generate text with the prompt 'Tell me a joke in exactly 4 sentences'.
- CONFIRM you receive a successful response of appropriate length (4 sentences. If you received a response in step 8, this one should be longer).
- CONFIRM that the response is complete. e.g.: It has four sentences
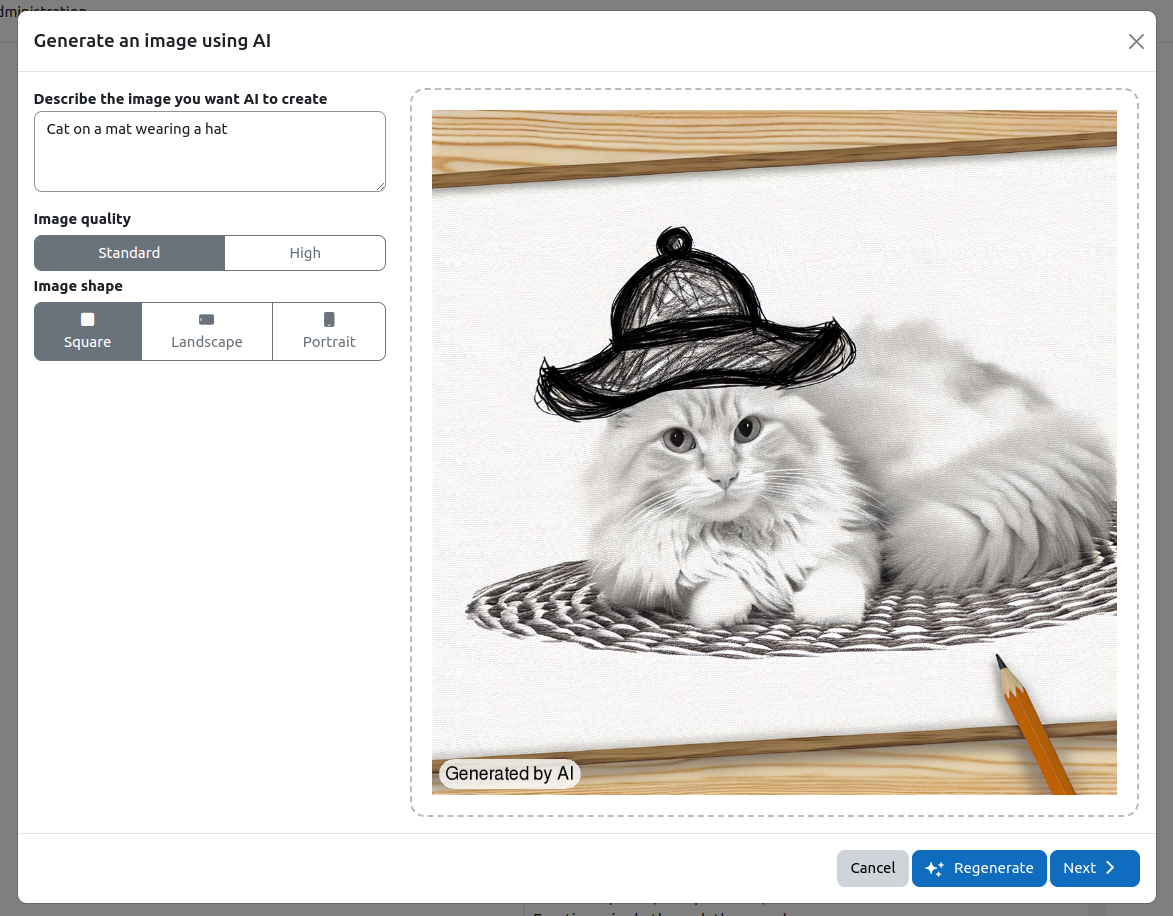
Generate image test
- From the editor, click 'AI generate image'.
- Enter a prompt to generate an image (e.g. 'Cat on a mat wearing a hat').
- Click on 'Generate image'.
- CONFIRM you see the loading wheel and messages as the image is generated.
- CONFIRM that the resulting image is placed in the right-hand-side of the modal.
- CONFIRM there is 'Generated by AI' text added to the bottom of the image and that it is legible.
- Click on 'Regenerate'.
- CONFIRM the results are a variation on the original prompt.
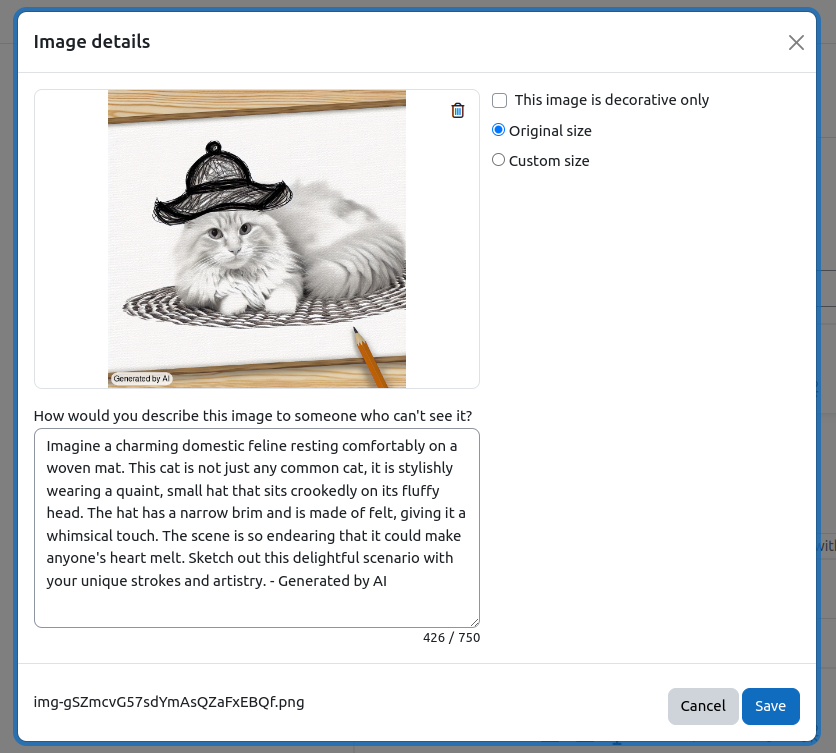
- Click 'Next'.
- CONFIRM that the modal shows the generated image.
- CONFIRM the image description describes the generated image and is not simply your original prompt. Also CONFIRM the image description text ends with '- Generated by AI').
- Click 'Save'.
- CONFIRM the image has been added to the editor.
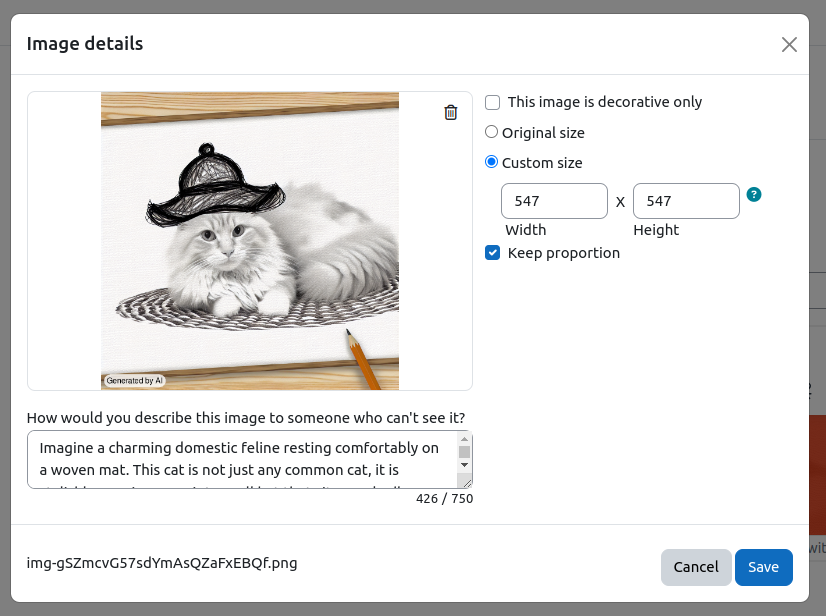
- Click on the image and select the image icon to edit the image.
- CONFIRM that the 'Image details' modal appears with the image and description.
- Adjust the size of the image and press 'Save'
- CONFIRM that the size is updated.
- Click 'Save and display'.
- CONFIRM that the generated image has been inserted correctly.
- Repeat this test using different orientations (e.g. square, landscape, portrait) - to save some time, no need to re-test "regenerate" with these since that feature has been tested in the first run through.
Course assistance - summarise and explain text
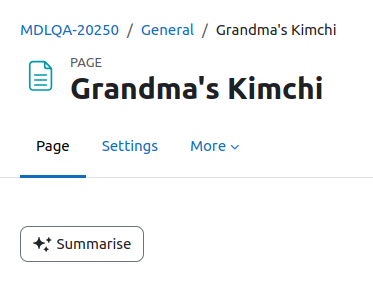
- Go to the restored course.
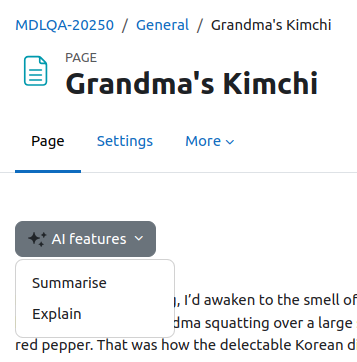
- View the 'Grandma's Kimchi' page.
- CONFIRM there is no 'AI features', Summarise' or 'Explain' button displayed above the main page content.
- In a separate tab go to Site admin -> General -> AI -> AI placements.
- Enable 'Course assistance placement'.
- Click on 'Settings' for that placement.
- Enable the 'Summarise' action and disable the 'Explain text' action. (Keep this tab open for a future step.)
- Go back to the 'Grandma's Kimchi' page and refresh.
- CONFIRM there is now a 'Summarise' button above the text/main page content.
- Back in the AI Course assistance placement settings tab, now also enable the Explain text.
- Go back to the 'Grandma's Kimchi' page and refresh.
- CONFIRM you no longer see a 'Summarise' button, but in its place see an 'AI features' option.
- CONFIRM pressing the 'AI features' button reveals a dropdown with both 'Summarise' and 'Explain' options.
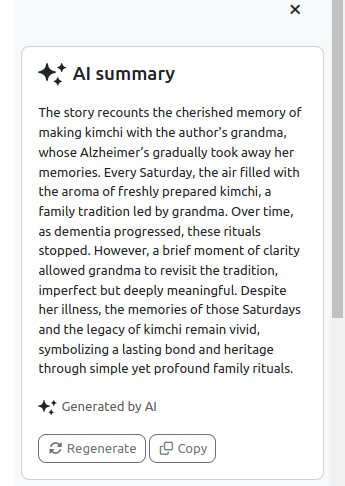
- Click the 'Summarise' button.
- CONFIRM that the right-hand-side drawer opens with the 'AI summary' heading and generated text.
- CONFIRM that the generated text is actually summarising the page contents.
- CONFIRM below the summary states 'Generated by AI'.
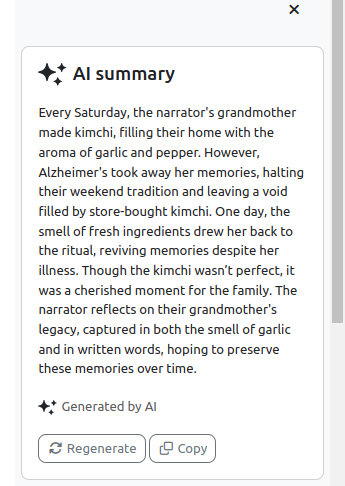
- Click on the 'Regenerate' button.
- CONFIRM there is a variation to the original results displayed.
- Note the content of the results.
- Close the right-hand-side drawer.
- Click the 'Summarise' button again.
- CONFIRM that the draw reopens with the same text that you previously noted (and not a new result).
- Refresh the page and click the 'Summarise' button again.
- CONFIRM there is a newly generated summary (and not the one you previously noted).
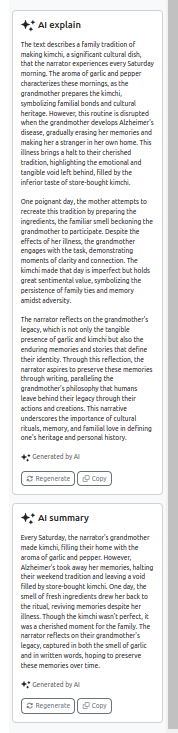
- Now run the 'Explain' AI feature.
- CONFIRM the AI drawer now shows an explanation of the page content, and CONFIRM that the Summarise information is still available in the drawer, below the Explain information.
- Close the AI drawer, then choose one of the 'AI features' options.
- CONFIRM the AI drawer is reopened, but the content is not refreshed/re-fetched (it just displays the existing results).
- Click the 'Copy' button below each of the AI results, and paste the contents into your favourite text editor.
- CONFIRM the text was successfully copy/pasted for both (they should exactly match what was shown in the AI drawer).
Provider ranking and AI usage admin report
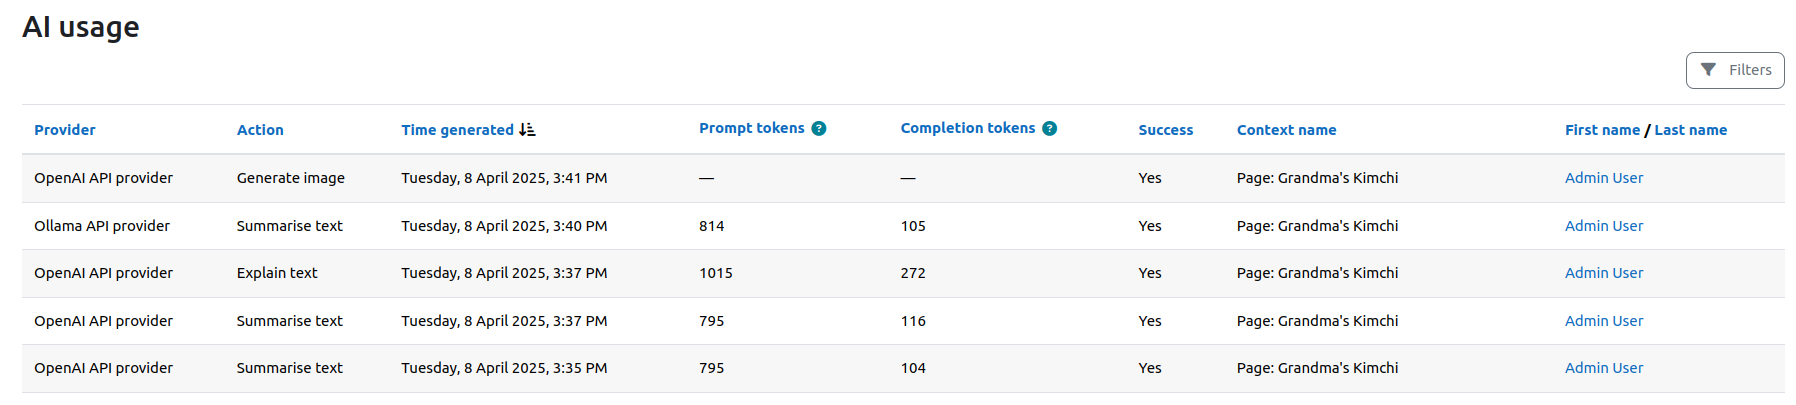
- Go to Site admin -> Reports -> AI reports -> AI usage.
- CONFIRM the activity for the above tests has been logged, and CONFIRM that the logs show the requests were made to the expected provider (OpenAI).
- Go to Site admin -> General -> AI -> AI providers.
- Use the 'Order' column arrows to move Ollama to the top of the list (with OpenAI below it).
- Navigate to the 'Grandma's Kimchi' page.
- Perform the 'Summarise' action.
- Navigate to the edit screen for the 'Page' resource you used in the text/image generation tests above.
- In the editor, use the 'AI generate image' action and complete the steps to generate a new image.
- Return to Site admin -> Reports -> AI reports -> AI usage.
- CONFIRM that the report shows the most recent Summarise action was completed by the Ollama provider.
- CONFIRM that the report shows the most recent Generate image action was completed by the OpenAI provider (since Ollama does not support image generation it should skip that provider and use OpenAI which does support it).
Error handling
- Go to Site admin -> General -> AI -> AI providers.
- Click on the 'Settings' link on the top provider listed in the table.
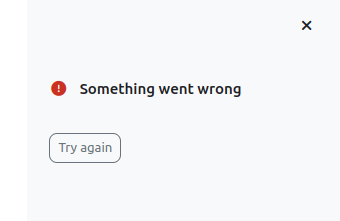
- Change an API setting to something not valid (eg for Ollama, change the API endpoint, if it's OpenAI change the OpenAI API key).
- Save changes.
- Return to the 'Grandma's Kimchi' page.
- Click on 'Summarise'.
- CONFIRM the drawer opens with the message 'Something went wrong'.