-
Improvement
-
Resolution: Fixed
-
 Major
Major
-
Future Dev
-
MOODLE_500_STABLE
-
MDL-78428-main -
To ensure seamless testing, I've provided a sample.vtt
 file and a list of url to be used during the testing process.
Video links with specified file name and extension.
- https://videos.pexels.com/video-files/5538262/5538262-hd_1920_1080_25fps.mp4
- https://www.shutterstock.com/shutterstock/videos/1106834663/preview/stock-footage-automated-pcb-assembly-line-conveyor-with-advanced-high-precision-robot-arms-at-electronics.webm
- https://media.geeksforgeeks.org/wp-content/uploads/20190616234019/Canvas.move_.mp4
Video platforms
- Vimeo: https://vimeo.com/107742013
- YouTube:
- youtube.com: https://www.youtube.com/watch?v=xZgZLOq1JKU
- y2u.be: https://y2u.be/xZgZLOq1JKU
- youtu.be: https://youtu.be/xZgZLOq1JKU?si=H_T3LMW8N00pNwiY
- playlist1: https://www.youtube.com/playlist?list=PLbpi6ZahtOH4wB_j_xc_ks8GbPLjz15eO
- playlist2: https://www.youtube.com/watch?v=0WA6h5whiiA&list=PLbpi6ZahtOH4wB_j_xc_ks8GbPLjz15eO
Audio links with specified file name and extension
- https://media.geeksforgeeks.org/wp-content/uploads/20230524142525/gfg_offline_classes_en.mp3
- https://media.geeksforgeeks.org/wp-content/uploads/20220913101124/audiosample.ogg
Image links to test for the thumbnail add from url
- https://encrypted-tbn0.gstatic.com/images?q=tbn:ANd9GcSouyQgYFwklkCFVWZZGwiZ1H9KxsHzS_HnPg&s
- https://www.furman.edu/faculty-development-center/wp-content/uploads/sites/108/2023/12/moodlecover.jpg
- https://media.geeksforgeeks.org/wp-content/uploads/20190627130930/a218.png
Most of the following testings are covered by automated tests, but it's always good to do the manual tests so feel free to explore
Testing 1: Repositories
- Login as admin
- Navigate to the Site Admin > Plugins > Repositories > Manage repositories.
- Set the "Enable and visible" value to the Upload a file repository.
- Navigate to the Edit Profile page.
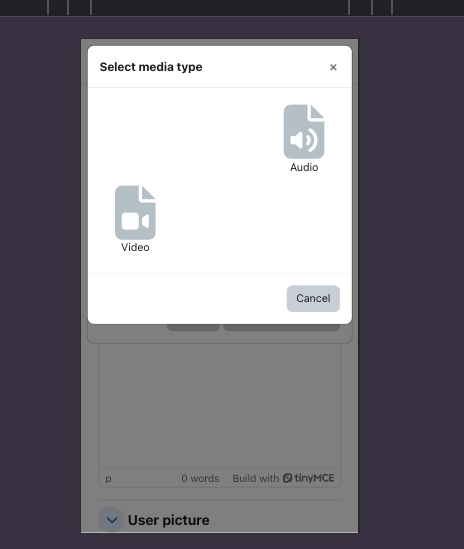
- In the description editor toolbar, click the "multimedia" icon
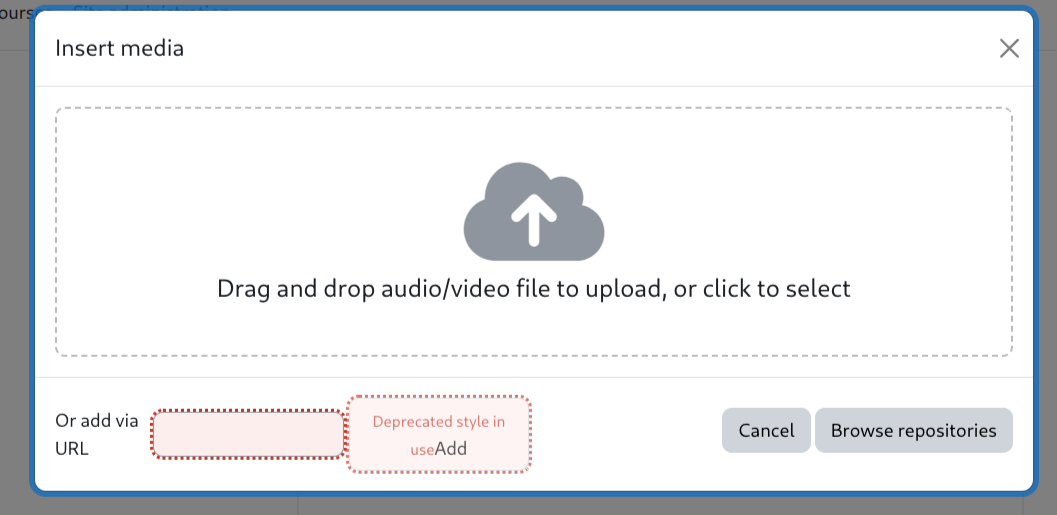
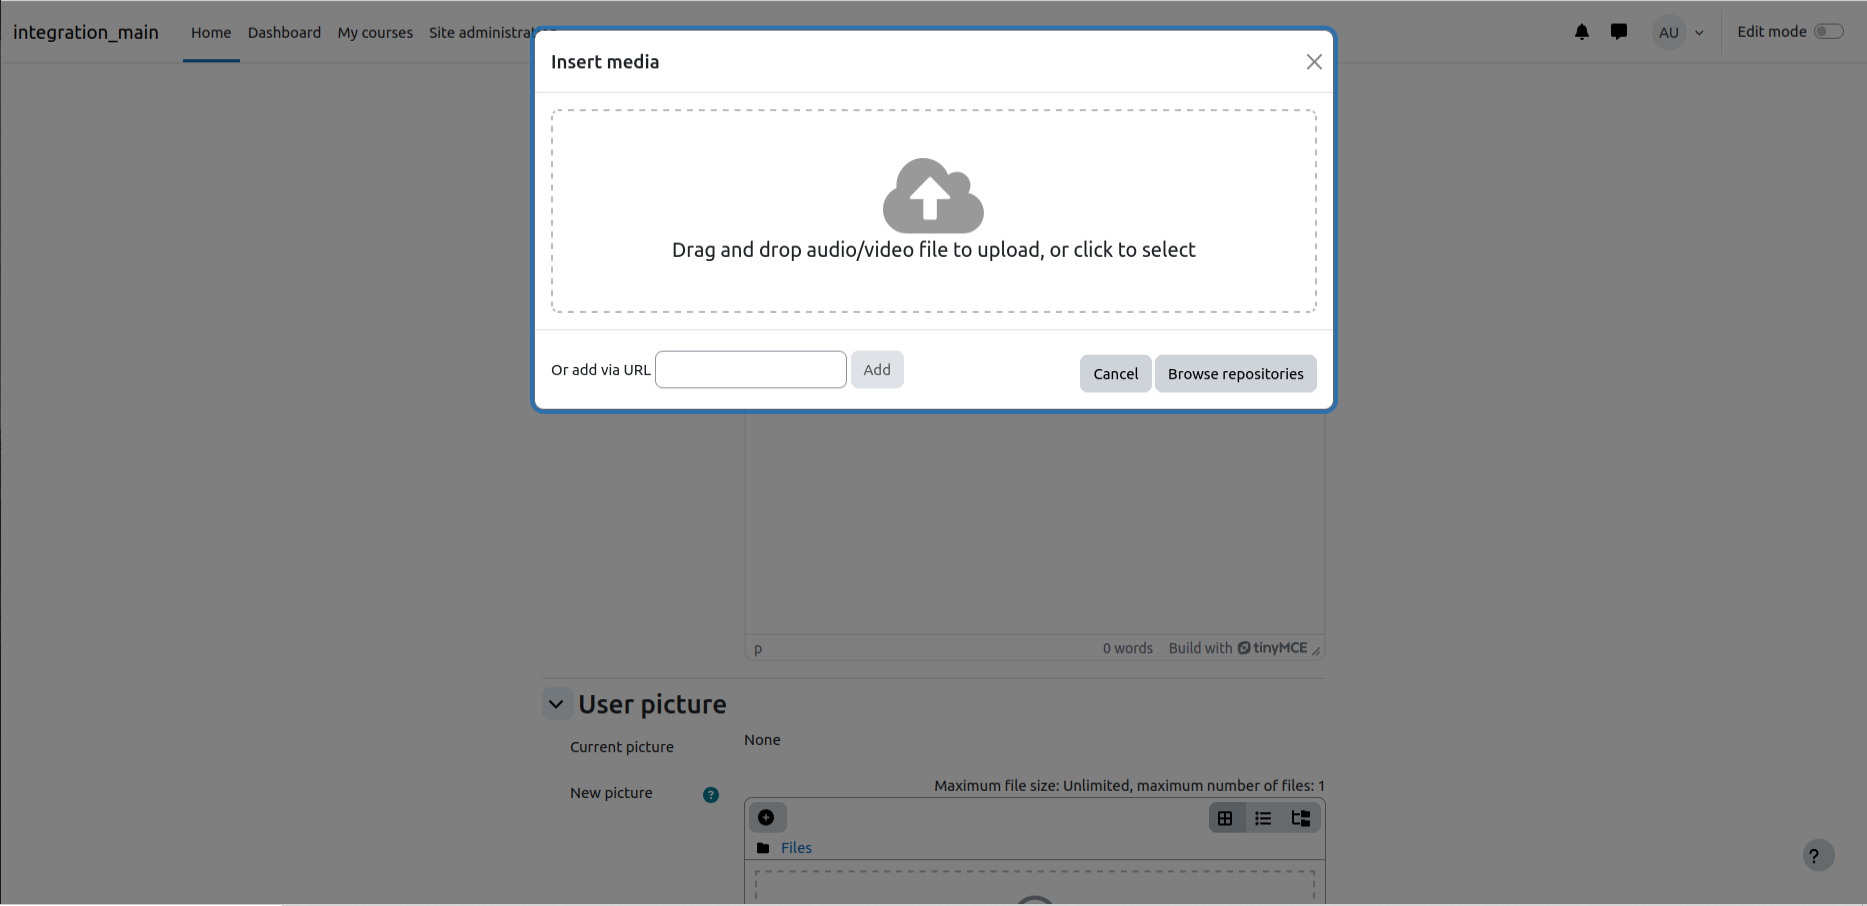
- Verify that there is an icon and text "Drag and drop audio/video file to upload, or click to select." and the browse repositories button
- Navigate back to the Site Admin > Plugins > Repositories > Manage repositories.
- Disable the Upload a file repository
- Navigate back to the Edit Profile page.
- In the description editor toolbar, click the multimedia icon
- Verify that there is an icon and text "Paste a link to an audio/video file in the field below or click the Browse Repositories button."
- Add a video file using "Add via URL" or "Browse Repositories"
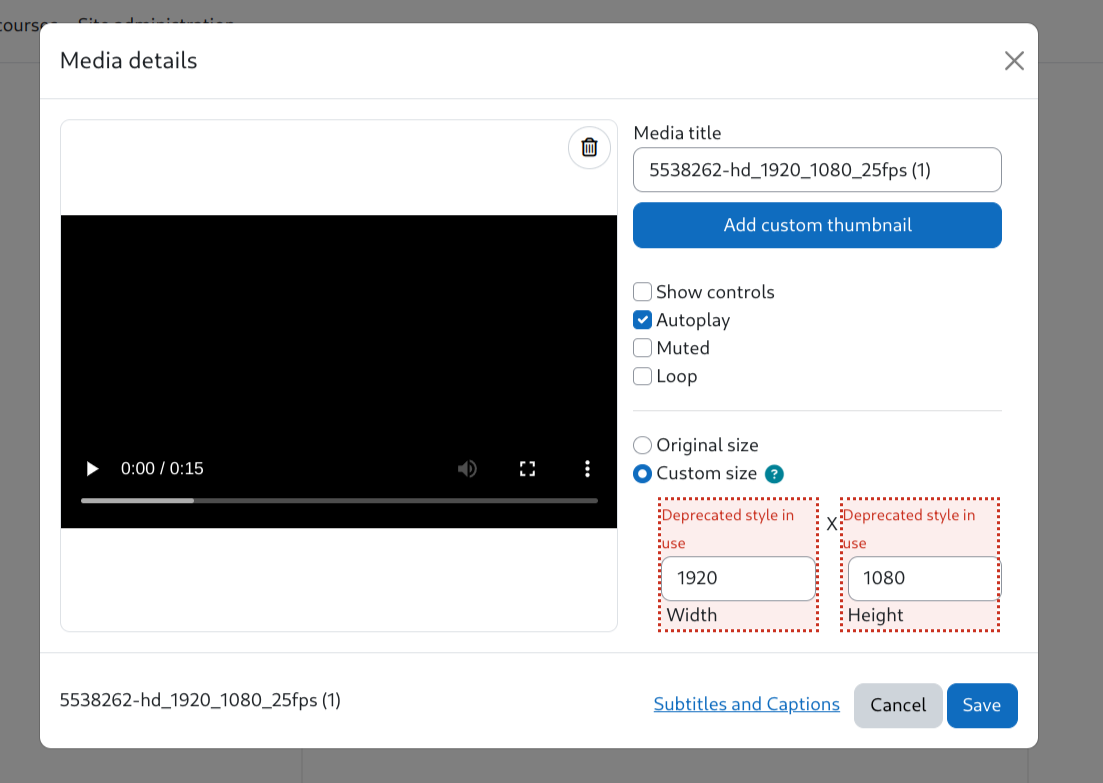
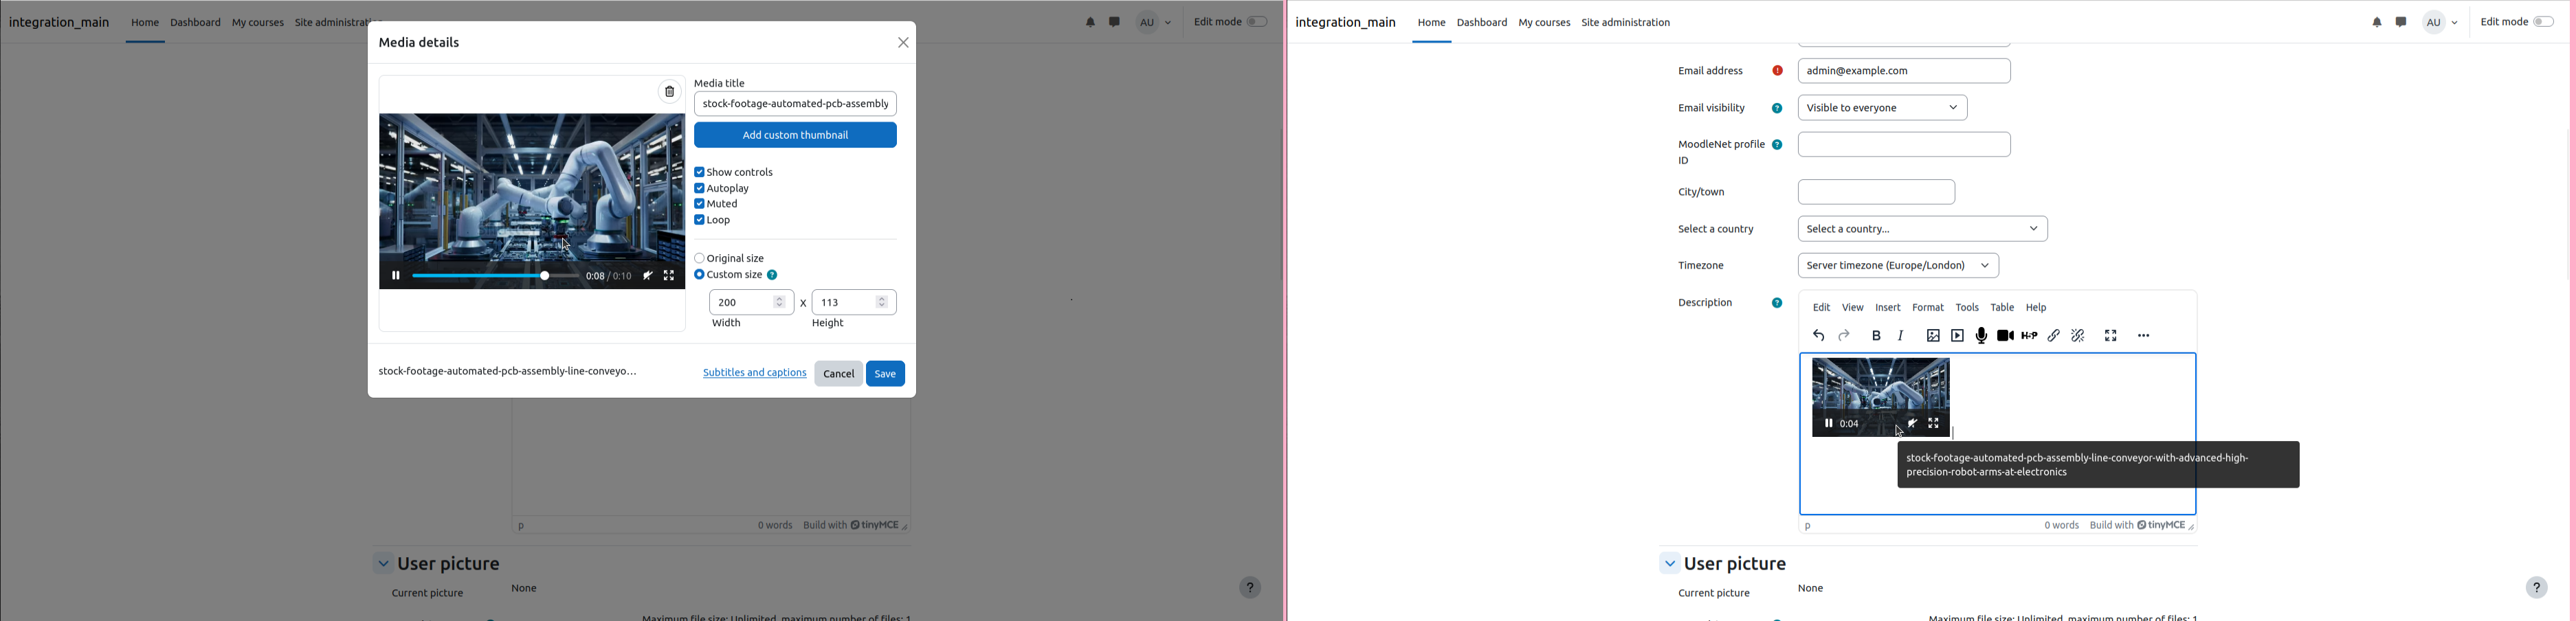
- Once the file is uploaded, verify that the file is previewed and you see a button called "Add custom thumbnail" and click on that.
- Verify that there is an icon and text "Paste an audio/video link in the field below."
- Navigate back to Site admin > Plugins > Repositories > Manage repositories and disabled all the repositories enabled in filepicker
- Navigate back to the Edit Profile page.
- In the description editor toolbar, click the multimedia icon
- Verify that there is an icon and text "Paste an audio/video link in the field below."
- Verify that you will not see the Browse repositories button
- Navigate back to Site admin > Plugins > Repositories > Manage repositories and enabled all the ones disabled in step #15 to continue the testing
Testing 2: Click anywhere inside the drag-and-dropzone (Subtitles and Captions are also covered by automated test)
- Login as admin
- Navigate back to the Site Admin > Plugins > Repositories > Manage repositories.
- Set Enable and visible the Upload a file repository
- Navigate to the Edit Profile section.
- Click on the "multimedia" icon in the toolbar located in the description field.
- Verify that a drag-and-drop zone with the following message appears - "Drag and drop audio/video file to upload, or click to select".
- Click the drag-and-drop zone
- Select a video file
- Verify that you see a preloader icon with uploading progress in percentage.
- After the loading is done, verify that you will see the video preview.
- Verify that you can play the video
- Verify that you see "Add custom thumbnail" button
- Click on a trash icon on the top right of the preview box to delete the preview.
- Click on "Delete"
- Verify that you are returned to the media insert modal.
- Repeat the steps to select a video file
- Once the video has been previewed, select custom size and change the sizes
- Verify that there is a help button that says:
For best viewing experience,the video's width and height will adjust together,keeping the original aspect ratio. - Verify that changing the width will change the height accordingly and vice versa
- Try adding subtitles and captions by clicking on Subtitles and captions
- On subtitles tab, click on "Browse repositories..." and use the sample.vtt file attached
- Select a language and put a label (You can do the same for the other ones)
- Click on Save
- Verify that the video appears in the editor.
- Verify that the video appears in the TinyMCE editor with the exact size we set
- Click on "Tools" in tiny menu bar and select "Source code"
- Verify that the selected subtitles, width/hight and etc have been embedded
Testing 3: select an audio (Also covered by automated test)
- Go to edit profile
- Click on the "multimedia" icon in the toolbar located in the description field.
- Select an audio file
- Verify that you see a spinner icon with uploading progress in percentage.
- After the progress hits 100%, verify that you see a spinner icon with "Preparing the media".
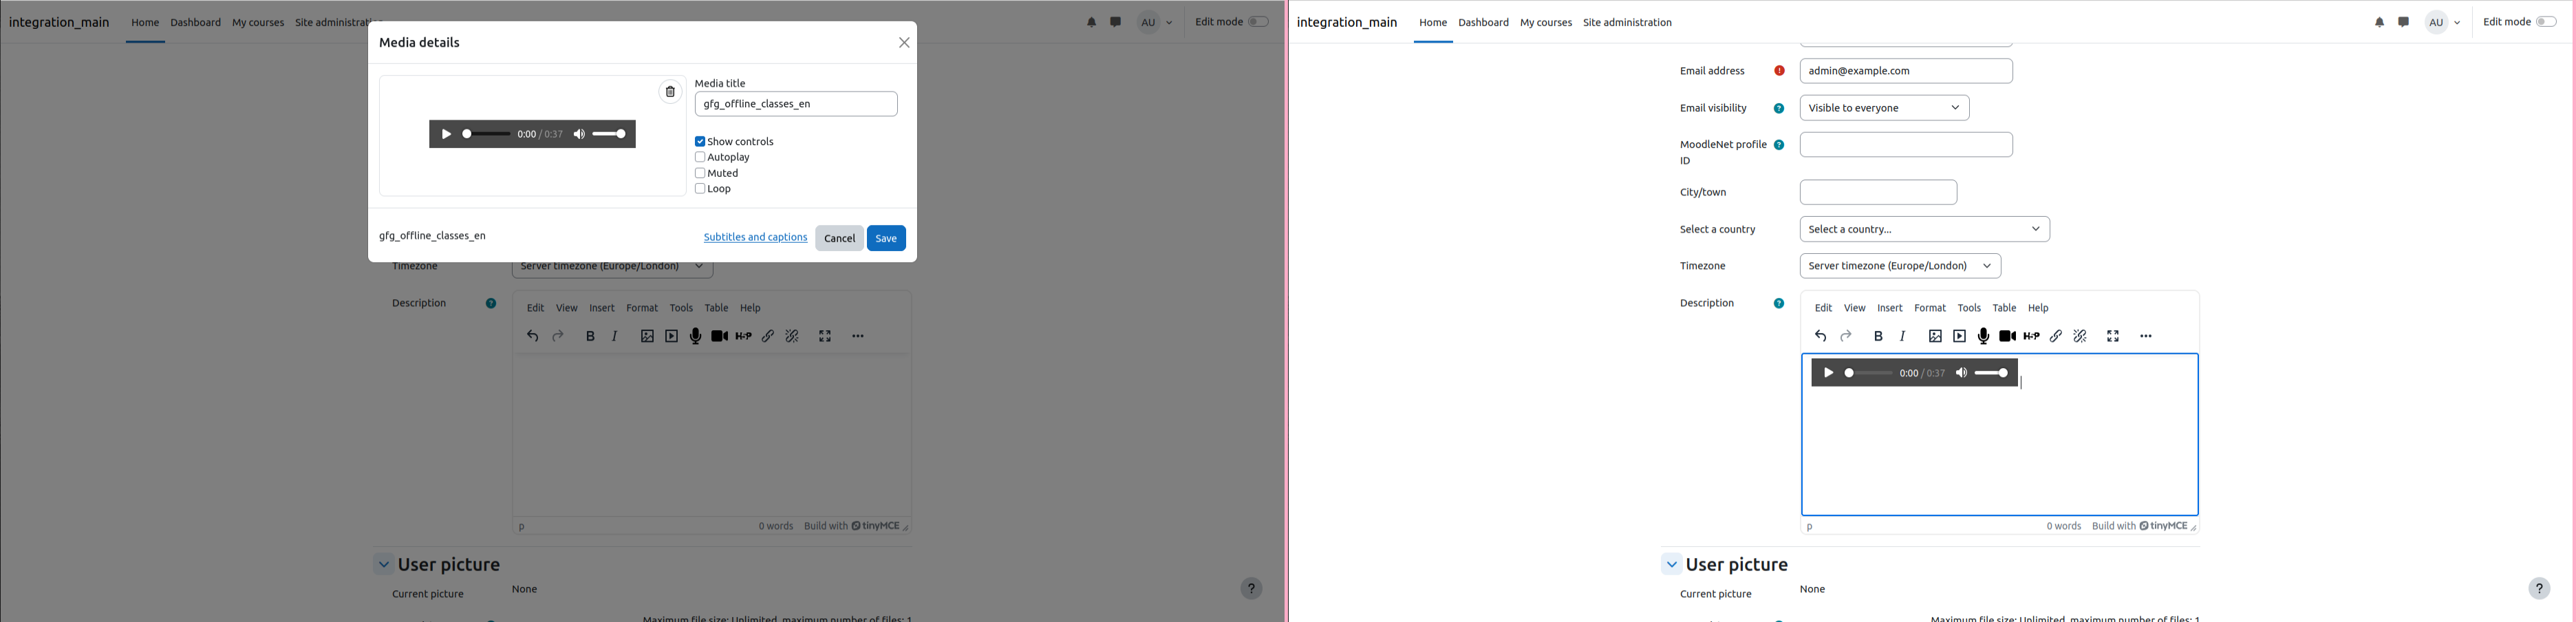
- After the loading is done, verify that you see the audio preview.
- Verify that you can play the audio
- Verify that you see don't see "Add custom thumbnail" button
- Verify that you see media controls like mute, autoplay and loop
- Verify that you see don't see Original/Custom size settings
- Click on Save
- Verify that the audio appears in the editor.
Testing 4: Insert external media URL (Also covered by automated test)
- Click on the "multimedia" icon in the toolbar located in the description field.
- In the "Or add via URL" input any link from the Video links with specified file name and extension. and Audio links with specified file name and extension
- Wait for the loading icon to disappear
- Verify that the media was previewed
- Verify that you see "Add custom thumbnail" button if it's a video
- Verify that you can play the media
- Verify that you see controls, autoplay, mute and loop
- Enabled autoplay, mute and controls
- Verify that you see Original/Custom size settings if it's a video
- Click on the "Save" button
- Verify that the media appears in the editor.
- Verify that the media is played automatically, muted and controls are shown.
Testing 5: Insert external media using links from Video platforms (Also covered by automated test (YouTube link only)). Vimeo was not covered by automated test due to security and privacy for different country.
- Enable YouTube and Vimeo in Side admin > Plugins > Media player.
- Put either of them on top of the table when testing it
- Click on the "multimedia" icon in the toolbar located in the description field.
- In the "Or add via URL" input any link from Video platforms
- Verify that the link is previewed
- Verify that you see media name/link on the left modal footer
- Verify that you can play the media link
- Set the Media title to ABC
- Click Save
- Verify that the ABC link was inserted to editor as a hyperlink
- Click on the inserted link
- Verify that the Multimedia icon plugin is highlighted
- Click on the Multimedia icon plugin
- Verify that you see the media preview modal
- Add a normal link by adding a link using link plugin and save
- Click on the link added using link plugin
- Verify that the multimedia icon plugin is not highlighted.
- Click on the Multimedia icon plugin
- Verify that you see insert new media modal
Testing 6: Add custom thumbnail (Upload image form local storage is covered by automated test)
- Select a video file
- After the video has been previewed, click on "Add custom thumbnail" button
- Select an image file
- Verify that you see a preview of the selected image
- Click on a trash icon on the top right of the preview box to delete the preview.
- Click on "Delete"
- Verify that you are returned to upload thumbnail modal
- Add an image by inserting any link from Image links to test for the thumbnail add from url into "Add via URL" input.
- Verify that you see a preview of the selected image
- Click on a trash icon on the top right of the preview box to delete the preview.
- Click on "Delete"
- Verify that you are returned to upload thumbnail modal
- Click on "Drag/drop.." to add a large image size large-image-sample.jpg or ultra-wide.jpg
- Verify that you see a preview of the selected image being shown nicely as whole
- Click next
- Verify that the added thumbnail has been applied to the previewed video in media details modal
- Verify that you don't see "Add custom thumbnail" button
- Verify that you see two buttons:
- Change thumbnail
- Delete thumbnail
- Click on "Delete thumbnail" button then click on "Delete"
- Verify that "Delete thumbnail" and "Change thumbnail" buttons are removed and "Add custom thumbnail" button is displayed
- Click save
- Verify that the media appears in the editor.
Testing 7: Image adding for the changes
- Click on the "image" icon in the toolbar located in the description field.
- Select an image
- Wait for the loading icon to disappear
- Check if the image details appear
- Verify that there is a single pixel border around the image, using the standard grey and round corners.
- Click on the Save button
- Verify that the warning message "An image must have a description unless it is marked as decorative only." appears
- Tick the "This image is decorative only" checkbox
- Select the Custom size radio button
- Verify there is a help icon near the width and height fields.
- Click the help icon
- Verify there is a popup window contains text:
This image is just a preview.Changes to its size will bevisible after you save it. - Verify that the Width input shows 600, the Height input shows 400 and the Keep proportion checkbox is checked
- Change the width to 300
- Verify that the height automatically changes to 200
- Uncheck the Keep proportion checkbox
- Change the width to 600
- Verify that the height remains at 200
- Click the Save button
- Check if the image appears in the TinyMCE editor with the exact size we set
- Click on the image and then on the Image icon on the toolbar
- Make sure the image details appear with the Custom size radio button selected and the same width and height
- Click on the Save button.
- Verify the image appears in the editor.
Testing a media with alternative sources
- Download Canvas.move_.mp4 and COUNTRY ROAD.mp4
- Checkout the last on-demand before this patch:
git checkout ############mdk run version - Login as admin
- Go to user profile and edit profile
- Click on the "multimedia" icon in the toolbar located in the description field.
- Click on "Video" tab and click on "Browse repositories..."
- Select a video file Canvas.move_.mp4 and wait till it's added
- Click on "Add alternative source"
- Delete the content of "Video source URL" and put "https://videos.pexels.com/video-files/5538262/5538262-hd_1920_1080_25fps.mp4"
- Click again on "Add alternative source"
- Delete the content of "Video source URL" and put "https://www.shutterstock.com/shutterstock/videos/1106834663/preview/stock-footage-automated-pcb-assembly-line-conveyor-with-advanced-high-precision-robot-arms-at-electronics.webm"
- Click on "Insert media"
- Click on the "tools" in the menu bar located in the description field.
- Select "Source code"
- Verify that you have three source tags inside the video tag like the following:
<source src="http://localhost/stable_master/draftfile.php/.../user/draft/.../Canvas.move_.mp4">
<source src="https://videos.pexels.com/video-files/5538262/5538262-hd_1920_1080_25fps.mp4">
<source src="https://www.shutterstock.com/shutterstock/videos/1106834663/preview/stock-footage-automated-pcb-assembly-line-conveyor-with-advanced-high-precision-robot-arms-at-electronics.webm">
- Click on "Update profile" to save the changes.
- Checkout the patch branch
- Purge caches
- Refresh the page, run site upgrade if needed
- Go to user profile and edit profile
- Click on the "tools" in the menu bar located in the description field.
- Select "Source code"
- Verify that you that have three source tags inside the video tag
- Close the "Source code" window.
- Click on the video previously added into tiny.
- Click on the "multimedia" icon in the toolbar located in the description field.
- Verify that the video is previewed.
- Click on trash icon in the preview to delete the preview.
- Click on the drag and drop audio/video to add new video file
- Select video file COUNTRY ROAD.mp4
- Verify that the video is previewed.
- Click on "Save"
- Click on the "tools" in the menu bar located in the description field.
- Select "Source code"
- Verify that you have three source tags inside the video tag like the following:
<source src="http://localhost/stable_master/draftfile.php/.../user/draft/.../COUNTRY%20ROAD%20%282%29.mp4">
<source src="https://videos.pexels.com/video-files/5538262/5538262-hd_1920_1080_25fps.mp4">
<source src="https://www.shutterstock.com/shutterstock/videos/1106834663/preview/stock-footage-automated-pcb-assembly-line-conveyor-with-advanced-high-precision-robot-arms-at-electronics.webm">
- Compare sources in step #15 with step #34
- Verify that only the first source tag's "src" is updated and the other two still remain the same
Testing when theme is not using the "font-awesome" as its font
- Go to theme/boost/config.php file
- Scroll down and set the following line as follows:
$THEME->iconsystem = null; //\core\output\icon_system::FONTAWESOME;
- Go to user profile and edit profile
- Click on the "multimedia" icon in the toolbar located in the description field.
- Verify that the upload icon is not small.
To ensure seamless testing, I've provided a sample.vtt file and a list of url to be used during the testing process. Video links with specified file name and extension. https://videos.pexels.com/video-files/5538262/5538262-hd_1920_1080_25fps.mp4 https://www.shutterstock.com/shutterstock/videos/1106834663/preview/stock-footage-automated-pcb-assembly-line-conveyor-with-advanced-high-precision-robot-arms-at-electronics.webm https://media.geeksforgeeks.org/wp-content/uploads/20190616234019/Canvas.move_.mp4 Video platforms Vimeo: https://vimeo.com/107742013 YouTube: youtube.com: https://www.youtube.com/watch?v=xZgZLOq1JKU y2u.be: https://y2u.be/xZgZLOq1JKU youtu.be: https://youtu.be/xZgZLOq1JKU?si=H_T3LMW8N00pNwiY playlist1: https://www.youtube.com/playlist?list=PLbpi6ZahtOH4wB_j_xc_ks8GbPLjz15eO playlist2: https://www.youtube.com/watch?v=0WA6h5whiiA&list=PLbpi6ZahtOH4wB_j_xc_ks8GbPLjz15eO Audio links with specified file name and extension https://media.geeksforgeeks.org/wp-content/uploads/20230524142525/gfg_offline_classes_en.mp3 https://media.geeksforgeeks.org/wp-content/uploads/20220913101124/audiosample.ogg Image links to test for the thumbnail add from url https://encrypted-tbn0.gstatic.com/images?q=tbn:ANd9GcSouyQgYFwklkCFVWZZGwiZ1H9KxsHzS_HnPg&s https://www.furman.edu/faculty-development-center/wp-content/uploads/sites/108/2023/12/moodlecover.jpg https://media.geeksforgeeks.org/wp-content/uploads/20190627130930/a218.png Most of the following testings are covered by automated tests , but it's always good to do the manual tests so feel free to explore Testing 1: Repositories Login as admin Navigate to the Site Admin > Plugins > Repositories > Manage repositories. Set the "Enable and visible" value to the Upload a file repository. Navigate to the Edit Profile page. In the description editor toolbar, click the "multimedia" icon Verify that there is an icon and text "Drag and drop audio/video file to upload, or click to select." and the browse repositories button Navigate back to the Site Admin > Plugins > Repositories > Manage repositories. Disable the Upload a file repository Navigate back to the Edit Profile page. In the description editor toolbar, click the multimedia icon Verify that there is an icon and text "Paste a link to an audio/video file in the field below or click the Browse Repositories button." Add a video file using "Add via URL" or "Browse Repositories" Once the file is uploaded, verify that the file is previewed and you see a button called "Add custom thumbnail" and click on that. Verify that there is an icon and text "Paste an audio/video link in the field below." Navigate back to Site admin > Plugins > Repositories > Manage repositories and disabled all the repositories enabled in filepicker Navigate back to the Edit Profile page. In the description editor toolbar, click the multimedia icon Verify that there is an icon and text "Paste an audio/video link in the field below." Verify that you will not see the Browse repositories button Navigate back to Site admin > Plugins > Repositories > Manage repositories and enabled all the ones disabled in step #15 to continue the testing Testing 2: Click anywhere inside the drag-and-dropzone ( Subtitles and Captions are also covered by automated test ) Login as admin Navigate back to the Site Admin > Plugins > Repositories > Manage repositories. Set Enable and visible the Upload a file repository Navigate to the Edit Profile section. Click on the "multimedia" icon in the toolbar located in the description field. Verify that a drag-and-drop zone with the following message appears - "Drag and drop audio/video file to upload, or click to select". Click the drag-and-drop zone Select a video file Verify that you see a preloader icon with uploading progress in percentage. After the loading is done, verify that you will see the video preview. Verify that you can play the video Verify that you see "Add custom thumbnail" button Click on a trash icon on the top right of the preview box to delete the preview. Click on "Delete" Verify that you are returned to the media insert modal. Repeat the steps to select a video file Once the video has been previewed, select custom size and change the sizes Verify that there is a help button that says: For best viewing experience, the video's width and height will adjust together, keeping the original aspect ratio. Verify that changing the width will change the height accordingly and vice versa Try adding subtitles and captions by clicking on Subtitles and captions On subtitles tab, click on "Browse repositories..." and use the sample.vtt file attached Select a language and put a label (You can do the same for the other ones) Click on Save Verify that the video appears in the editor. Verify that the video appears in the TinyMCE editor with the exact size we set Click on "Tools" in tiny menu bar and select "Source code" Verify that the selected subtitles, width/hight and etc have been embedded Testing 3: select an audio ( Also covered by automated test ) Go to edit profile Click on the "multimedia" icon in the toolbar located in the description field. Select an audio file Verify that you see a spinner icon with uploading progress in percentage. After the progress hits 100%, verify that you see a spinner icon with "Preparing the media". After the loading is done, verify that you see the audio preview. Verify that you can play the audio Verify that you see don't see "Add custom thumbnail" button Verify that you see media controls like mute, autoplay and loop Verify that you see don't see Original/Custom size settings Click on Save Verify that the audio appears in the editor. Testing 4: Insert external media URL ( Also covered by automated test ) Click on the "multimedia" icon in the toolbar located in the description field. In the "Or add via URL" input any link from the Video links with specified file name and extension. and Audio links with specified file name and extension Wait for the loading icon to disappear Verify that the media was previewed Verify that you see "Add custom thumbnail" button if it's a video Verify that you can play the media Verify that you see controls, autoplay, mute and loop Enabled autoplay, mute and controls Verify that you see Original/Custom size settings if it's a video Click on the "Save" button Verify that the media appears in the editor. Verify that the media is played automatically, muted and controls are shown. Testing 5: Insert external media using links from Video platforms ( Also covered by automated test (YouTube link only) ) . Vimeo was not covered by automated test due to security and privacy for different country. Enable YouTube and Vimeo in Side admin > Plugins > Media player. Put either of them on top of the table when testing it Click on the "multimedia" icon in the toolbar located in the description field. In the "Or add via URL" input any link from Video platforms Verify that the link is previewed Verify that you see media name/link on the left modal footer Verify that you can play the media link Set the Media title to ABC Click Save Verify that the ABC link was inserted to editor as a hyperlink Click on the inserted link Verify that the Multimedia icon plugin is highlighted Click on the Multimedia icon plugin Verify that you see the media preview modal Add a normal link by adding a link using link plugin and save Click on the link added using link plugin Verify that the multimedia icon plugin is not highlighted. Click on the Multimedia icon plugin Verify that you see insert new media modal Testing 6: Add custom thumbnail ( Upload image form local storage is covered by automated test ) Select a video file After the video has been previewed, click on "Add custom thumbnail" button Select an image file Verify that you see a preview of the selected image Click on a trash icon on the top right of the preview box to delete the preview. Click on "Delete" Verify that you are returned to upload thumbnail modal Add an image by inserting any link from Image links to test for the thumbnail add from url into "Add via URL" input. Verify that you see a preview of the selected image Click on a trash icon on the top right of the preview box to delete the preview. Click on "Delete" Verify that you are returned to upload thumbnail modal Click on "Drag/drop.." to add a large image size large-image-sample.jpg or ultra-wide.jpg Verify that you see a preview of the selected image being shown nicely as whole Click next Verify that the added thumbnail has been applied to the previewed video in media details modal Verify that you don't see "Add custom thumbnail" button Verify that you see two buttons: Change thumbnail Delete thumbnail Click on "Delete thumbnail" button then click on "Delete" Verify that "Delete thumbnail" and "Change thumbnail" buttons are removed and "Add custom thumbnail" button is displayed Click save Verify that the media appears in the editor. Testing 7: Image adding for the changes Click on the "image" icon in the toolbar located in the description field. Select an image Wait for the loading icon to disappear Check if the image details appear Verify that there is a single pixel border around the image, using the standard grey and round corners. Click on the Save button Verify that the warning message "An image must have a description unless it is marked as decorative only." appears Tick the "This image is decorative only" checkbox Select the Custom size radio button Verify there is a help icon near the width and height fields. Click the help icon Verify there is a popup window contains text: This image is just a preview. Changes to its size will be visible after you save it. Verify that the Width input shows 600, the Height input shows 400 and the Keep proportion checkbox is checked Change the width to 300 Verify that the height automatically changes to 200 Uncheck the Keep proportion checkbox Change the width to 600 Verify that the height remains at 200 Click the Save button Check if the image appears in the TinyMCE editor with the exact size we set Click on the image and then on the Image icon on the toolbar Make sure the image details appear with the Custom size radio button selected and the same width and height Click on the Save button. Verify the image appears in the editor. Testing a media with alternative sources Download Canvas.move_.mp4 and COUNTRY ROAD.mp4 Checkout the last on-demand before this patch: git checkout ############ mdk run version Login as admin Go to user profile and edit profile Click on the "multimedia" icon in the toolbar located in the description field. Click on "Video" tab and click on "Browse repositories..." Select a video file Canvas.move_.mp4 and wait till it's added Click on "Add alternative source" Delete the content of "Video source URL" and put "https://videos.pexels.com/video-files/5538262/5538262-hd_1920_1080_25fps.mp4" Click again on "Add alternative source" Delete the content of "Video source URL" and put "https://www.shutterstock.com/shutterstock/videos/1106834663/preview/stock-footage-automated-pcb-assembly-line-conveyor-with-advanced-high-precision-robot-arms-at-electronics.webm" Click on "Insert media" Click on the "tools" in the menu bar located in the description field. Select "Source code" Verify that you have three source tags inside the video tag like the following: < source src = "http://localhost/stable_master/draftfile.php/.../user/draft/.../Canvas.move_.mp4" > < source src = "https://videos.pexels.com/video-files/5538262/5538262-hd_1920_1080_25fps.mp4" > < source src = "https://www.shutterstock.com/shutterstock/videos/1106834663/preview/stock-footage-automated-pcb-assembly-line-conveyor-with-advanced-high-precision-robot-arms-at-electronics.webm" > Click on "Update profile" to save the changes. Checkout the patch branch Purge caches Refresh the page, run site upgrade if needed Go to user profile and edit profile Click on the "tools" in the menu bar located in the description field. Select "Source code" Verify that you that have three source tags inside the video tag Close the "Source code" window. Click on the video previously added into tiny. Click on the "multimedia" icon in the toolbar located in the description field. Verify that the video is previewed. Click on trash icon in the preview to delete the preview. Click on the drag and drop audio/video to add new video file Select video file COUNTRY ROAD.mp4 Verify that the video is previewed. Click on "Save" Click on the "tools" in the menu bar located in the description field. Select "Source code" Verify that you have three source tags inside the video tag like the following: < source src = "http://localhost/stable_master/draftfile.php/.../user/draft/.../COUNTRY%20ROAD%20%282%29.mp4" > < source src = "https://videos.pexels.com/video-files/5538262/5538262-hd_1920_1080_25fps.mp4" > < source src = "https://www.shutterstock.com/shutterstock/videos/1106834663/preview/stock-footage-automated-pcb-assembly-line-conveyor-with-advanced-high-precision-robot-arms-at-electronics.webm" > Compare sources in step #15 with step #34 Verify that only the first source tag's "src" is updated and the other two still remain the same Testing when theme is not using the "font-awesome" as its font Go to theme/boost/config.php file Scroll down and set the following line as follows: $THEME ->iconsystem = null; //\core\output\icon_system::FONTAWESOME; Go to user profile and edit profile Click on the "multimedia" icon in the toolbar located in the description field. Verify that the upload icon is not small. -
 Fails against automated checks.
Checked
MDL-78428using repository: https://github.com/stevandoMoodle/moodle.git main (1 errors / 1 warnings) [branch: MDL-78428-main | CI Job]
Built on: Thu Mar 13 08:10:24 UTC 2025
Fails against automated checks. Checked MDL-78428 using repository: https://github.com/stevandoMoodle/moodle.git main (1 errors / 1 warnings) [branch: MDL-78428-main | CI Job ] overview (0/0) , phplint (0/0) , phpcs (0/0) , js (0/0) , css (0/0) , phpdoc (0/0) , commit (0/1) , savepoint (0/0) , thirdparty (0/0) , externalbackup (0/0) , grunt (1/0) , shifter (0/0) , mustache (0/0) , gherkin (0/0) , Should these errors be fixed? Built on: Thu Mar 13 08:10:24 UTC 2025 -
-
2
-
Team Dragons 2025 Sprint 1.2, Team Dragons 2025 Sprint 1.3
We want to improve the user experience of adding media (audio and video) in TinyMCE. Some of this work will need to be done as part of the larger project to improve the filepicker. However, there are some initial steps that can be done to improve things now.
UX Designs: Figma Proto


- blocks
-
MDL-83422 Media insert modal footer's buttons are not aligned
-

- Closed
-
-
-
- Closed
-
-
-
- Open
-
- is child of
-
IDEA-239 Improve media content creation
-

- Closed
-
- Testing discovered
-
MDL-85076 Create Behat test for external video sources
-
- Open
-
