-
Improvement
-
Resolution: Fixed
-
 Minor
Minor
-
4.1
-
MOODLE_401_STABLE
-
MOODLE_402_STABLE
-
Setup
- Download MDL-75943.diff
 patch (to add some extra attributes to system/custom reports) to your moodle root instance.
 - Apply the patch
git apply MDL-75943.diff - Log in as admin
- Navegate to Site administration > Development > Purge caches and Purge all caches to ensure new styles are being served
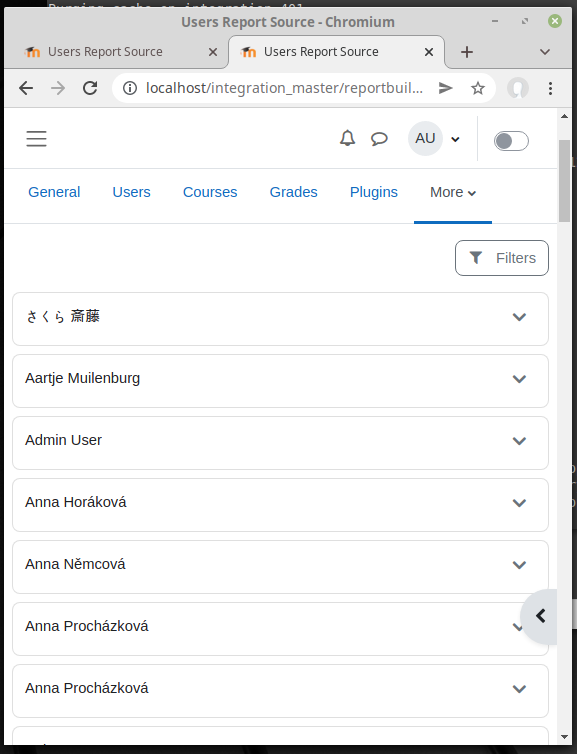
- Navigate to Reports in user menu
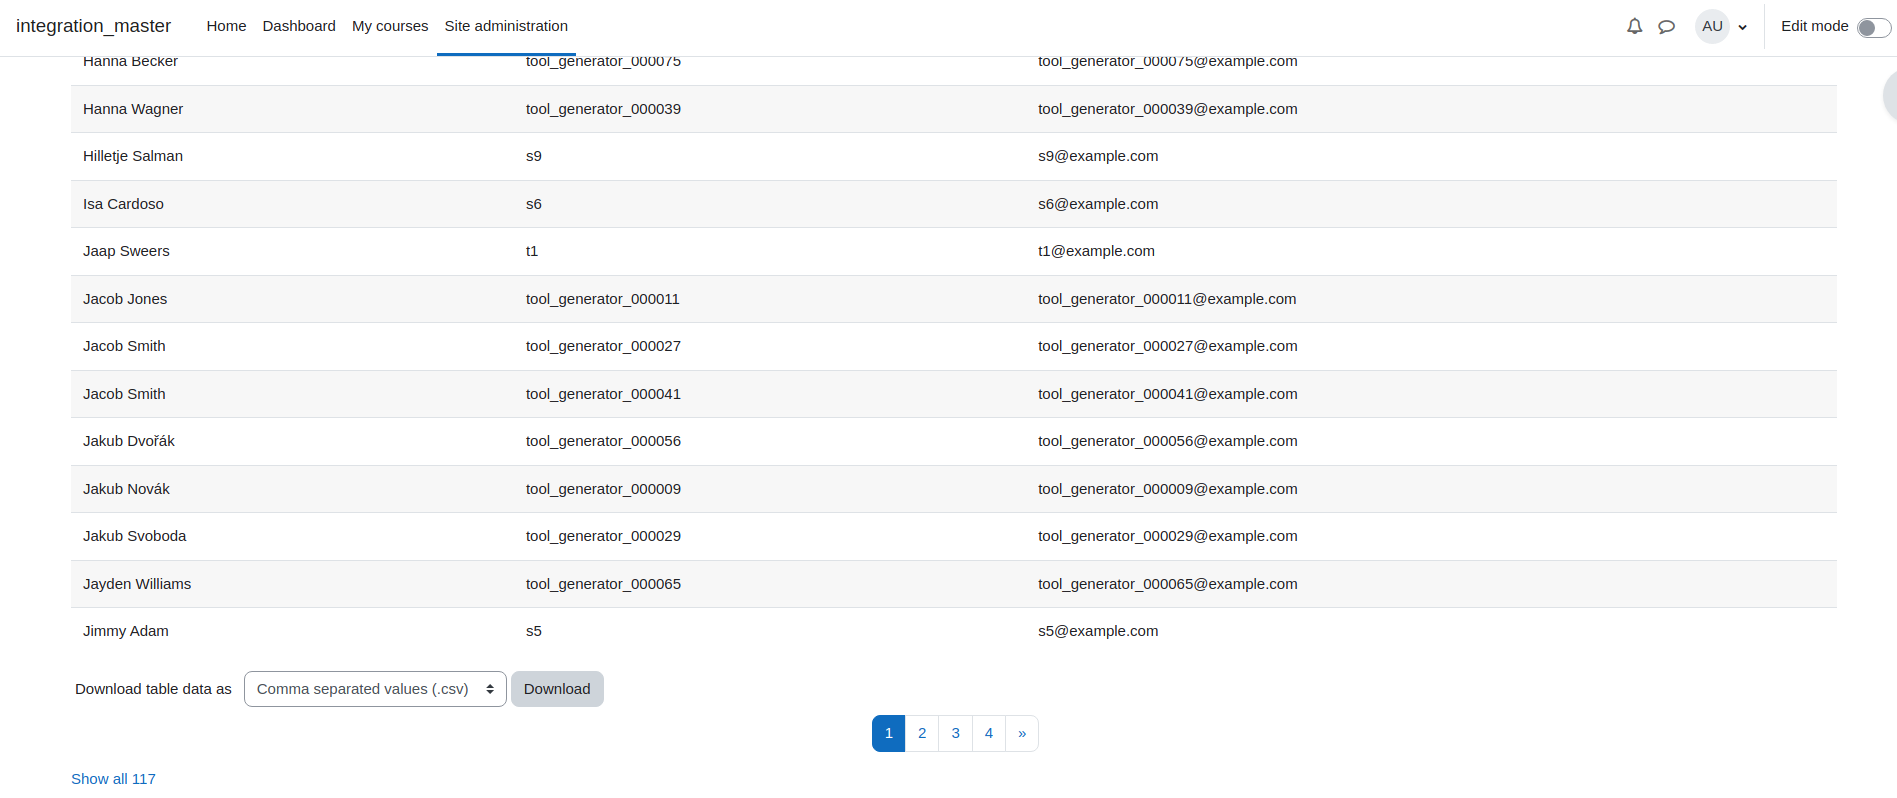
- Create new report from Users report source, with default setup
Test custom attributes in a system report
- Navigate to Reports in user menu
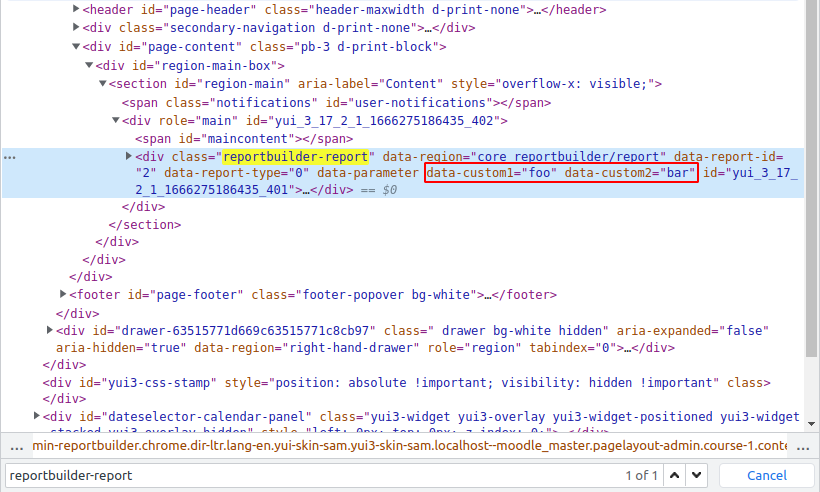
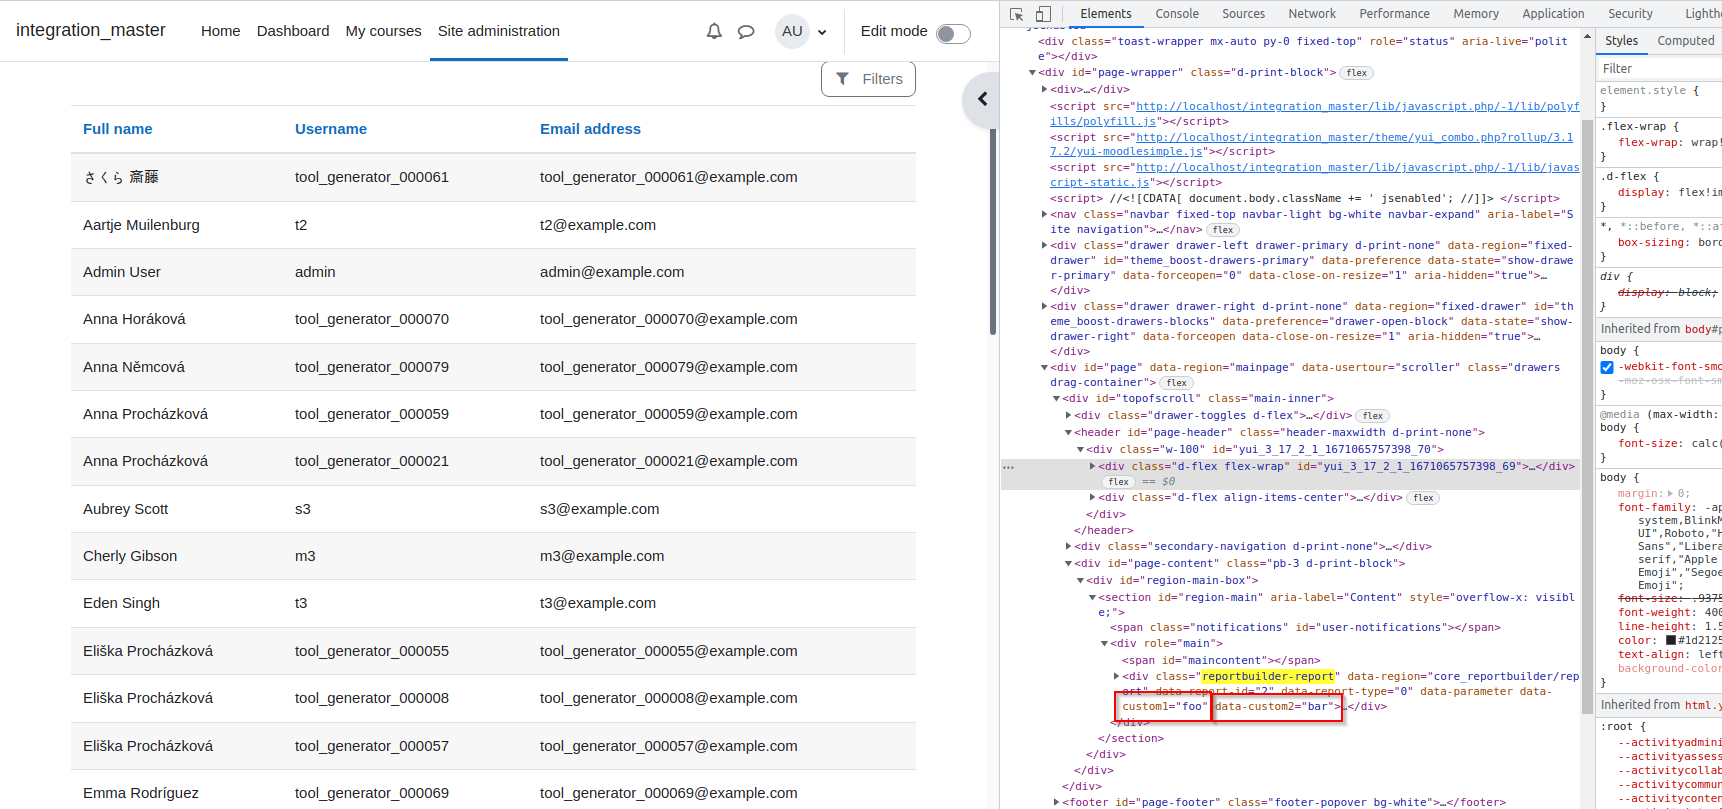
- Open the browser developer tools (usually F12 key) and find "reportbuilder-report" class element
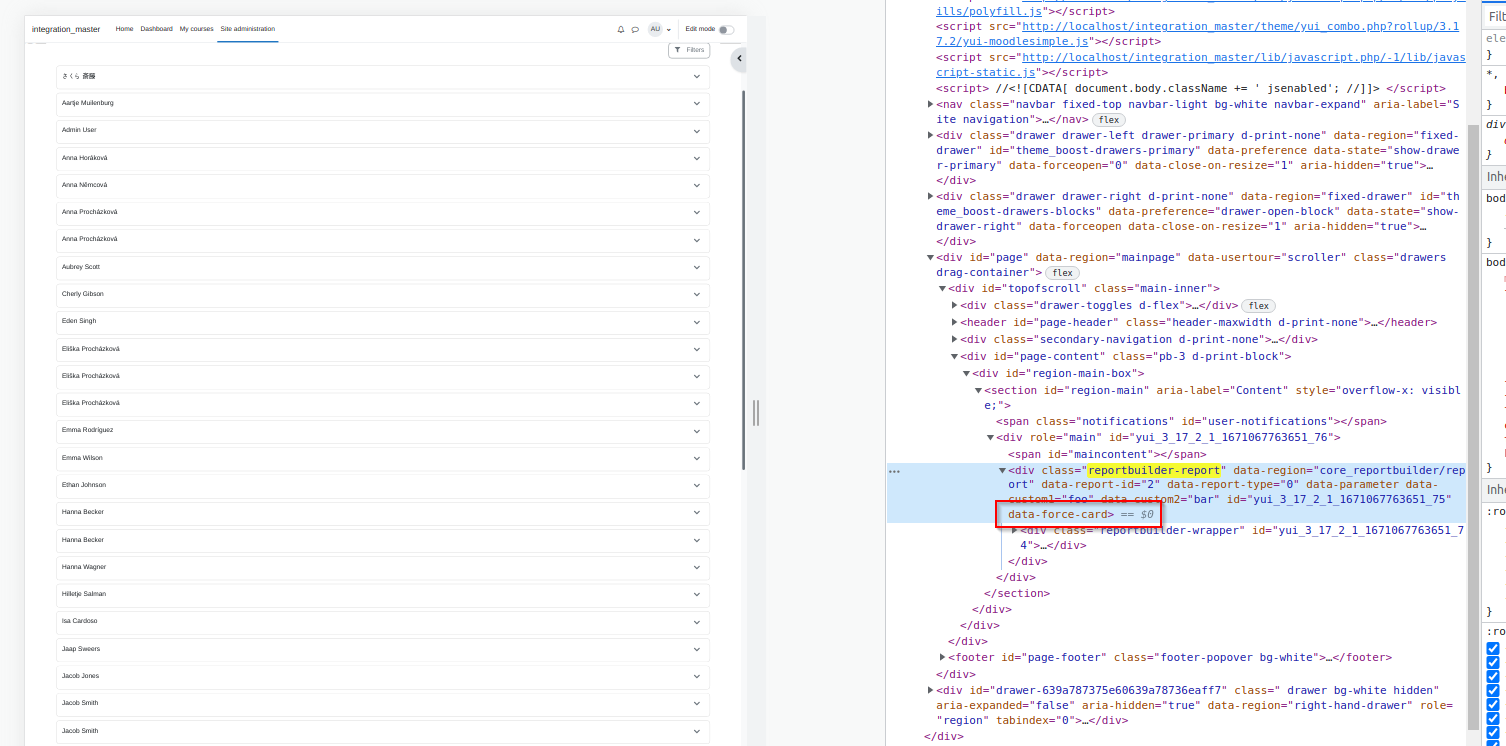
- Confirm that this element has data-custom1="foo" and data-custom2="bar" attributes (see screenshot-1.png)
Test custom attributes in a custom report (view page)
- Navigate to Reports in user menu
- Click on View report option in the report action menu
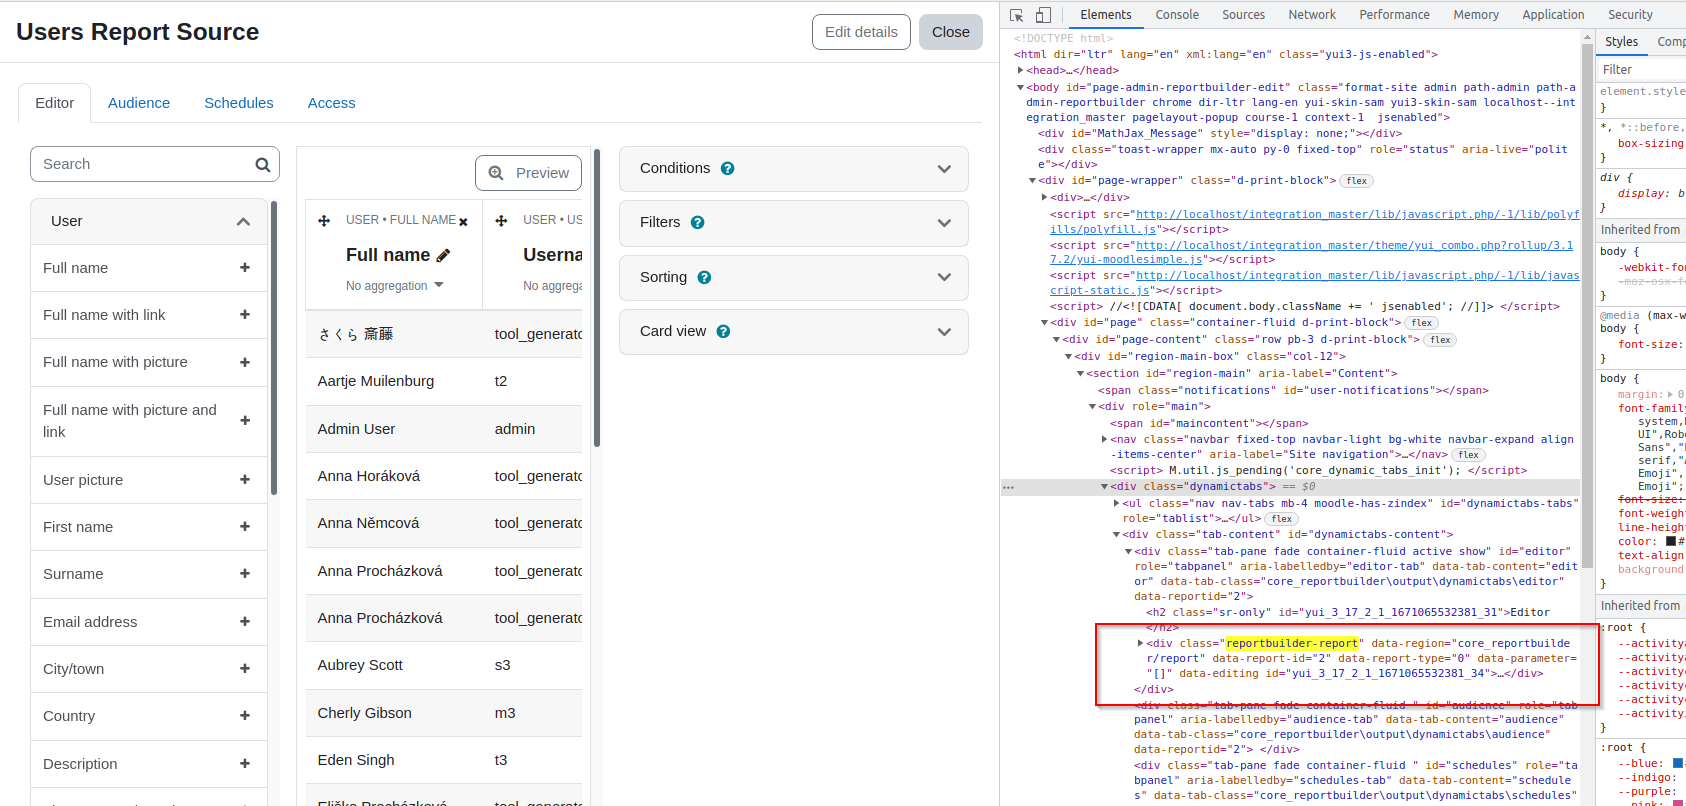
- Open the browser developer tools and find "reportbuilder-report" class element
- Confirm that this element has data-custom1="foo" and data-custom2="bar" attributes
Test custom attributes in a custom report (edit page)
- Navigate to Reports in user menu
- Click on Edit report content option in the report action menu
- Open the browser developer tools and find "reportbuilder-report" class element
- Confirm that this element does not have data-custom1="foo" and data-custom2="bar" attributes
- Click on Preview button
- Open the browser developer tools and find "reportbuilder-report" class element
- Confirm that this element has data-custom1="foo" and data-custom2="bar" attributes
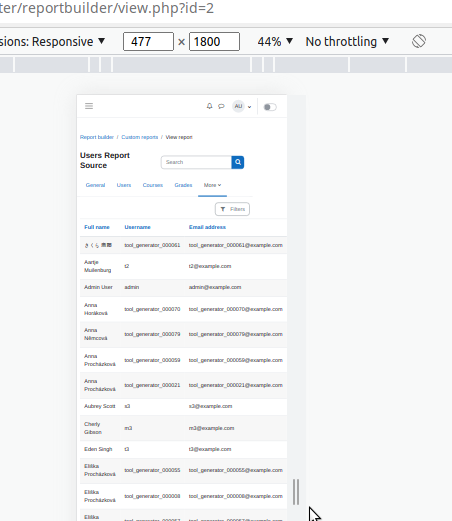
Test "force card/table" in a custom report (view page)
- Navigate to Reports in user menu
- Click on View report option in the report action menu
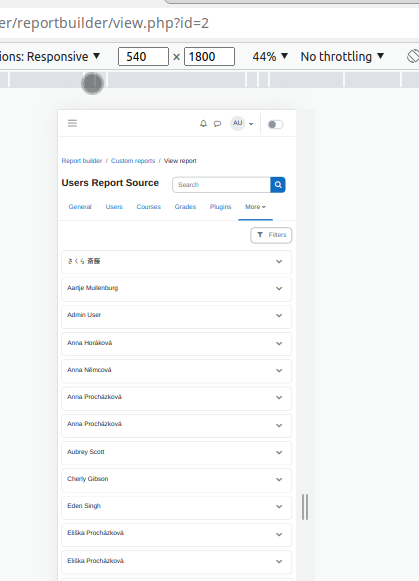
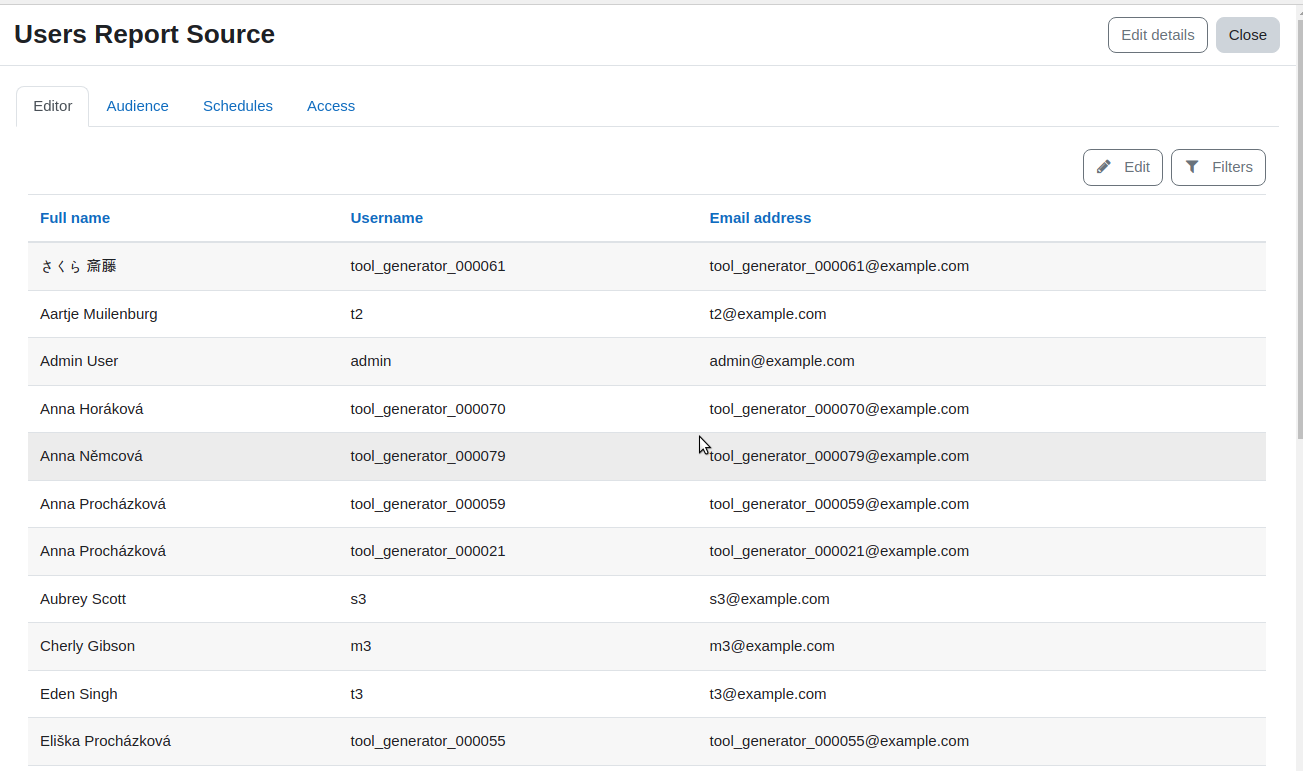
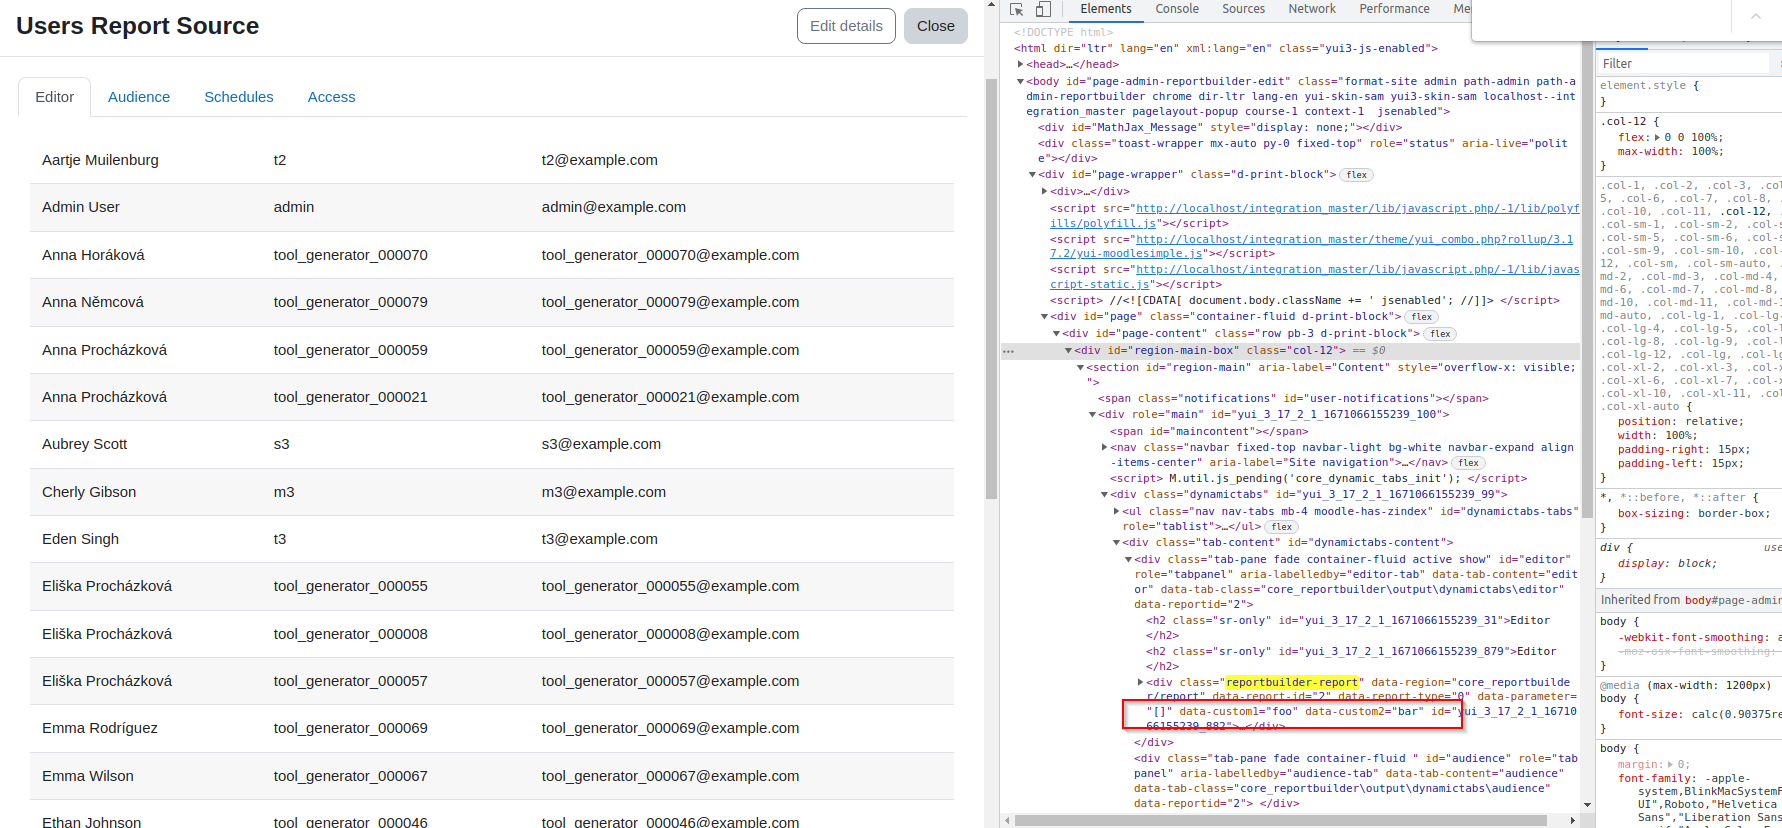
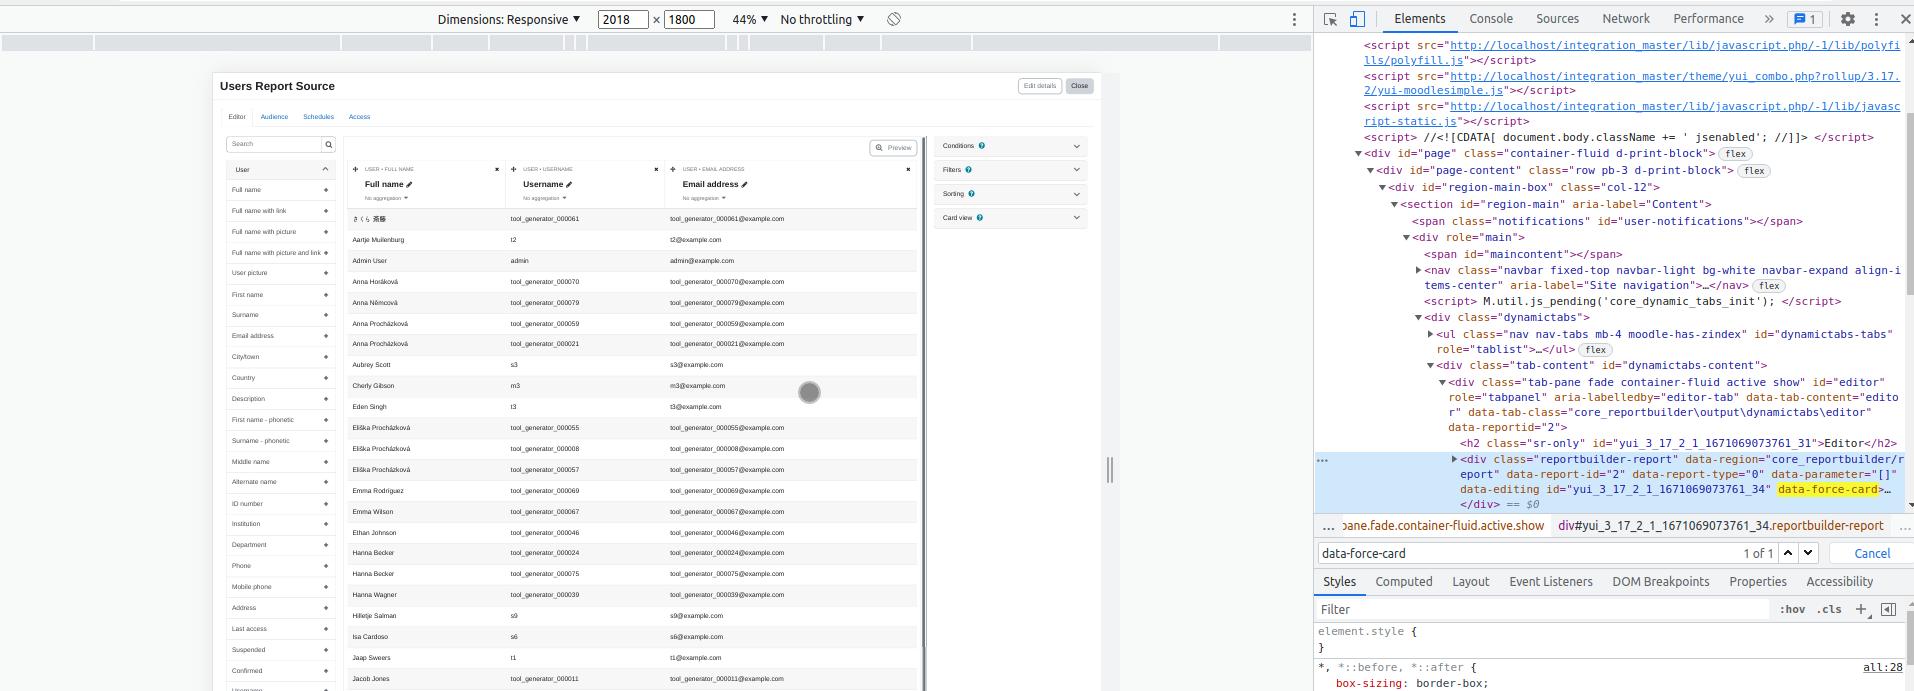
- Confirm that report is displayed as a table (screenshot-3.png)
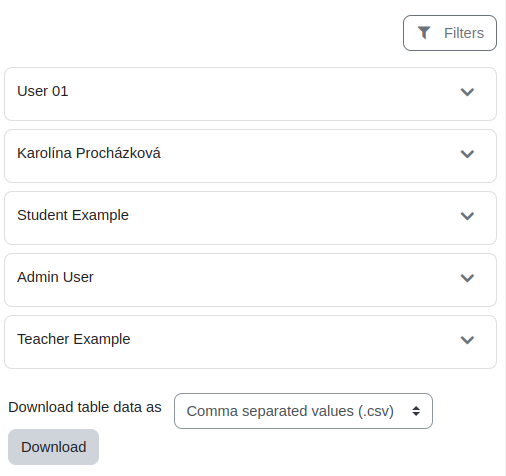
- Resize the browser window to a small screen size (< 576 px)
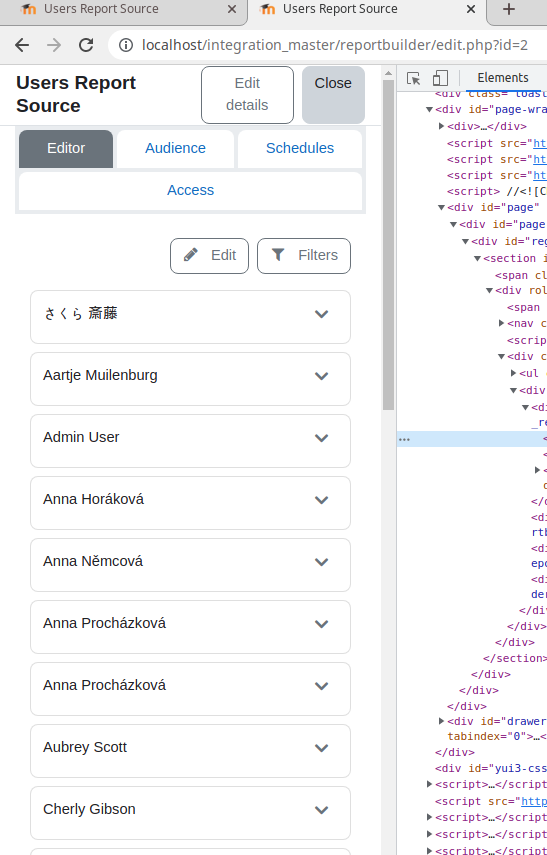
- Confirm that report is displayed as cards (screenshot-4.png)
- Resize the browser window again to a larger screen size (> 576 px)
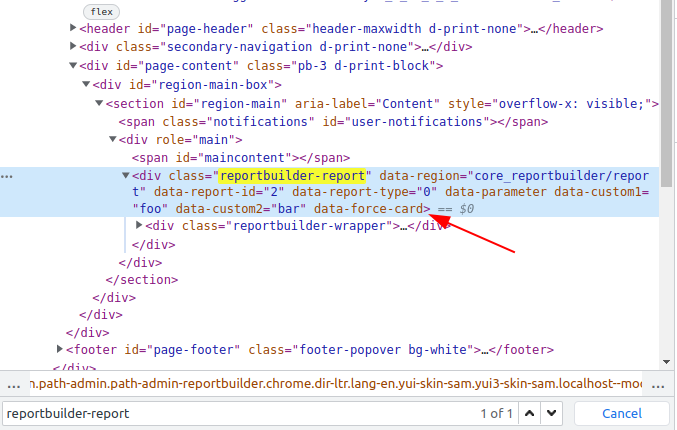
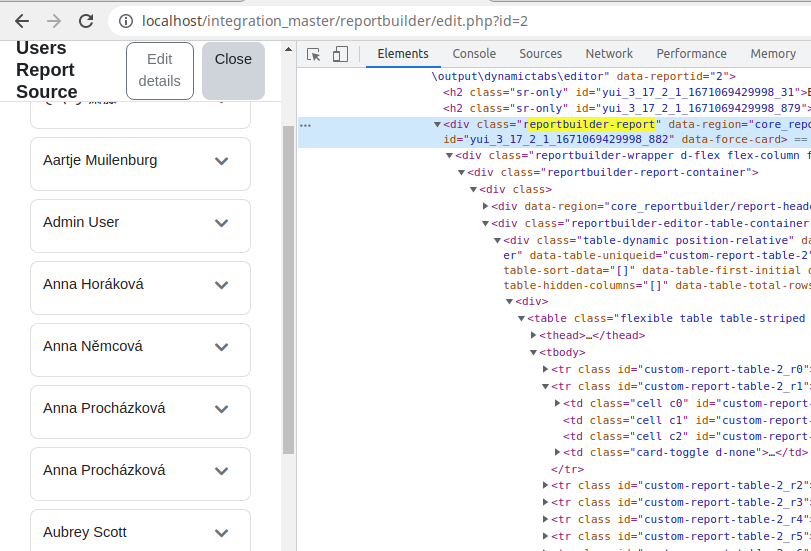
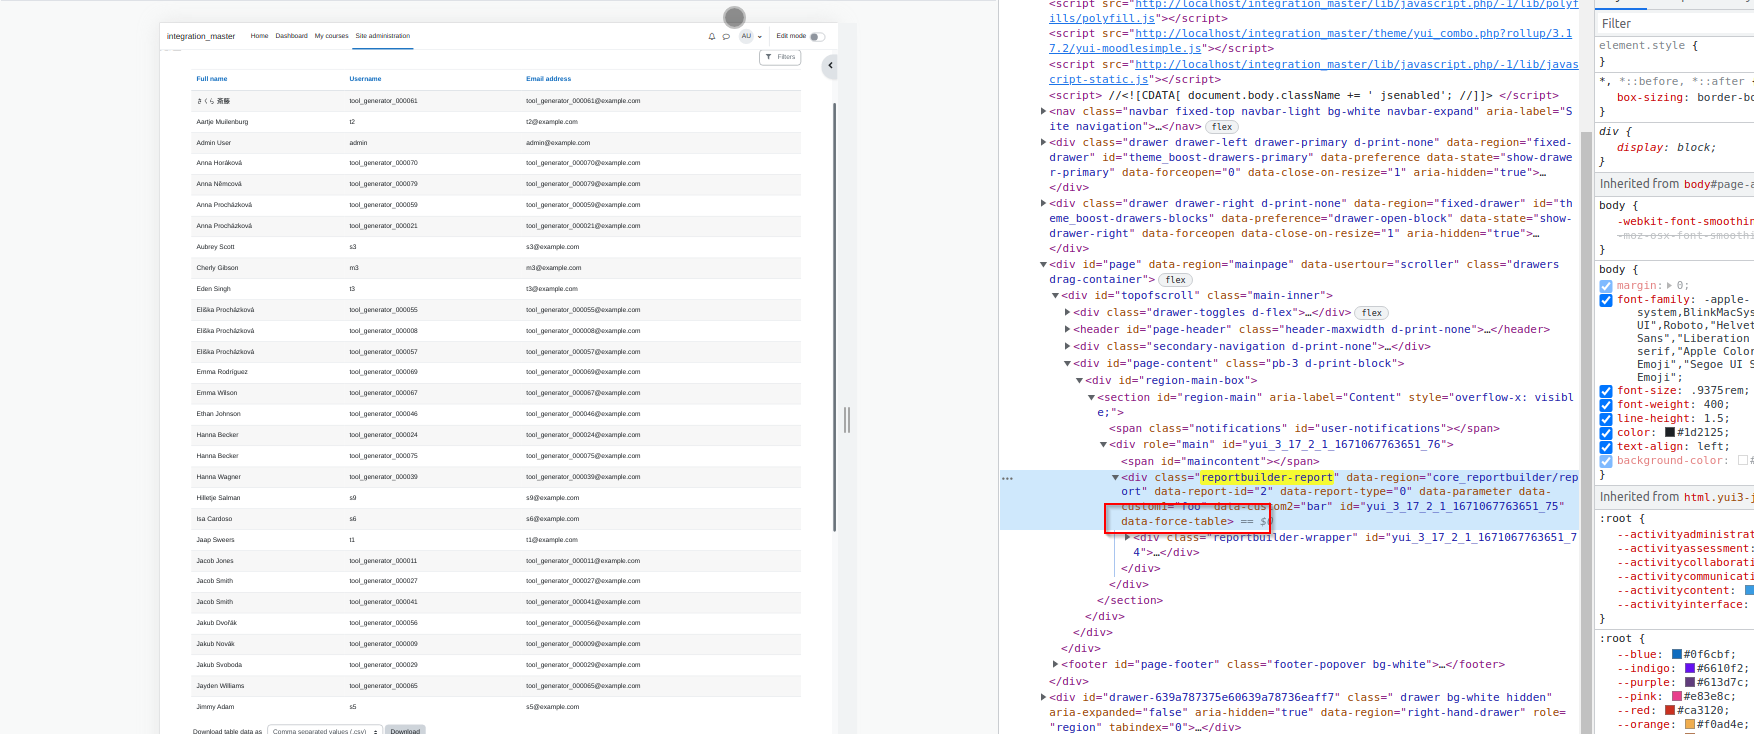
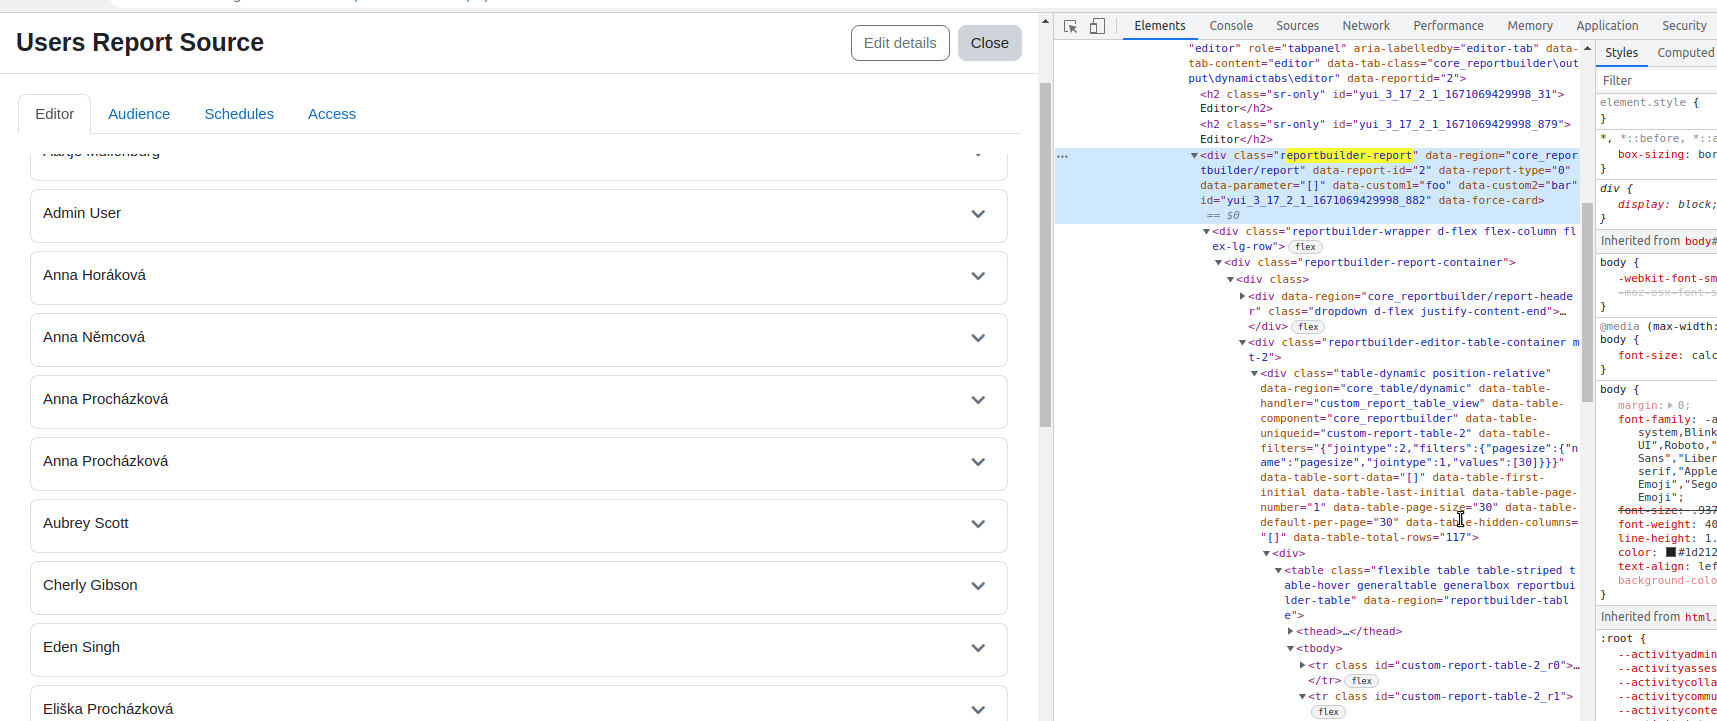
- Open the browser inspector and manually add data-force-card attribute to the "reportbuilder-report" class element (see screenshot-2.png)
- Confirm that report is now displayed as cards
- Resize the browser window to a small screen size (< 576 px)
- Confirm that report is still displayed as cards
- Resize the browser window again to a larger screen size (> 576 px)
- Open the browser inspector and manually replace data-force-card with data-force-table attribute in the "reportbuilder-report" class element
- Confirm that report is displayed as a table
- Resize the browser window to a small screen size (< 576 px)
- Confirm that report is also displayed as a table
Test "force card/table" in a custom report (edit page)
- Navigate to Reports in user menu
- Click on Edit report content option in the report action menu
- Open the browser inspector and manually add data-force-card attribute to the "reportbuilder-report" class element
- Confirm that report is still displayed as a table (card view is not available while editing the report)
- Click on Preview button
- Confirm that report is displayed as a table
- Resize the browser window to a small screen size (< 576 px)
- Confirm that report is displayed as cards
- Resize the browser window again to a larger screen size (> 576 px)
- Open the browser inspector and manually add data-force-card attribute to the "reportbuilder-report" class element
- Confirm that report is now displayed as cards
- Resize the browser window to a small screen size (< 576 px)
- Confirm that report is still displayed as cards
- Resize the browser window again to a larger screen size (> 576 px)
- Open the browser inspector and manually replace data-force-card with data-force-table attribute in the "reportbuilder-report" class element
- Confirm that report is displayed as a table
- Resize the browser window to a small screen size (< 576 px)
- Confirm that report is also displayed as a table
Setup Download MDL-75943.diff patch (to add some extra attributes to system/custom reports) to your moodle root instance. Apply the patch git apply MDL-75943.diff Log in as admin Navegate to Site administration > Development > Purge caches and Purge all caches to ensure new styles are being served Navigate to Reports in user menu Create new report from Users report source, with default setup Test custom attributes in a system report Navigate to Reports in user menu Open the browser developer tools (usually F12 key) and find "reportbuilder-report" class element Confirm that this element has data-custom1="foo" and data-custom2="bar" attributes (see screenshot-1.png ) Test custom attributes in a custom report (view page) Navigate to Reports in user menu Click on View report option in the report action menu Open the browser developer tools and find "reportbuilder-report" class element Confirm that this element has data-custom1="foo" and data-custom2="bar" attributes Test custom attributes in a custom report (edit page) Navigate to Reports in user menu Click on Edit report content option in the report action menu Open the browser developer tools and find "reportbuilder-report" class element Confirm that this element does not have data-custom1="foo" and data-custom2="bar" attributes Click on Preview button Open the browser developer tools and find "reportbuilder-report" class element Confirm that this element has data-custom1="foo" and data-custom2="bar" attributes Test "force card/table" in a custom report (view page) Navigate to Reports in user menu Click on View report option in the report action menu Confirm that report is displayed as a table ( screenshot-3.png ) Resize the browser window to a small screen size (< 576 px) Confirm that report is displayed as cards ( screenshot-4.png ) Resize the browser window again to a larger screen size (> 576 px) Open the browser inspector and manually add data-force-card attribute to the "reportbuilder-report" class element (see screenshot-2.png ) Confirm that report is now displayed as cards Resize the browser window to a small screen size (< 576 px) Confirm that report is still displayed as cards Resize the browser window again to a larger screen size (> 576 px) Open the browser inspector and manually replace data-force-card with data-force-table attribute in the "reportbuilder-report" class element Confirm that report is displayed as a table Resize the browser window to a small screen size (< 576 px) Confirm that report is also displayed as a table Test "force card/table" in a custom report (edit page) Navigate to Reports in user menu Click on Edit report content option in the report action menu Open the browser inspector and manually add data-force-card attribute to the "reportbuilder-report" class element Confirm that report is still displayed as a table (card view is not available while editing the report) Click on Preview button Confirm that report is displayed as a table Resize the browser window to a small screen size (< 576 px) Confirm that report is displayed as cards Resize the browser window again to a larger screen size (> 576 px) Open the browser inspector and manually add data-force-card attribute to the "reportbuilder-report" class element Confirm that report is now displayed as cards Resize the browser window to a small screen size (< 576 px) Confirm that report is still displayed as cards Resize the browser window again to a larger screen size (> 576 px) Open the browser inspector and manually replace data-force-card with data-force-table attribute in the "reportbuilder-report" class element Confirm that report is displayed as a table Resize the browser window to a small screen size (< 576 px) Confirm that report is also displayed as a table - Download MDL-75943.diff
Reportbuilder is displaying the report as cards when the screen size is below 576 pixels.
Would be nice to have a way to "force" report to be displayed as a table avoiding this "Card view" styling even when the screem size is below 576 pixels.

To add even more flexibility to the reports, would be nice to have a method to add custom attributes to the report HTML.
And with this new addition will be possible to add the following attributes to force card/table view:
data-force-card: Force the report to be displayed always as cards
data-force-table: Force the report to be displayed always as a table
