Uploaded image for project: 'Moodle'
  1. Moodle
  2. MDL-63211

Make message contacts a two-way approval process

XMLWordPrintable

    • Icon: Improvement Improvement
    • Resolution: Fixed
    • Icon: Minor Minor
    • 3.6
    • 3.6
    • Messages
    • MOODLE_36_STABLE
    • MOODLE_36_STABLE
    • MDL-63211_master
    • Hide

      Note: Using MDK would be helpful

      Test 1 - New install
      1. Create a new site with some users.

        mdk install -r users
        

      2. Check the database (e.g. using phppgadmin, if you're using PostgreSQL or phpmyadmin if your using MySQL) .
      3. Confirm there are the following tables -
        1. message_contacts
        2. message_users_blocked
        3. message_contact_requests
      4. Confirm the message_contacts table has the following fields.
        1. id
        2. userid
        3. contactid
        4. timecreated
      5. Confirm the message_contacts table has the following keys.
        1. userid, contactid
        2. contactid
        3. userid
        4. id
      6. Confirm the message_users_blocked table has the following fields.
        1. id
        2. userid
        3. blockeduserid
        4. timecreated
      7. Confirm the message_users_blocked table has the following keys.
        1. userid, blockeduserid
        2. blockeduserid
        3. userid
        4. id
      8. Confirm the message_contact_requests table has the following fields.
        1. id
        2. userid
        3. requesteduserid
        4. timecreated
      9. Confirm the message_contact_requests table has the following keys.
        1. userid, requesteduserid
        2. requesteduserid
        3. userid
        4. id
      10. Log in as an admin
      11. Visit 'Dashboard' > 'Site administration' > 'Advanced features'.
      12. Set 'Allow messages from anyone on the site' to 'Yes' and save.
      13. Log out.
      14. Log in as one of the users (User A).
      15. Visit the messaging page.
      16. Click on the contacts tab.
      17. Search for another user (User B).
      18. Click on their name.
      19. Click on their name in the messaging panel.
      20. Click on 'Add contact'.
      21. Log in as another user (User C)
      22. Do the same as before and add User B as a contact.
      23. Log in as User B.
      24. Check that there are two notifications saying that users have requested you as a contact.
      25. Click on one of the notifications.
      26. Ensure you get taken to a page (it is temporary so ignore that it doesn't look great).
      27. Confirm there are 2 requests shown.
      28. Confirm one of the requests.
      29. Decline one of the requests.
      30. Visit the messaging page.
      31. Click on the contacts tab.
      32. Confirm only the one you confirmed is shown.
      Test 2 - Upgrade
      1. Open your terminal and go to your moodle instance's root folder
      2. If your moodle instance has already been installed, uninstall it.

        mdk uninstall -y
        

      3. Check out the latest weekly release.

        git checkout 81bbf426f6fde2ad6bc4736fb8f3e719ec9179ce

      4. Install your moodle instance with some users on it.

        mdk install -r users
        

      5. Download the file create_data.php and place it in your moodle instance's root folder.
      6. Run the test script:
         

        php create_data.php

      7. Log in as admin.
      8. Click on messaging pop-over then ‘See all’.
      9. Click on contacts.
      10. Confirm you have contacts, some of them blocked.
      11. Make a note of the users who are blocked.
      12. Check out the latest code base with this patch applied:

        git checkout master
        

      13. Visit the admin/index.php page.
      14. Run through the upgrade.
      15. Confirm the upgrade completes successfully and you don't get any error messages.
      16. Browse your database (e.g. using phppgadmin, if you're using PostgreSQL or phpmyadmin if your using MySQL)
      17. Confirm the tables message_contacts, message_users_blocked and message_contact_requests match the tables in Test 1.
      18. Click on messaging pop-over then ‘See all’.
      19. Click on contacts.
      20. Confirm you only have 2 contacts.
      21. Search for the users who were blocked before the upgrade.
      22. Click on their name.
      23. Confirm there is a blocked symbol next to their name.
      Show
      Note: Using MDK would be helpful Test 1 - New install Create a new site with some users. mdk install -r users Check the database (e.g. using phppgadmin, if you're using PostgreSQL or phpmyadmin if your using MySQL) . Confirm there are the following tables - message_contacts message_users_blocked message_contact_requests Confirm the message_contacts table has the following fields. id userid contactid timecreated Confirm the message_contacts table has the following keys. userid, contactid contactid userid id Confirm the message_users_blocked table has the following fields. id userid blockeduserid timecreated Confirm the message_users_blocked table has the following keys. userid, blockeduserid blockeduserid userid id Confirm the message_contact_requests table has the following fields. id userid requesteduserid timecreated Confirm the message_contact_requests table has the following keys. userid, requesteduserid requesteduserid userid id Log in as an admin Visit 'Dashboard' > 'Site administration' > 'Advanced features'. Set 'Allow messages from anyone on the site' to 'Yes' and save. Log out. Log in as one of the users (User A). Visit the messaging page. Click on the contacts tab. Search for another user (User B). Click on their name. Click on their name in the messaging panel. Click on 'Add contact'. Log in as another user (User C) Do the same as before and add User B as a contact. Log in as User B. Check that there are two notifications saying that users have requested you as a contact. Click on one of the notifications. Ensure you get taken to a page (it is temporary so ignore that it doesn't look great). Confirm there are 2 requests shown. Confirm one of the requests. Decline one of the requests. Visit the messaging page. Click on the contacts tab. Confirm only the one you confirmed is shown. Test 2 - Upgrade Open your terminal and go to your moodle instance's root folder If your moodle instance has already been installed, uninstall it. mdk uninstall -y Check out the latest weekly release. git checkout 81bbf426f6fde2ad6bc4736fb8f3e719ec9179ce Install your moodle instance with some users on it. mdk install -r users Download the file create_data.php and place it in your moodle instance's root folder. Run the test script:   php create_data.php Log in as admin. Click on messaging pop-over then ‘See all’. Click on contacts. Confirm you have contacts, some of them blocked. Make a note of the users who are blocked. Check out the latest code base with this patch applied: git checkout master Visit the admin/index.php page. Run through the upgrade. Confirm the upgrade completes successfully and you don't get any error messages. Browse your database (e.g. using phppgadmin, if you're using PostgreSQL or phpmyadmin if your using MySQL) Confirm the tables message_contacts , message_users_blocked and message_contact_requests match the tables in Test 1. Click on messaging pop-over then ‘See all’. Click on contacts. Confirm you only have 2 contacts. Search for the users who were blocked before the upgrade. Click on their name. Confirm there is a blocked symbol next to their name.

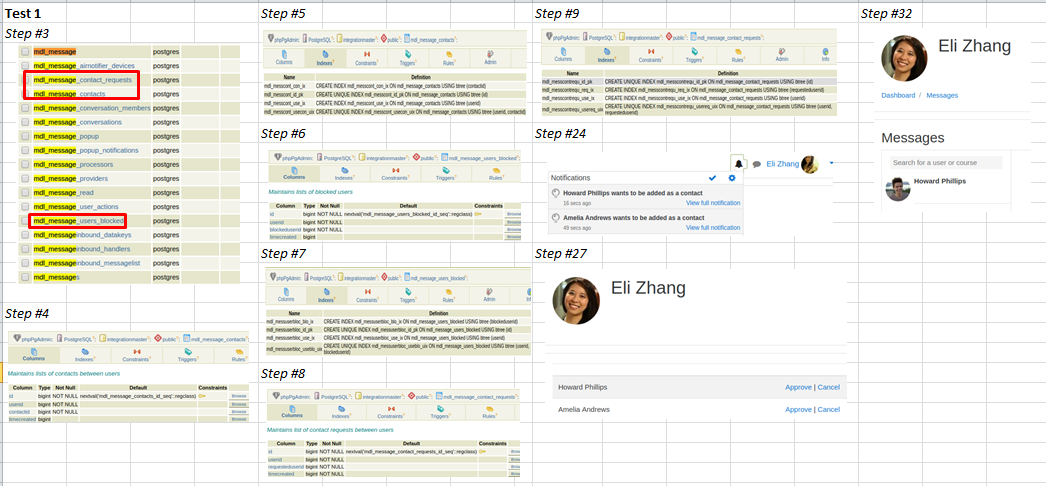
      Currently you can add anyone as a contact. We should really have this a two-way process. This would really help as well with the issue where you can't message people who have the setting 'Prevent non-contacts from messaging me' enabled. This would allow you to add the person as a contact and let them know you want to message them, they can of course approve/disapprove.

        1. create_data.php
          0.6 kB
          Mark Nelson
        2. MDL-63211 (p1).PNG
          272 kB
          Anna Carissa Sadia
        3. MDL-63211 (p2).PNG
          55 kB
          Anna Carissa Sadia

            markn Mark Nelson
            markn Mark Nelson
            Jake Dallimore Jake Dallimore
            Jun Pataleta Jun Pataleta
            Anna Carissa Sadia Anna Carissa Sadia
            Votes:
            0 Vote for this issue
            Watchers:
            8 Start watching this issue

              Created:
              Updated:
              Resolved:

                Estimated:
                Original Estimate - 0 minutes
                0m
                Remaining:
                Remaining Estimate - 0 minutes
                0m
                Logged:
                Time Spent - 30 minutes
                30m

                  Error rendering 'clockify-timesheets-time-tracking-reports:timer-sidebar'. Please contact your Jira administrators.